
前述
在升级之前,我们先简单介绍一下 Kubernetes(K8S)、Containerd、Runc 三者之前的关系。Kubernetes 是一个开源的容器编排平台,用于自动部署、扩展和管理容器化应用程序。Kubernetes 支持多种容器运行时,包括 Docker、containerd、CRI-O 等。Containerd 是一个行业标准的容器运行时,它是 Docker 的核心组件之一,但现在已经从 Docker 独立出来,成为一个独立的开源项目。它提供了容器的核心功能,比如: 镜像管理、容器执行和监控、存储和网络管理等,但它提供了一个更加模块化的架构,允许它被用作各种不同环境的容器运行时。它符合 Kubernetes 的容器运行时接口(CRI),因此可以直接与 Kubernetes 集成。Runc 是一个轻量级的容器运行时,是 Open Container Initiative(OCI)的一个实现,用于根据 OCI 规范运行容器。Containerd 使用 runc 作为其默认的底层容器运行时,主要用于创建和运行容器。虽然 containerd 默认使用 runc,但它也支持其他实现了 OCI 规范的容器运行时,如 gVisor 或 Kata Containers,这些替代运行时可以提供不同的隔离级别或安全特性,所以使用 containerd 的时候并不一定必须使用 runc,但在大多数情况下,因为 containerd 在安装的时候,会默认安装依懒 runc,所以 runc 成为了更多人的选择,而且经过广泛测试和使用的。
有些同学可能对于 containerd 和 runc 在容器管理和运行方面的分工不是很清楚,这里更详细的描述一下两者的分工:
containerd:
- 镜像管理:containerd 能够拉取、存储和管理容器镜像。
- 容器生命周期管理:它负责容器的创建、执行、暂停、恢复和删除等生命周期事件(事件触发)。
- 存储和卷管理:containerd 管理容器的存储层,包括快照和文件系统的挂载。
- 网络管理:虽然 containerd 本身不直接处理网络,它通过插件和外部工具(如 CNI)来配置容器的网络。
- 监控:containerd 提供容器的状态和资源使用信息,支持监控和日志记录。
runc:
- 容器的创建与运行:runc 是一个轻量级的命令行工具,专门负责根据 OCI (Open Container Initiative) 规范来创建和运行容器。它实际上是执行容器运行的底层组件。
- 进程隔离和资源限制:runc 直接与 Linux 内核特性(如 namespaces 和 cgroups)交互,实现容器的进程隔离和资源限制。
在 Kubernetes 环境中,containerd 作为容器运行时接口(CRI)的实现,负责容器相关的高级操作,而 runc 在底层为 containerd 执行具体的容器运行和隔离工作。当 containerd 收到请求创建容器时,它会配置必要的参数并调用 runc 来实际启动容器。这样的架构分层帮助实现了关注点分离,提高了系统的灵活性和可维护性。
升级 Containerd 及 Runc
Containerd 和 runc 定期发布新版本,但如果您目前使用的版本运行稳定且没有遇到由于 Bug 引起的问题,通常不建议轻易升级,因为系统的稳定性至关重要。然而,如果有特殊情况要求必须升级,重要的是先仔细查阅官方发布的修复说明和可能的已知问题。这包括但不限于检查新版本与您当前 Kubernetes 版本的兼容性,以及 Containerd 和 Runc 之间的兼容性。尽管兼容性问题出现的可能性较低,但也不应被忽视。
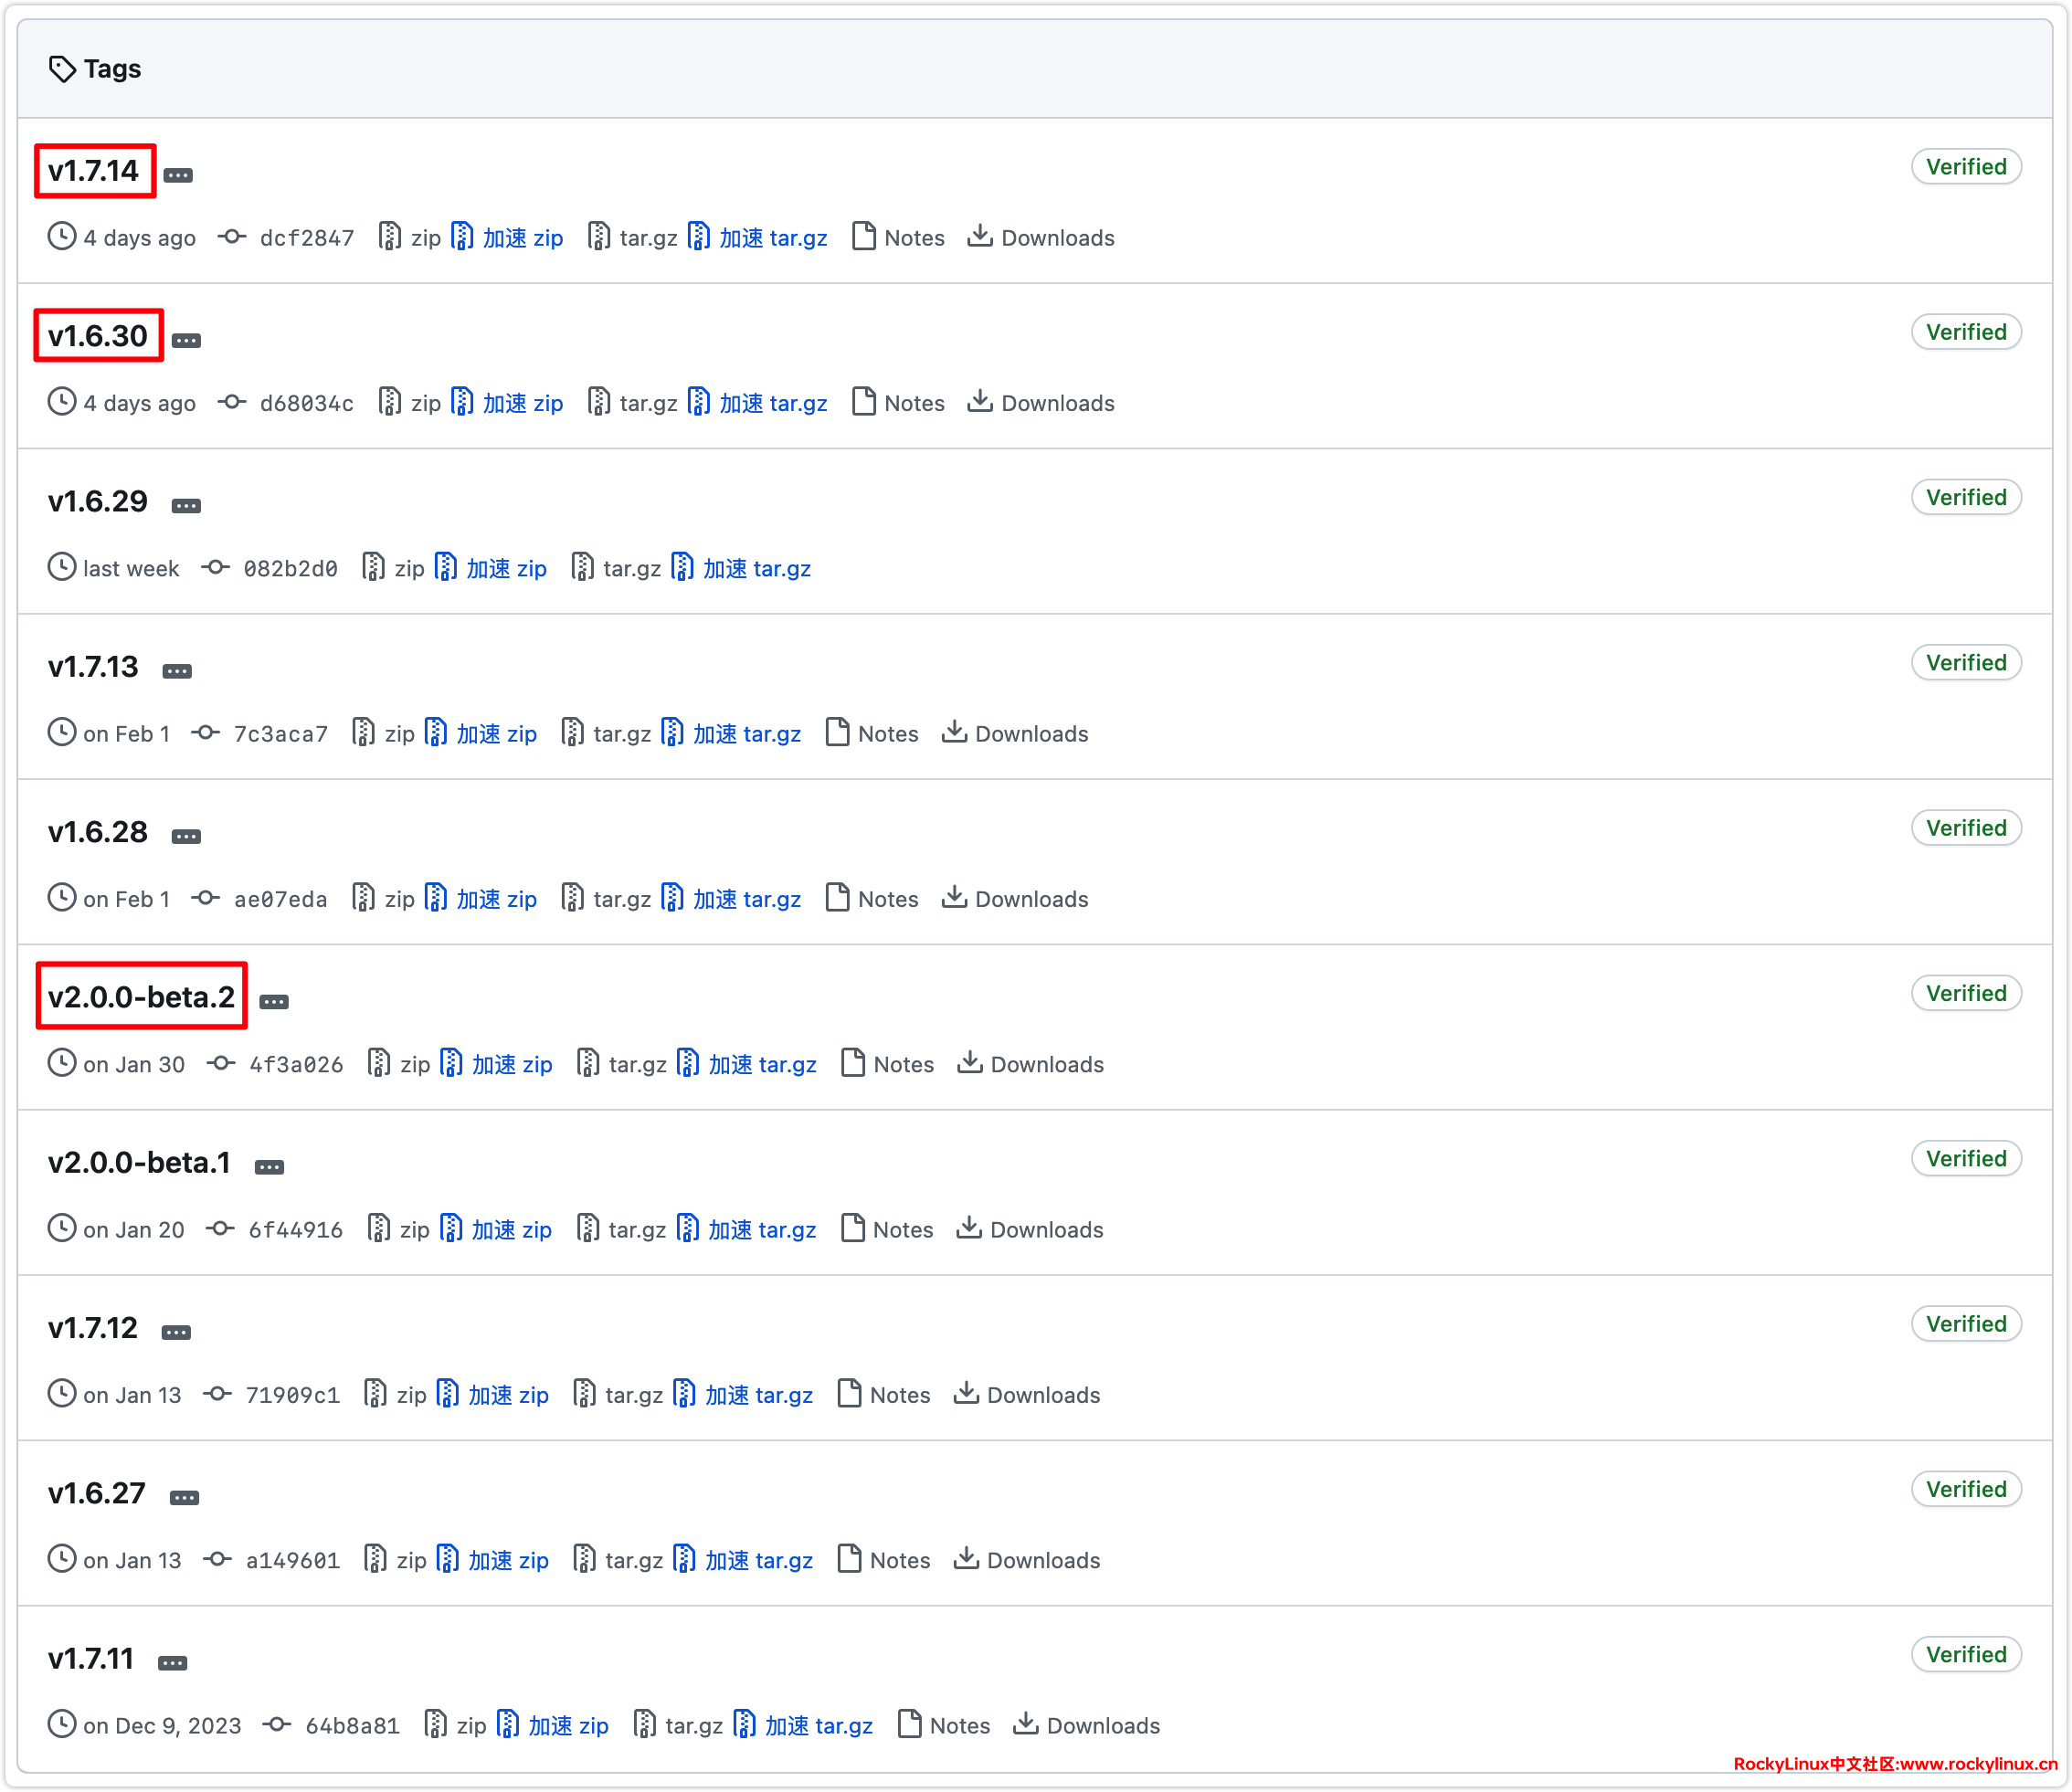
在选择 Containerd 版本时,当前提供了 v1.6.X、v1.7.X 和 v2.0.X 等多个版本供下载。选择哪个版本取决于多种因素,包括稳定性和新特性的需求。根据经验,从一个与您当前版本相近的版本进行升级通常是最佳做法,因为这有助于确保最大程度的兼容性。例如,如果您当前使用的是 containerd://1.6.14,在考虑升级时,选择 containerd://1.6.30 可能是最合适的,因为它更可能与您现有的系统环境保持兼容。在进行任何升级之前,请确保充分测试新版本在您的环境中的表现,以避免潜在的问题。
Containerd 下载链接: Tags · containerd/containerd · GitHub
Runc 下载链接: Tags · opencontainers/runc · GitHub
正确节点升级操作步骤:
1、设置需要升级节点停止调度。
2、驱逐需要升级节点上的 Pod。
3、开始升级 containerd 及 runc。
4、重启节点。
5、验证节点可用性。
6、启用节点调度。
因为木子这里是测试环境,为了避免对应升级节点 Pod 调度到其它节点,影响其它节点的负载,我们直接原地升级再重启,让 Pod 自动启动,建议在业务低峰期操作。前期木子的 containerd 是安装在 /usr/bin/ 目录,为更快原地升级,我们将新版本 containerd 安装在 /usr/local/bin 目录。
这是以升级 w002 节点为例:
# 下载 containerd
[root@w002 ~]# wget https://github.com/containerd/containerd/releases/download/v1.6.28/containerd-1.6.28-linux-amd64.tar.gz
# 下载 runc
[root@w002 ~]# wget https://github.com/opencontainers/runc/releases/download/v1.1.12/runc.amd64
# 解压
[root@w002 ~]# tar -zxvf containerd-1.6.28-linux-amd64.tar.gz
# 安装 containerd
[root@w002 ~]# cp -rf bin/* /usr/local/bin/
# 安装 runc
[root@w002 ~]# install -m 755 runc.amd64 /usr/local/sbin/runc && ls -l /usr/local/sbin/runc

# 修改启动文件
[root@w002 ~]# cat > /usr/lib/systemd/system/containerd.service << \EOF
[Unit]
Description=containerd container runtime
Documentation=https://containerd.io
After=network.target local-fs.target

[Service]
ExecStartPre=-/sbin/modprobe overlay
ExecStart=/usr/local/bin/containerd # 确保可执行文件路径是正确的

Type=notify
Delegate=yes
KillMode=process
Restart=always
RestartSec=5

LimitNPROC=infinity
LimitCORE=infinity

TasksMax=infinity
OOMScoreAdjust=-999

[Install]
WantedBy=multi-user.target
EOF

# 验证文件正常
[root@w002 ~]# cat /usr/lib/systemd/system/containerd.service

# 重启服务器
[root@w002 ~]# reboot

# 验证文件位置是否正确
[root@w002 ~]# which containerd
[root@w002 ~]# which ctr
[root@w002 ~]# which runc

# 查看版本是否正确
[root@w002 ~]#  /usr/local/bin/containerd -v
containerd github.com/containerd/containerd v1.6.28 ae07eda36dd25f8a1b98dfbf587313b99c0190bb
[root@w002 ~]# /usr/local/bin/ctr -v
ctr github.com/containerd/containerd v1.6.28
[root@w002 ~]#  /usr/local/sbin/runc -v
runc version 1.1.12
commit: v1.1.12-0-g51d5e946
spec: 1.0.2-dev
go: go1.20.13
libseccomp: 2.5.4

# 验证服务是否启动正常
[root@w002 ~]# systemctl status containerd.service
● containerd.service - containerd container runtime
     Loaded: loaded (/usr/lib/systemd/system/containerd.service; enabled; vendor preset: disabled)
     Active: activating (start) since Wed 2024-03-01 20:15:51 CST; 1min 16s ago
       Docs: https://containerd.io
    Process: 1363 ExecStartPre=/sbin/modprobe overlay (code=exited, status=0/SUCCESS)
   Main PID: 1367 (containerd)
      Tasks: 47
     Memory: 278.9M
        CPU: 10.299s
     CGroup: /system.slice/containerd.service
             └─1367 /usr/local/bin/containerd

Mar 01 20:15:55 w002 containerd[1367]: time="2024-03-01T20:15:55.628592128+08:00" level=info msg="loading plugin \"io.containerd.grpc.v1.cri\"..." type=io.containerd.grpc.v1
Mar 01 20:15:55 w002 containerd[1367]: time="2024-03-01T20:15:55.629267320+08:00" level=warning msg="`mirrors` is deprecated, please use `config_path` instead"
Mar 01 20:15:55 w002 containerd[1367]: time="2024-03-01T20:15:55.629315795+08:00" level=warning msg="`configs` is deprecated, please use `config_path` instead"
Mar 01 20:15:55 w002 containerd[1367]: time="2024-03-01T20:15:55.629493173+08:00" level=info msg="Start cri plugin with config {PluginConfig:{ContainerdConfig:{Snapshotter:overlayfs DefaultRuntimeName:runc De>
Mar 01 20:15:55 w002 containerd[1367]: time="2024-03-01T20:15:55.634308304+08:00" level=info msg="Connect containerd service"
Mar 01 20:15:55 w002 containerd[1367]: time="2024-03-01T20:15:55.634550209+08:00" level=info msg="Get image filesystem path \"/var/lib/containerd/io.containerd.snapshotter.v1.overlayfs\""
Mar 01 20:15:55 w002 containerd[1367]: time="2024-03-01T20:15:55.647072683+08:00" level=info msg=serving... address=/run/containerd/containerd.sock.ttrpc
Mar 01 20:15:55 w002 containerd[1367]: time="2024-03-01T20:15:55.647258706+08:00" level=info msg=serving... address=/run/containerd/containerd.sock
Mar 01 20:15:55 w002 containerd[1367]: time="2024-03-01T20:15:55.647834665+08:00" level=info msg="Start subscribing containerd event"
Mar 01 20:15:55 w002 containerd[1367]: time="2024-03-01T20:15:55.651088974+08:00" level=info msg="Start recovering state\"

# 验证节点是否正常
[root@m001 ~]# kubectl get nodes -o wide
NAME             STATUS   ROLES           AGE    VERSION   INTERNAL-IP     EXTERNAL-IP   OS-IMAGE                      KERNEL-VERSION               CONTAINER-RUNTIME
m001   Ready    control-plane   422d   v1.26.0   192.168.1.101   <none>        Rocky Linux 9.1 (Blue Onyx)   6.1.80-1.el9.elrepo.x86_64    containerd://1.6.14
m002   Ready    control-plane   422d   v1.26.0   192.168.1.102   <none>        Rocky Linux 9.1 (Blue Onyx)   6.1.80-1.el9.elrepo.x86_64    containerd://1.6.14
m003   Ready    control-plane   422d   v1.26.0   192.168.1.103   <none>        Rocky Linux 9.1 (Blue Onyx)   6.1.80-1.el9.elrepo.x86_64    containerd://1.6.14
w001   Ready    worker          422d   v1.26.0   192.168.1.104   <none>        Rocky Linux 9.1 (Blue Onyx)   6.1.80-1.el9.elrepo.x86_64    containerd://1.6.14
w002   Ready    worker          422d   v1.26.0   192.168.1.105   <none>        Rocky Linux 9.1 (Blue Onyx)   6.1.80-1.el9.elrepo.x86_64    containerd://1.6.28
w003   Ready    worker          422d   v1.26.0   192.168.1.106   <none>        Rocky Linux 9.1 (Blue Onyx)   6.1.80-1.el9.elrepo.x86_64    containerd://1.6.14
w004   Ready    worker          422d   v1.26.0   192.168.1.104   <none>        Rocky Linux 9.1 (Blue Onyx)   6.1.80-1.el9.elrepo.x86_64    containerd://1.6.14
w005   Ready    worker          422d   v1.26.0   192.168.1.105   <none>        Rocky Linux 9.1 (Blue Onyx)   6.1.80-1.el9.elrepo.x86_64    containerd://1.6.14
w006   Ready    worker          422d   v1.26.0   192.168.1.106   <none>        Rocky Linux 9.1 (Blue Onyx)   6.1.80-1.el9.elrepo.x86_64    containerd://1.6.14
w007   Ready    worker          422d   v1.26.0   192.168.1.107   <none>        Rocky Linux 9.1 (Blue Onyx)   6.1.80-1.el9.elrepo.x86_64    containerd://1.6.14
w008   Ready    worker          422d   v1.26.0   192.168.1.108   <none>        Rocky Linux 9.1 (Blue Onyx)   6.1.80-1.el9.elrepo.x86_64    containerd://1.6.14
w009   Ready    worker          422d   v1.26.0   192.168.1.109   <none>        Rocky Linux 9.1 (Blue Onyx)   6.1.80-1.el9.elrepo.x86_64    containerd://1.6.14
w010   Ready    worker          422d   v1.26.0   192.168.1.110   <none>        Rocky Linux 9.1 (Blue Onyx)   6.1.80-1.el9.elrepo.x86_64    containerd://1.6.14
w011   Ready    worker          422d   v1.26.0   192.168.1.111   <none>        Rocky Linux 9.1 (Blue Onyx)   6.1.80-1.el9.elrepo.x86_64    containerd://1.6.14
w012   Ready    worker          422d   v1.26.0   192.168.1.112   <none>        Rocky Linux 9.1 (Blue Onyx)   6.1.80-1.el9.elrepo.x86_64    containerd://1.6.14
w013   Ready    worker          422d   v1.26.0   192.168.1.113   <none>        Rocky Linux 9.1 (Blue Onyx)   6.1.80-1.el9.elrepo.x86_64    containerd://1.6.14
w014   Ready    worker          422d   v1.26.0   192.168.1.114   <none>        Rocky Linux 9.1 (Blue Onyx)   6.1.80-1.el9.elrepo.x86_64    containerd://1.6.14
w015   Ready    worker          422d   v1.26.0   192.168.1.115   <none>        Rocky Linux 9.1 (Blue Onyx)   6.1.80-1.el9.elrepo.x86_64    containerd://1.6.14

# 确认升级节点正常以后,再删除原有 containerd ctr 可执行文件
[root@w002 ~]# rm -rf /usr/bin/containerd*
[root@w002 ~]# rm -rf /usr/bin/ctr
至此,w002 节点的升级流程已顺利完成。在升级其他节点之前,我们建议您先观察 w002 节点正常运行至少一周,如果在此期间,Pod 运行正常且未观察到任何异常,那么可以开始逐步升级其余节点。这样的渐进式升级策略有助于最小化因潜在 Bug 导致的集群大范围内的故障,确保 Kubernetes 集群的稳定性和可用性。


操作系统:rocky9.3 k8s:1.22 docker:1.26 内核:5.14 出现问题: cat: can’t open ‘/sys/fs/cgroup/memory/memory.limit_in_bytes’: No such file or directory expr: syntax error sh: 10240: unknown operand /usr/bin/start.sh: line 26: arithmetic syntax error 该怎么解决啊 ,我这个是设置了内存和cpu限制,在启动服务的时候
在 Rocky Linux 9.3 系统中,cgroups 的版本升级到了cgroups v2。但 Docker 在一些版本中默认还是使用cgroups v1,这可能导致了这个问题。有两种解决:
1、切换回 cgroups v1:可以通过在启动参数中添加
systemd.unified_cgroup_hierarchy=0来实现。然后重启您的系统。这将强制 Linux 使用cgroups v1。2、升级 Docker 版本:新的 Docker 版本(例如20.10及以上)已经支持cgroups v2。您可以尝试升级您的 Docker 到最新版本。
简单判断是 cgroups v2 还是 cgroups v1 命令:
if [ -e /sys/fs/cgroup/cgroup.controllers ]; then echo "cgroups v2"; else echo "cgroups v1"; fi以上方法无法解决,可以参考链接:https://github.com/oracle/docker-images/issues/1939 进行排错。
谢谢