
DNS 高可用方案概述
在常规企业场景下,通常不需要为 DNS 服务器单独部署复杂的负载均衡和高可用方案。一般做法是在网络配置中指定主备两个 DNS 服务器 IP 地址(即主 DNS 和备用 DNS),即可满足绝大多数中小型企业的需求。从我们对 CoreDNS 性能测试结果来看,单台节点的处理能力已足以支撑中小型企业内部的 DNS 查询压力,且配置和维护成本较低。然而,对于大型企业用户或面向公网提供 DNS 解析服务的场景,尤其是那些要求极高可用性、性能和容错的业务场景,部署 DNS 负载均衡和高可用架构就非常有必要。在国内,53 端口对公网开放需完成工信部备案,因此主要还是在内网环境中实施。
以下是当前常见的几类 DNS 负载均衡和高可用方案,以及它们各自的优缺点:
1. HAProxy + Keepalived
- 特性:HAProxy 适合做 TCP/UDP/HTTP/HTTPS 的转发和负载均衡,Keepalived 实现 VIP 漂移,保证服务节点故障时集群 IP 能自动切换,实现高可用。
- 优点:社区版支持 DNS 53/TCP、853/DoT、443/DoH 等协议的代理和负载,支持健康检查;企业版支持 UDP 代理(需要购买许可)。
- 不足:社区版原生不支持 DNS 53/UDP 代理,对于纯 UDP 访问的 DNS 场景有限制。
2. LVS + Keepalived
- 特性:LVS(Linux Virtual Server)工作在四层(传输层),可高性能转发 TCP/UDP 流量,支持多种调度算法。
- 优点:转发性能极高,适合高并发、低延迟场景,配置灵活性强。
- 不足:一般采用 LVS-DR(Direct Routing)模式实现负载均衡,但存在 LVS 节点自身不能作为真正 DNS 服务器,且可能出现回环请求(Loopback issue);对健康检测能力有限,需辅以其他方案。
3. Nginx + Keepalived
- 特性:Nginx 工作在七层(应用层),支持 DNS over HTTPS(DoH)、DNS over TLS(DoT)等新型 DNS 协议代理,并可用 NGINX 实现复杂转发和健康探测。
- 优点:支持 DNS 53/UDP、53/TCP、853/DoT、443/DoH 多协议代理,具备液态健康检查与流量控制,高可用性与灵活性兼备。
- 不足:对于原生 DNS 53/UDP 的反代、负载能力有限,需结合第三方扩展模块
--with-stream实现。
4. Nftables + Keepalived
- 特性:nftables 是新一代内核级防火墙/流量转发(替代 iptables),工作在四层,可实现简易的转发或 NAT。
- 优点:内核态性能优秀,适合高并发场景。
- 不足:只支持简单的轮询(round robin),无权重/最少连接/健康检查等高级负载均衡功能;维护和监控能力较弱。
5. 客户端分流策略(简易方案)
- 方案:将部分客户端主 DNS 配置为服务器 A,另一部分配为服务器 B。若有 DHCP,可统一在 DHCP 服务器设置,也可以人工手动分配。
- 优点:实现成本低,无需额外部署/维护负载均衡设备。
- 不足:客户端维护成本较高,不能实现自动切换和容错。
DNS 的高可用设计应根据场景灵活权衡成本、复杂度和可用性等级:中小型应用可选主从部署并配合 DHCP 分流,大型或公网业务应部署专业负载均衡和多活备份,确保服务持续可用性。
高可用架构图
高可用架构,我们还是采用前期的设计方案。详细如下图所示:
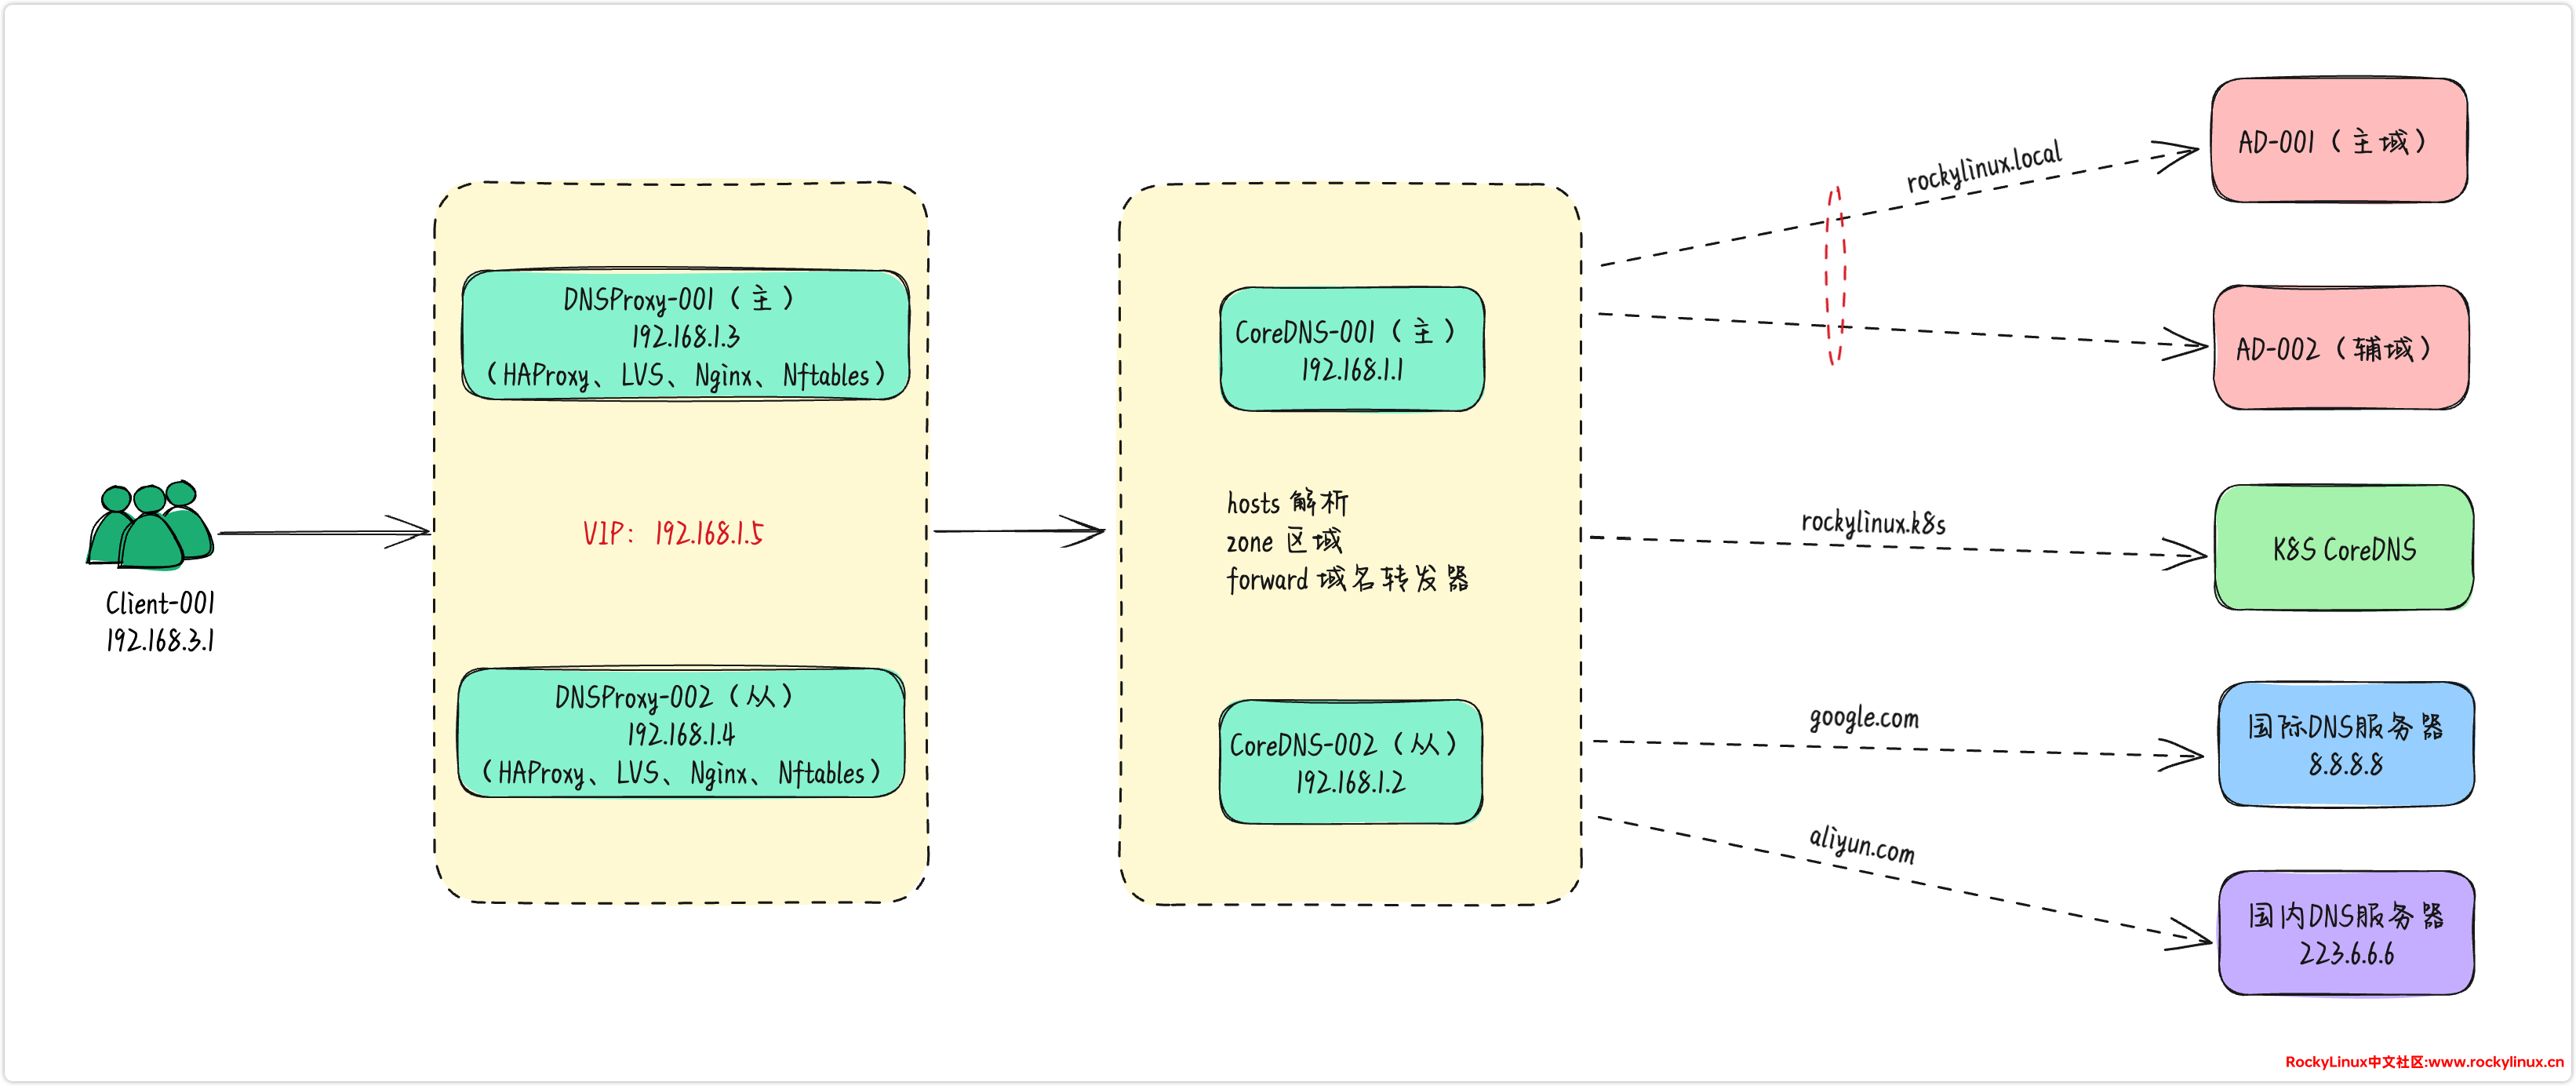
节点资源规划:
| 主机名 | IP | 作用 |
|---|---|---|
| CoreDNS-001 | 192.168.1.1 | CoreDNS 服务器主节点 |
| CoreDNS-002 | 192.168.1.2 | CoreDNS 服务器从节点 |
| DNSProxy-001 | 192.168.1.3 | DNS 代理服务器主节点 |
| DNSProxy-002 | 192.168.1.4 | DNS 代理服务器从节点 |
| VIP | 192.168.1.5 | DNSProxy 服务器 VIP 地址 |
| Client-001 | 192.168.3.1 | CoreDNS 客户端测试节点 |
HAProxy
由于 HAProxy 社区版原生不支持 UDP 负载均衡,因此无法实现对 53/UDP(即标准 DNS 查询协议)的负载分流。不过,HAProxy 社区版可以用于 TCP(如 DNS 53/TCP)、DoT(DNS over TLS)和 DoH(DNS over HTTPS)等基于 TCP 协议的代理与负载均衡场景。
需要注意的是,从 HAProxy Enterprise 2.9+ 版本开始,官方企业版已通过原生模块支持 UDP 负载均衡功能,具体可参考 Load balance UDP with HAProxy Enterprise | HAProxy Enterprise。
TCP 配置
服务器端配置
本文中的 HAProxy 安装和配置仅用于对 DNS 基于 TCP 协议的服务进行简单验证和测试。鉴于社区版 HAProxy 尚不支持 UDP 高可用方案,因此不涉及与 Keepalived 配合实现 UDP 高可用的具体配置,相应内容不在本文讨论范围之内。
# 安装 haproxy
[root@dnsproxy-001 ~]# dnf install epel-release
[root@dnsproxy-001 ~]# dnf install haproxy

# 备份当前配置
[root@dnsproxy-001 ~]# cp /etc/haproxy/haproxy.cfg /etc/haproxy/haproxy.cfg.bak

# 配置 DNS TCP 反代如下
[root@dnsproxy-001 ~]# cat /etc/haproxy/haproxy.cfg | grep -v "^$" | grep -v "#"
global
    log         127.0.0.1 local2
    chroot      /var/lib/haproxy
    pidfile     /var/run/haproxy.pid
    maxconn     4000
    user        haproxy
    group       haproxy
    daemon
    stats socket /var/lib/haproxy/stats
    ssl-default-bind-ciphers PROFILE=SYSTEM
    ssl-default-server-ciphers PROFILE=SYSTEM
defaults
    log                     global
    option                  dontlognull
    retries                 3
    timeout queue           1m
    timeout connect         10s
    timeout client          1m
    timeout server          1m
    timeout http-keep-alive 10s
    timeout check           10s
    maxconn                 3000

# 统计设置
listen stats
    bind  *:8088
    mode  http
    log   global
    stats enable
    stats hide-version
    stats refresh 30s
    stats show-node
    stats auth admin:password
    stats uri /stats

# DNS TCP 反代
frontend dns_tcp_frontend
    bind *:53
    mode tcp # 注意模式为 TCP(与后面的 DoH 不同)
    default_backend dns_tcp_backend
backend dns_tcp_backend
    mode tcp
    balance roundrobin # 负载均衡方式:轮循
    server coredns-001 192.168.1.1:53 check
    server coredns-002 192.168.1.2:53 check

# 验证配置文件可用性
[root@dnsproxy-001 ~]# haproxy -c -f /etc/haproxy/haproxy.cfg
Configuration file is valid

# 设置服务开机自启动,并启动服务
[root@dnsproxy-001 ~]# systemctl enable --now haproxy
Created symlink /etc/systemd/system/multi-user.target.wants/haproxy.service → /usr/lib/systemd/system/haproxy.service.

# 查看服务状态
[root@DNSProxy-001 haproxy]# systemctl status haproxy
● haproxy.service - HAProxy Load Balancer
     Loaded: loaded (/usr/lib/systemd/system/haproxy.service; enabled; preset: disabled)
     Active: active (running) since Mon 2025-01-14 18:30:06 CST; 1s ago
    Process: 26267 ExecStartPre=/usr/sbin/haproxy -f $CONFIG -f $CFGDIR -c -q $OPTIONS (code=exited, status=0/SUCCESS)
   Main PID: 26269 (haproxy)
      Tasks: 5 (limit: 48916)
     Memory: 6.6M
        CPU: 71ms
     CGroup: /system.slice/haproxy.service
             ├─26269 /usr/sbin/haproxy -Ws -f /etc/haproxy/haproxy.cfg -f /etc/haproxy/conf.d -p /run/haproxy.pid
             └─26272 /usr/sbin/haproxy -Ws -f /etc/haproxy/haproxy.cfg -f /etc/haproxy/conf.d -p /run/haproxy.pid

Jan 14 18:30:06 DNSProxy-001 systemd[1]: Starting HAProxy Load Balancer...
Jan 14 18:30:06 DNSProxy-001 haproxy[26269]: [NOTICE]   (26269) : New worker #1 (26272) forked
Jan 14 18:30:06 DNSProxy-001 systemd[1]: Started HAProxy Load Balancer.

# 查看监听端口是否正常
[root@dnsproxy-001 ~]# ss -antlp | grep -E "53|8088"
LISTEN 0      3000         0.0.0.0:8088       0.0.0.0:*    users:(("haproxy",pid=333907,fd=7))
LISTEN 0      3000         0.0.0.0:53         0.0.0.0:*    users:(("haproxy",pid=333907,fd=6))

# 配置防火墙规则,允许 8088 与 53 端口
[root@dnsproxy-001 ~]# firewall-cmd --add-port=8088/tcp --permanent
[root@dnsproxy-001 ~]# firewall-cmd --add-port=53/tcp --permanent
[root@dnsproxy-001 ~]# firewall-cmd --reload
客户端验证
# 第一次请求测试
[root@client-001 ~]# dig +tcp @192.168.1.3 www.baidu.com

; <<>> DiG 9.10.6 <<>> +tcp @192.168.1.3 www.baidu.com
; (1 server found)
;; global options: +cmd
;; Got answer:
;; ->>HEADER<<- \opcode: QUERY, status: NOERROR, id: 53096
;; flags: qr rd ra; QUERY: 1, ANSWER: 3, AUTHORITY: 0, ADDITIONAL: 1

;; OPT PSEUDOSECTION:
; EDNS: version: 0, flags:; udp: 4096
;; QUESTION SECTION:
;www.baidu.com.         IN  A

;; ANSWER SECTION:
www.baidu.com.      127 IN  CNAME   www.a.shifen.com.
www.a.shifen.com.   44  IN  A   183.2.172.177
www.a.shifen.com.   44  IN  A   183.2.172.17

;; Query time: 21 msec
;; SERVER: 192.168.1.3#53(192.168.1.3)
;; WHEN: Tue Jan 14 10:11:54 CST 2025
;; MSG SIZE  rcvd: 149

# 第二次请求测试
[root@client-001 ~]# dig +tcp @192.168.1.3 www.soso.com

; <<>> DiG 9.10.6 <<>> +tcp @192.168.1.3 www.soso.com
; (1 server found)
;; global options: +cmd
;; Got answer:
;; ->>HEADER<<- \opcode: QUERY, status: NOERROR, id: 38558
;; flags: qr rd ra; QUERY: 1, ANSWER: 3, AUTHORITY: 0, ADDITIONAL: 1

;; OPT PSEUDOSECTION:
; EDNS: version: 0, flags:; udp: 4096
;; QUESTION SECTION:
;www.soso.com.          IN  A

;; ANSWER SECTION:
www.soso.com.       376 IN  CNAME   waf-hd3-stage.cdn.sogou.com.
waf-hd3-stage.cdn.sogou.com. 379 IN A   117.89.181.121
waf-hd3-stage.cdn.sogou.com. 379 IN A   121.229.91.101

;; Query time: 18 msec
;; SERVER: 192.168.1.3#53(192.168.1.3)
;; WHEN: Tue Jan 14 10:12:52 CST 2025
;; MSG SIZE  rcvd: 180

# DNS 后端服务器 coredns-001 收到请求
[root@coredns-001 ~]# journalctl -f -u coredns
Jan 14 10:11:54 coredns-001 coredns[186293]: [INFO] 192.168.1.3:41196 - 53096 "A IN www.baidu.com. tcp 42 false 65535" NOERROR qr,rd,ra 149 0.016657978s

# DNS 后端服务器 coredns-002 收到请求
[root@coredns-002 ~]# journalctl -f -u coredns
Jan 14 10:12:52 coredns-002 coredns[179153]: [INFO] 192.168.1.3:35194 - 38558 "A IN www.soso.com. tcp 41 false 65535" NOERROR qr,rd,ra 180 0.0155299s
从测试结果来看,HAProxy 已成功实现了 DNS 53/TCP 高可用,并且能够在不同的后端节点之间进行请求轮转。
DoT 配置
服务器端配置
# 在原有配置基础上,追加以下配置
[root@dnsproxy-001 ~]# cat /etc/haproxy/haproxy.cfg
frontend dot
    bind *:853 ssl crt /etc/haproxy/dns_cert.pem # 配置证书
    mode tcp
    default_backend dot_servers

backend dot_servers
    mode tcp
    balance roundrobin
    server coredns-001 192.168.1.1:853 check ssl verify none
    server coredns-002 192.168.1.2:853 check ssl verify none

# 检查配置文件可用性,会提示找不到私有密钥
[root@dnsproxy-001 ~]# haproxy -c -f /etc/haproxy/haproxy.cfg
[NOTICE]   (38240) : haproxy version is 2.4.22-f8e3218
[NOTICE]   (38240) : path to executable is /usr/sbin/haproxy
[ALERT]    (38240) : parsing [/etc/haproxy/haproxy.cfg:82] : 'bind *:853' : No Private Key found in '/etc/haproxy/dns_cert.pem.key'.
[ALERT]    (38240) : Error(s) found in configuration file : /etc/haproxy/haproxy.cfg
[ALERT]    (38240) : Fatal errors found in configuration.

# 从 CoreDNS-001 服务器复制 /etc/coredns/certs/fullchain.pem 至 DNSProxy-001 服务器 /etc/haproxy/dns_cert.pem
# 从 CoreDNS-001 服务器复制 /etc/coredns/certs/key.pem 至 DNSProxy-001 服务器 /etc/haproxy/dns_cert.pem.key
[root@coredns-001 ~]# cat /etc/coredns/Corefile
.:53 {
    import common.conf
    forward . 223.6.6.6 114.114.114.119
}

# 修改域名转发器字段
tls://.:853 {
    tls /etc/coredns/certs/fullchain.pem /etc/coredns/certs/key.pem { # 证书信息
         client_auth nocert
         # client_auth require_and_verify
    }
    forward . tls://8.8.8.8 tls://8.8.4.4 {
        tls_servername dns.google
    }
    log
    debug
}

# 文件信息,如下所示
[root@dnsproxy-001 ~]# ls -l /etc/haproxy/
total 16
drwxr-xr-x 2 root root    6 Feb  4 20:19 conf.d
-rw-r--r-- 1 root root 2930 Jan 14 19:19 dns_cert.pem
-rw-r--r-- 1 root root  227 Jan 14 19:31 dns_cert.pem.key
-rw-r--r-- 1 root root 2960 Jan 14 19:23 haproxy.cfg

# 再次验证配置文件可用性
[root@dnsproxy-001 ~]# haproxy -c -f /etc/haproxy/haproxy.cfg
Configuration file is valid

# 重启服务
[root@dnsproxy-001 ~]# systemctl restart haproxy

# 查看监听端口是否正常
[root@dnsproxy-001 ~]# ss -antlp | grep 853
LISTEN 0      3000         0.0.0.0:853        0.0.0.0:*    users:(("haproxy",pid=333907,fd=8))

# 配置防火墙规则,允许 853 端口
[root@dnsproxy-001 ~]# firewall-cmd --add-port=853/tcp --permanent
[root@dnsproxy-001 ~]# firewall-cmd --reload
客户端验证
# 客户端连续请求 4 次
[root@client-001 ~]# kdig @192.168.1.3 -p 853 google.com +tls -d
;; DEBUG: Querying for owner(google.com.), class(1), type(1), server(192.168.1.3), port(853), protocol(TCP)
;; DEBUG: TLS, received certificate hierarchy:
;; DEBUG:  #1, CN=dns.rockylinux.cn
;; DEBUG:      SHA-256 PIN: yZxRF4IxyMutN63XBYn7H36387B1JZHaCN44/DK+yRk=
;; DEBUG:  #2, C=US,O=Let's Encrypt,CN=E5
;; DEBUG:      SHA-256 PIN: NYbU7PBwV4y9J67c4guWTki8FJ+uudrXL0a4V4aRcrg=
;; DEBUG: TLS, skipping certificate PIN check
;; DEBUG: TLS, skipping certificate verification
;; TLS session (TLS1.2)-(ECDHE-ECDSA-SECP256R1)-(AES-256-GCM)
;; ->>HEADER<<- \opcode: QUERY; status: NOERROR; id: 8969
;; Flags: qr rd ra; QUERY: 1; ANSWER: 1; AUTHORITY: 0; ADDITIONAL: 1

;; EDNS PSEUDOSECTION:
;; Version: 0; flags: ; UDP size: 4096 B; ext-rcode: NOERROR
;; PADDING: 409 B

;; QUESTION SECTION:
;; google.com.                  IN      A

;; ANSWER SECTION:
google.com.             59      IN      A       142.250.71.206

;; Received 478 B
;; Time 2025-01-14 10:20:58 CST
;; From 192.168.1.3@853(TCP) in 78.8 ms

# CoreDNS-001 日志如下,收到两次请求
[root@coredns-001 ~]# journalctl -f -u coredns
Jan 14 10:20:54 coredns-001 coredns[229585]: [INFO] 192.168.1.3:46940 - 7349 "A IN google.com. tcp 128 false 65535" NOERROR qr,rd,ra 478 0.073516111s
Jan 14 10:20:56 coredns-001 coredns[229585]: [INFO] 192.168.1.3:53632 - 45973 "A IN google.com. tcp 128 false 65535" NOERROR qr,rd,ra 478 0.072106629s

# CoreDNS-002 日志如下,收到两次请求
[root@coredns-002 ~]# journalctl -f -u coredns
Jan 14 10:20:55 coredns-002 coredns[309159]: [INFO] 192.168.1.3:53296 - 34356 "A IN google.com. tcp 128 false 65535" NOERROR qr,rd,ra 478 0.073886476s
Jan 14 10:20:58 coredns-002 coredns[309159]: [INFO] 192.168.1.3:53316 - 8969 "A IN google.com. tcp 128 false 65535" NOERROR qr,rd,ra 478 0.073791925s
DoH 配置
服务器端配置
# 在原有配置基础上,追加以下配置
[root@dnsproxy-001 ~]# cat /etc/haproxy/haproxy.cfg
frontend doh
    bind *:443 ssl crt /etc/haproxy/dns_cert.pem
    mode http # 注意模式为 HTTP(与前面的 TCP 不同)
    default_backend doh_servers

backend doh_servers
    mode http
    balance roundrobin
    server coredns-001 192.168.1.1:443 check ssl verify none # 不进行证书验证
    server coredns-002 192.168.1.2:443 check ssl verify none

# 验证配置文件可用性
[root@dnsproxy-001 ~]# haproxy -c -f /etc/haproxy/haproxy.cfg
Configuration file is valid

# 重启服务
[root@dnsproxy-001 ~]# systemctl restart haproxy

# 查看监听端口是否正常
[root@dnsproxy-001 ~]# ss -antlp | grep 443
LISTEN 0      3000         0.0.0.0:443        0.0.0.0:*    users:(("haproxy",pid=333907,fd=9))

# 配置防火墙规则,允许 443 端口
[root@dnsproxy-001 ~]# firewall-cmd --add-port=443/tcp --permanent
[root@dnsproxy-001 ~]# firewall-cmd --reload
客户端验证
# 客户端连续请求 4 次
[root@client-001 ~]# kdig @192.168.1.3 +https google.com +tls -d
;; DEBUG: Querying for owner(google.com.), class(1), type(1), server(192.168.1.3), port(443), protocol(TCP)
;; DEBUG: TLS, received certificate hierarchy:
;; DEBUG:  #1, CN=dns.rockylinux.cn
;; DEBUG:      SHA-256 PIN: yZxRF4IxyMutN63XBYn7H36387B1JZHaCN44/DK+yRk=
;; DEBUG:  #2, C=US,O=Let's Encrypt,CN=E5
;; DEBUG:      SHA-256 PIN: NYbU7PBwV4y9J67c4guWTki8FJ+uudrXL0a4V4aRcrg=
;; DEBUG: TLS, skipping certificate PIN check
;; DEBUG: TLS, skipping certificate verification
;; TLS session (TLS1.2)-(ECDHE-ECDSA-SECP256R1)-(AES-256-GCM)
;; HTTP session (HTTP/2-POST)-(192.168.1.3/dns-query)-(status: 200)
;; ->>HEADER<<- \opcode: QUERY; status: NOERROR; id: 0
;; Flags: qr rd ra; QUERY: 1; ANSWER: 1; AUTHORITY: 0; ADDITIONAL: 1

;; EDNS PSEUDOSECTION:
;; Version: 0; flags: ; UDP size: 4096 B; ext-rcode: NOERROR
;; PADDING: 409 B

;; QUESTION SECTION:
;; google.com.                  IN      A

;; ANSWER SECTION:
google.com.             213     IN      A       142.250.71.206

;; Received 478 B
;; Time 2025-01-14 10:30:52 CST
;; From 192.168.1.3@443(TCP) in 81.4 ms

# CoreDNS-001 日志如下,收到两次请求
[root@coredns-001 ~]# journalctl -f -u coredns
Jan 14 10:30:52 coredns-001 coredns[229585]: [INFO] 192.168.1.3:55700 - 0 "A IN google.com. tcp 128 false 65535" NOERROR qr,rd,ra 478 0.075528974s
Jan 14 10:31:51 coredns-001 coredns[229585]: [INFO] 192.168.1.3:55700 - 0 "A IN google.com. tcp 128 false 65535" NOERROR qr,rd,ra 478 0.018979385s

# CoreDNS-002 日志如下,收到两次请求
[root@coredns-002 ~]# journalctl -f -u coredns
Jan 14 10:30:58 coredns-002 coredns[309159]: [INFO] 192.168.1.3:57734 - 0 "A IN google.com. tcp 128 false 65535" NOERROR qr,rd,ra 478 0.081945846s
Jan 14 10:31:55 coredns-002 coredns[309159]: [INFO] 192.168.1.3:57734 - 0 "A IN google.com. tcp 128 false 65535" NOERROR qr,rd,ra 478 0.072615621s
从下图中可以看出,每台 DNS 服务器都收到了两次请求,这表明负载均衡功能运行正常。
LVS
在 HAProxy 高可用部分,我们已对 CoreDNS 的 TCP、DoT 和 DoH 配置进行了详细拆解。因此,本节将针对 LVS 部署进行整体讲解,不再逐项细化配置。
LVS 服务器配置
LVS 支持三种工作模式:DR(直接路由,Direct Routing)、NAT(网络地址转换,Network Address Translation)、TUN(隧道,IP Tunneling)。不同模式适用于不同的网络架构(详细说明请参见后续教程)。本示例采用 DR(直连路由)模式,该模式要求 VIP(虚拟 IP)与真实服务器处于同一网段,数据包直接转发,提高了性能和效率。
实际部署中,通常通过 Keepalived 来统一管理 LVS 的配置,实现高可用。因此无需手动单独配置 LVS 转发规则,相关规则会由 Keepalived 自动接管和维护。
lvs-001 服务器配置
# ipvsadm keepalived 安装
[root@dnsproxy-001 ~]# dnf install epel-release
[root@dnsproxy-001 ~]# dnf install -y keepalived ipvsadm

# keepalived 配置
[root@dnsproxy-001 ~]# cat /etc/keepalived/keepalived.conf
# 全局设置
global_defs {
   notification_email {
     [email protected] # 接收通知邮箱
   }
   notification_email_from [email protected] # 发送通知邮箱
   smtp_server 192.168.200.1 # SMTP 邮件发送服务器(确保可用)
   smtp_connect_timeout 30 # SMTP 服务器连接超时
   router_id lvs134 # 路由 ID 号(局域网内唯一)
   vrrp_skip_check_adv_addr # 用于跳过 VRRP 通告包中的广告地址(例如源 IP 地址)的校验
#   vrrp_strict # 启用 VRRP 的严格模式(启用后 VIP 地址无法 Ping 通)
   vrrp_garp_interval 2 # 设置 GARP (Gratuitous ARP) 包的发送间隔
   vrrp_gna_interval 2 # 设置 GNA (Gratuitous Neighbor Advertisement) 包的发送间隔(IPv6 的 GARP)
}

vrrp_instance VI_1 {
    state MASTER # 设置此节点为主节点
    interface ens18 # VIP 绑定在 ens18 接口上
    virtual_router_id 134 # 虚拟路由ID为 134
    priority 100 # 优先级为 100
    advert_int 1 # 表示 VRRP 广告(advertisement)报文的发送间隔
    authentication { # VRRP 认证信息
        auth_type PASS # 认证类型为 密码
        auth_pass dnsvip # 认证密码为 dnsvip
    }
    virtual_ipaddress { # VIP 地址
        192.168.1.5
    }
}

# 虚拟服务器配置
# DNS UDP 代理 53 端口
virtual_server 192.168.1.5 53 { # 虚拟服务器IP
    delay_loop 6 # 真实服务器(real server)健康状态检测间隔时间
    lb_algo rr # LVS 负载均衡方式
    lb_kind DR # LVS 工作模式 DR 表示直接路由
    protocol UDP # 协议为 UDP

    real_server 192.168.1.1 53 { # 真实服务器IP
        weight 1 # 权重
        UDP_CHECK {
            connect_timeout 3  # 检查连接超时 3 秒
            nb_get_retry 3     # 最大重试次数 3,默认值 3 次
            delay_before_retry 2  # 重试之前延迟 2 秒,默认值 1 秒。
        }
    }

    real_server 192.168.1.2 53 {
        weight 1
        UDP_CHECK {
            connect_timeout 3
        }
    }
}

# 其它虚拟服务器设置相同,不再单独说明各参数的意思
# DNS TCP 代理 53 端口
virtual_server 192.168.1.5 53 {
    delay_loop 6
    lb_algo rr
    lb_kind DR
    persistence_timeout 50
    protocol TCP # 53 TCP 端口

    real_server 192.168.1.1 53 {
        weight 1
        TCP_CHECK {
            connect_timeout 3
        }
    }

    real_server 192.168.1.2 53 {
        weight 1
        TCP_CHECK {
            connect_timeout 3
        }
    }
}

# DoT (DNS over TLS) 853 端口
virtual_server 192.168.1.5 853 {
    delay_loop 6
    lb_algo rr
    lb_kind DR
    persistence_timeout 50
    protocol TCP

    real_server 192.168.1.1 853 {
        weight 1
        TCP_CHECK {
            connect_timeout 3
        }
    }

    real_server 192.168.1.2 853 {
        weight 1
        TCP_CHECK {
            connect_timeout 3
        }
    }
}

# DoH (DNS over HTTPS) 443 端口
virtual_server 192.168.1.5 443 {
    delay_loop 6
    lb_algo rr
    lb_kind DR
    persistence_timeout 50
    protocol TCP

    real_server 192.168.1.1 443 {
        weight 1
        TCP_CHECK {
            connect_timeout 3
        }
    }

    real_server 192.168.1.2 443 {
        weight 1
        TCP_CHECK {
            connect_timeout 3
        }
    }
}

# 设置服务开机自启动,并启动服务
[root@dnsproxy-001 ~]# systemctl enable --now keepalived

# 查看服务状态
[root@dnsproxy-001 ~]# systemctl status keepalived.service
● keepalived.service - LVS and VRRP High Availability Monitor
     Loaded: loaded (/usr/lib/systemd/system/keepalived.service; disabled; preset: disabled)
     Active: active (running) since Thu 2025-01-14 18:52:31 CST; 6s ago
   Main PID: 363681 (keepalived)
      Tasks: 3 (limit: 48916)
     Memory: 2.2M
        CPU: 43ms
     CGroup: /system.slice/keepalived.service
             ├─363681 /usr/sbin/keepalived --dont-fork -D
             ├─363682 /usr/sbin/keepalived --dont-fork -D
             └─363683 /usr/sbin/keepalived --dont-fork -D

Jan 14 18:52:35 dnsproxy-001 Keepalived_vrrp[363683]: Sending gratuitous ARP on ens18 for 192.168.1.5
Jan 14 18:52:35 dnsproxy-001 Keepalived_healthcheckers[363682]: TCP connection to [192.168.1.2]:tcp:443 success. # 真实服务器健康检测正常
Jan 14 18:52:36 dnsproxy-001 Keepalived_healthcheckers[363682]: UDP connection to [192.168.1.2]:udp:53 success.
Jan 14 18:52:37 dnsproxy-001 Keepalived_healthcheckers[363682]: TCP connection to [192.168.1.1]:tcp:53 success.
Jan 14 18:52:37 dnsproxy-001 Keepalived_healthcheckers[363682]: TCP connection to [192.168.1.2]:tcp:853 success.
Jan 14 18:52:38 dnsproxy-001 Keepalived_healthcheckers[363682]: UDP connection to [192.168.1.1]:udp:53 success.

# 确保 VIP 绑定在 ens18 上
[root@dnsproxy-001 ~]# ip addr
1: lo: <LOOPBACK,UP,LOWER_UP> mtu 65536 qdisc noqueue state UNKNOWN group default qlen 1000
    link/loopback 00:00:00:00:00:00 brd 00:00:00:00:00:00
    inet 127.0.0.1/8 scope host lo
       valid_lft forever preferred_lft forever
    inet6 ::1/128 scope host
       valid_lft forever preferred_lft forever
2: ens18: <BROADCAST,MULTICAST,UP,LOWER_UP> mtu 1500 qdisc fq_codel state UP group default qlen 1000
    link/ether 52:e9:eb:77:3d:fe brd ff:ff:ff:ff:ff:ff
    altname enp0s18
    inet 192.168.1.3/24 brd 192.168.1.255 scope global noprefixroute ens18
       valid_lft forever preferred_lft forever
    inet 192.168.1.5/32 scope global ens18 # VIP 地址
       valid_lft forever preferred_lft forever
    inet6 fe80::486a:e224:31e4:d1fc/64 scope link noprefixroute
       valid_lft forever preferred_lft forever

# 配置防火墙,允许 dns 和 vrrp 协议或端口
[root@dnsproxy-001 ~]# firewall-cmd --permanent --add-protocol=vrrp
[root@dnsproxy-001 ~]# firewall-cmd --add-port=53/tcp --permanent
[root@dnsproxy-001 ~]# firewall-cmd --add-port=53/udp --permanent
[root@dnsproxy-001 ~]# firewall-cmd --add-port=853/tcp --permanent
[root@dnsproxy-001 ~]# firewall-cmd --add-port=443/tcp --permanent
[root@dnsproxy-001 ~]# firewall-cmd --reload

# 查看 LVS 后端转发信息,Route 表示 DR 模式
[root@dnsproxy-001 ~]# ipvsadm -Ln
IP Virtual Server version 1.2.1 (size=4096)
Prot LocalAddress:Port Scheduler Flags
  -> RemoteAddress:Port           Forward Weight ActiveConn InActConn
TCP  192.168.1.5:53 rr persistent 50
  -> 192.168.1.1:53             Route   1      0          0
  -> 192.168.1.2:53             Route   1      0          0
TCP  192.168.1.5:443 rr persistent 50
  -> 192.168.1.1:443            Route   1      0          0
  -> 192.168.1.2:443            Route   1      0          0
TCP  192.168.1.5:853 rr persistent 50
  -> 192.168.1.1:853            Route   1      0          0
  -> 192.168.1.2:853            Route   1      0          0
UDP  192.168.1.5:53 rr
  -> 192.168.1.1:53             Route   1      0          0
  -> 192.168.1.2:53             Route   1      0          0

# 需要注意的是,LVS 工作在内核层而非用户层,因此无法通过常用的命令(如 netstat 或 ss )看到 LVS 监听的端口。但是,如果配置正确,通过 telnet VIP 53 端口是可以正常连接的。同时,防火墙需要放行对应的 53 端口,确保访问通畅。
[root@dnsproxy-001 ~]# ss -antlp
State                     Recv-Q                    Send-Q                                        Local Address:Port                                          Peer Address:Port                    Process
LISTEN                    0                         128                                                 0.0.0.0:22                                                 0.0.0.0:*                        users:(("sshd",pid=798,fd=3))
LISTEN                    0                         128                                                    [::]:22                                                    [::]:*                        users:(("sshd",pid=798,fd=4))
详细参数说明:
-
vrrp_skip_check_adv_addr
- 描述: 此配置参数用于跳过 VRRP 通告包中的广播地址(例如源 IP 地址)的校验。
- 用途: 在某些网络环境下,节点可能会动态改变 IP 地址。在这种情况下,为了避免因为 IP 地址的变化而导致 VRRP 通告包被错误地丢弃,可以使用此参数来跳过广播地址的校验。
-
vrrp_strict
- 描述: 此配置参数启用 VRRP 的严格模式。
- 用途: 在严格模式下,Keepalived 会对 VRRP 通告包进行严格的检查,以确保包的各个字段都符合预期。这个设置可以提高安全性,但可能会导致在某些不太规范的网络情况下,某些尽管正常但稍有偏差的 VRRP 通告包被丢弃。
-
vrrp_garp_interval
- 描述: 这个参数设置 GARP (Gratuitous ARP) 包的发送间隔。
- 用途: 当 VRRP 切换发生时,新的主服务器会发送 GARP 包来告知网络中的所有设备它的新 IP-MAC 地址绑定。这可以使得网络中的设备及时更新其 ARP 缓存,从而确保数据包正确路由到新的主服务器。
vrrp_garp_interval用于设置这些包的发送频率。 - 设置: 单位为秒,设为
0时表示不发送 GARP 包。例如vrrp_garp_interval 0表示不发送 GARP 包。通常,建议将该值设置为1到5秒之间。
-
vrrp_gna_interval
- 描述: 这个参数设置 GNA (Gratuitous Neighbor Advertisement) 包的发送间隔。
- 用途: 在 IPv6 网络中,类似于 IPv4 的 GARP,GNA 用于告知网络中所有设备新的主服务器的 IPv6 地址。这使得设备能够及时更新邻居发现缓存,从而确保数据包正确路由到新的主服务器。
vrrp_gna_interval用于设置这些包的发送频率。 - 设置: 单位为秒,设为
0时表示不发送 GNA 包。例如vrrp_gna_interval 0表示不发送 GNA 包。通常,建议将该值设置为1到5秒之间。
-
delay_loop
- 描述: 指定 Keepalived 检查真实服务器(real server)状态的时间间隔,单位是秒。
- 用途: 这个参数对于确保负载均衡器发送流量到尽可能健康的服务器非常重要,同时避免频繁检查带来的不必要的网络开销。
- 设置:
delay_loop 6表示 Keepalived 每6秒钟检查一次每个真实服务器的健康状态,以确定它们是否处于运行状态。如果真实服务器不可用,Keepalived 会停止将流量转发给它。
-
lb_algo
- 描述: 指定 LVS 使用的负载均衡算法。
- 用途: 轮循算法是一种简单且常用的负载均衡算法,因为它不需跟踪连接状态,适合比较均匀的负载分配场景。但它并不考虑服务器的实际负载情况。除了 rr 外,还有 wrr、lc、wlc 等负载均衡算法。
- 设置:
lb_algo rr表示使用 "轮循" (round-robin) 算法,即按顺序将到达的连接依次分配给后端真实服务器。
-
lb_kind
- 描述: 指定 LVS 负载均衡的模式。
- 用途: DR 模式的一个好处是效率高,因为请求通过负载均衡器,但负载均衡器不会成为瓶颈,它不像 NAT(网络地址转换)模式那样把返回流量也通过负载均衡器。因此,DR 模式适用于大多数高性能和高吞吐量的应用场景。除了 DR 外,还有 NAT、TUN 等模式。
- 设置:
lb_kind DR表示使用 "直接路由" (Direct Routing, 或简称 DR) 模式。这种模式中请求数据包直接到达 LVS 负载均衡器,负载均衡器随后将包直接传送到真实服务器而不修改目标 IP。响应包则直接从真实服务器返回给客户端。
lvs-002 服务器配置
说明:仅对与主节点 DNSProxy-001 配置不相同部份,添加注解。
# ipvsadm keepalived 安装
[root@dnsproxy-002 ~]# dnf install epel-release
[root@dnsproxy-002 ~]# dnf install -y keepalived ipvsadm

# keepalived 配置
[root@dnsproxy-002 ~]# cat /etc/keepalived/keepalived.conf
global_defs {
   notification_email {
     [email protected]
   }
   notification_email_from [email protected]
   smtp_server 192.168.200.1
   smtp_connect_timeout 30
   router_id lvs134 # 确保路由 ID 与主节点相同
   vrrp_skip_check_adv_addr
#   vrrp_strict
   vrrp_garp_interval 0
   vrrp_gna_interval 0
}

vrrp_instance VI_1 {
    state BACKUP # 设置此节点为从节点
    interface ens18
    virtual_router_id 134
    priority 90 # 设置优化级为 90,小于主节点的 100
    advert_int 1
    authentication {
        auth_type PASS
        auth_pass dnsvip
    }
    virtual_ipaddress {
        192.168.1.5
    }
}

virtual_server 192.168.1.5 53 {
    delay_loop 6
    lb_algo rr
    lb_kind DR
    protocol UDP

    real_server 192.168.1.1 53 {
        weight 1
        UDP_CHECK {
            connect_timeout 3
        }
    }

    real_server 192.168.1.2 53 {
        weight 1
        UDP_CHECK {
            connect_timeout 3
        }
    }
}

virtual_server 192.168.1.5 53 {
    delay_loop 6
    lb_algo rr
    lb_kind DR
    persistence_timeout 50
    protocol TCP

    real_server 192.168.1.1 53 {
        weight 1
        TCP_CHECK {
            connect_timeout 3
        }
    }

    real_server 192.168.1.2 53 {
        weight 1
        TCP_CHECK {
            connect_timeout 3
        }
    }
}

virtual_server 192.168.1.5 853 {
    delay_loop 6
    lb_algo rr
    lb_kind DR
    persistence_timeout 50
    protocol TCP

    real_server 192.168.1.1 853 {
        weight 1
        TCP_CHECK {
            connect_timeout 3
        }
    }

    real_server 192.168.1.2 853 {
        weight 1
        TCP_CHECK {
            connect_timeout 3
        }
    }
}

virtual_server 192.168.1.5 443 {
    delay_loop 6
    lb_algo rr
    lb_kind DR
    persistence_timeout 50
    protocol TCP

    real_server 192.168.1.1 443 {
        weight 1
        TCP_CHECK {
            connect_timeout 3
        }
    }

    real_server 192.168.1.2 443 {
        weight 1
        TCP_CHECK {
            connect_timeout 3
        }
    }
}
CoreDNS 服务器配置
在 LVS 的 DR(Direct Routing,直连路由)模式下,客户端(CIP)发起的请求首先到达 LVS 负载均衡器,然后被直接转发至后端真实服务器(RIP)。需要注意的是,这些请求的数据包的目标地址依然是虚拟 IP(VIP),而非真实服务器的 IP(RIP)。
因此,后端真实服务器必须能够接收并处理目的地址为 VIP 的数据包。为此,需要在每台 CoreDNS 服务器的回环接口(lo 或 lo:0)上绑定 VIP,否则这些包会因目标地址不匹配而被丢弃。
下面以 CoreDNS-001 服务器为例,其配置方法如下(两台 CoreDNS 服务器均需按照此方式配置):
# 查看连接信息
[root@coredns-001 ~]# nmcli con show
NAME   UUID                                  TYPE      DEVICE
ens18  61b3beeb-ac98-4bb3-bda4-275c1be29d1a  ethernet  ens18
lo     e33c607b-9ed8-4f22-9587-3eeb691a12ed  loopback  lo

# 修改现在 lo 接口 IP
[root@coredns-001 ~]# nmcli con modify lo ipv4.addresses "127.0.0.1/8,192.168.1.5/32"

# 激活连接
[root@coredns-001 ~]# nmcli con up lo
Connection successfully activated (D-Bus active path: /org/freedesktop/NetworkManager/ActiveConnection/3)

# 查看 IP 信息
[root@coredns-001 ~]# ip addr
1: lo: <LOOPBACK,UP,LOWER_UP> mtu 65536 qdisc noqueue state UNKNOWN group default qlen 1000
    link/loopback 00:00:00:00:00:00 brd 00:00:00:00:00:00
    inet 127.0.0.1/8 scope host lo
       valid_lft forever preferred_lft forever
    inet 192.168.1.5/32 scope global lo # 确保 VIP 配置成功
       valid_lft forever preferred_lft forever
2: ens18: <BROADCAST,MULTICAST,UP,LOWER_UP> mtu 1500 qdisc fq_codel state UP group default qlen 1000
    link/ether 26:d5:e2:3f:c8:8a brd ff:ff:ff:ff:ff:ff
    altname enp0s18
    inet 192.168.1.1/24 brd 192.168.1.255 scope global noprefixroute ens18
       valid_lft forever preferred_lft forever

# 设置重启服务器,VIP 自动绑定至 lo
[root@coredns-001 ~]# nmcli connection modify lo connection.autoconnect yes

# 确保 lo 配置文件配置如下,避免重启失效
[root@coredns-001 ~]# cat /etc/NetworkManager/system-connections/lo.nmconnection
[connection]
id=lo
uuid=e33c607b-9ed8-4f22-9587-3eeb691a12ed
type=loopback
autoconnect=true # 命令&参数 二选一
interface-name=lo
timestamp=1731122447

[loopback]

[ipv4]
address1=127.0.0.1/8
address2=192.168.1.5/32
method=manual

[ipv6]
addr-gen-mode=default
method=auto

[proxy]

# 禁用任何接口的 ARP 请求
[root@coredns-001 ~]# cat >> /etc/sysctl.conf << \EOF
# 设置回环接口忽略来自任何接口的 ARP 请求
net.ipv4.conf.lo.arp_ignore = 1
# 设置回环地址仅仅公告本地的 IP 地址,但是不响应 ARP 请求
net.ipv4.conf.lo.arp_announce = 2
# 设置所有接口忽略来自任何接口的 ARP 请求
net.ipv4.conf.all.arp_ignore = 1
# 设置所有接口仅仅公告本地的 IP 地址,但是响应 ARP 请求
net.ipv4.conf.all.arp_announce = 2
EOF

# 生效配置
[root@coredns-001 ~]# sysctl -p

# 查看配置是否生效
[root@coredns-001 ~]# sysctl -a | grep net.ipv4.conf.lo.arp_ignore
[root@coredns-001 ~]# sysctl -a | grep net.ipv4.conf.lo.arp_announce
[root@coredns-001 ~]# sysctl -a | grep net.ipv4.conf.all.arp_ignore
[root@coredns-001 ~]# sysctl -a | grep net.ipv4.conf.all.arp_announce

# 临时生效配置(可选)
[root@coredns-001 ~]# echo 1 > /proc/sys/net/ipv4/conf/lo/arp_ignore
[root@coredns-001 ~]# echo 2 > /proc/sys/net/ipv4/conf/lo/arp_announce
[root@coredns-001 ~]# echo 1 > /proc/sys/net/ipv4/conf/all/arp_ignore
[root@coredns-001 ~]# echo 2 > /proc/sys/net/ipv4/conf/all/arp_announce

# 查看配置是否生效(可选)
[root@coredns-001 ~]# cat /proc/sys/net/ipv4/conf/all/arp_ignore
[root@coredns-001 ~]# cat /proc/sys/net/ipv4/conf/all/arp_announce
[root@coredns-001 ~]# cat /proc/sys/net/ipv4/conf/lo/arp_ignore
[root@coredns-001 ~]# cat /proc/sys/net/ipv4/conf/lo/arp_announce
客户端验证
# 测试 VIP 端口连接正常
[root@client-001 ~]# telnet 192.168.1.5 53
Trying 192.168.1.5...
Connected to 192.168.1.5.
Escape character is '^]'.
^]
telnet> quit
Connection closed.

# UDP 测试正常
[root@client-001 ~]# dig @192.168.1.5 www.baidu.com

; <<>> DiG 9.11.4-P2-RedHat-9.11.4-26.P2.el7_9.16 \<<>> @192.168.1.5 www.baidu.com
; (1 server found)
;; global options: +cmd
;; Got answer:
;; ->>HEADER<<- \opcode: QUERY, status: NOERROR, id: 13890
;; flags: qr rd ra; QUERY: 1, ANSWER: 3, AUTHORITY: 0, ADDITIONAL: 1

;; OPT PSEUDOSECTION:
; EDNS: version: 0, flags:; udp: 4096
;; QUESTION SECTION:
;www.baidu.com.                 IN      A

;; ANSWER SECTION:
www.baidu.com.          715     IN      CNAME   www.a.shifen.com.
www.a.shifen.com.       303     IN      A       183.2.172.177
www.a.shifen.com.       303     IN      A       183.2.172.17

;; Query time: 30 msec
;; SERVER: 192.168.1.5#53(192.168.1.5)
;; WHEN: 二 1月 14 19:30:23 CST 2025
;; MSG SIZE  rcvd: 149

# TCP 测试正常
[root@client-001 ~]# dig +tcp @192.168.1.5 www.baidu.com

; <<>> DiG 9.11.4-P2-RedHat-9.11.4-26.P2.el7_9.16 \<<>> +tcp @192.168.1.5 www.baidu.com
; (1 server found)
;; global options: +cmd
;; Got answer:
;; ->>HEADER<<- \opcode: QUERY, status: NOERROR, id: 18310
;; flags: qr rd ra; QUERY: 1, ANSWER: 3, AUTHORITY: 0, ADDITIONAL: 1

;; OPT PSEUDOSECTION:
; EDNS: version: 0, flags:; udp: 4096
;; QUESTION SECTION:
;www.baidu.com.                 IN      A

;; ANSWER SECTION:
www.baidu.com.          602     IN      CNAME   www.a.shifen.com.
www.a.shifen.com.       602     IN      A       183.2.172.17
www.a.shifen.com.       602     IN      A       183.2.172.177

;; Query time: 59 msec
;; SERVER: 192.168.1.5#53(192.168.1.5)
;; WHEN: 二 1月 14 19:30:30 CST 2025
;; MSG SIZE  rcvd: 149

# DoT 测试正常
[root@client-001 ~]# kdig @192.168.1.5 -p 853 baidu.com +tls -d
;; DEBUG: Querying for owner(baidu.com.), class(1), type(1), server(192.168.1.5), port(853), protocol(TCP)
;; DEBUG: TLS, received certificate hierarchy:
;; DEBUG:  #1, CN=dns.rockylinux.cn
;; DEBUG:      SHA-256 PIN: yZxRF4IxyMutN63XBYn7H36387B1JZHaCN44/DK+yRk=
;; DEBUG:  #2, C=US,O=Let's Encrypt,CN=E5
;; DEBUG:      SHA-256 PIN: NYbU7PBwV4y9J67c4guWTki8FJ+uudrXL0a4V4aRcrg=
;; DEBUG: TLS, skipping certificate PIN check
;; DEBUG: TLS, skipping certificate verification
;; TLS session (TLS1.2)-(ECDHE-ECDSA-SECP256R1)-(AES-128-GCM)
;; ->>HEADER<<- \opcode: QUERY; status: NOERROR; id: 46262
;; Flags: qr rd ra; QUERY: 1; ANSWER: 2; AUTHORITY: 0; ADDITIONAL: 1

;; EDNS PSEUDOSECTION:
;; Version: 0; flags: ; UDP size: 4096 B; ext-rcode: NOERROR
;; PADDING: 394 B

;; QUESTION SECTION:
;; baidu.com.                   IN      A

;; ANSWER SECTION:
baidu.com.              251     IN      A       110.242.68.66
baidu.com.              251     IN      A       39.156.66.10

;; Received 486 B
;; Time 2025-01-14 10:18:49 CST
;; From 192.168.1.5@853(TCP) in 114.6 ms

# DoH 测试正常
[root@client-001 ~]# kdig @192.168.1.5 +https google.com +tls -d
;; DEBUG: Querying for owner(google.com.), class(1), type(1), server(192.168.1.5), port(443), protocol(TCP)
;; DEBUG: TLS, received certificate hierarchy:
;; DEBUG:  #1, CN=dns.rockylinux.cn
;; DEBUG:      SHA-256 PIN: yZxRF4IxyMutN63XBYn7H36387B1JZHaCN44/DK+yRk=
;; DEBUG:  #2, C=US,O=Let's Encrypt,CN=E5
;; DEBUG:      SHA-256 PIN: NYbU7PBwV4y9J67c4guWTki8FJ+uudrXL0a4V4aRcrg=
;; DEBUG: TLS, skipping certificate PIN check
;; DEBUG: TLS, skipping certificate verification
;; TLS session (TLS1.2)-(ECDHE-ECDSA-SECP256R1)-(AES-128-GCM)
;; HTTP session (HTTP/2-POST)-(192.168.1.5/dns-query)-(status: 200)
;; ->>HEADER<<- \opcode: QUERY; status: NOERROR; id: 0
;; Flags: qr rd ra; QUERY: 1; ANSWER: 1; AUTHORITY: 0; ADDITIONAL: 1

;; EDNS PSEUDOSECTION:
;; Version: 0; flags: ; UDP size: 4096 B; ext-rcode: NOERROR
;; PADDING: 409 B

;; QUESTION SECTION:
;; google.com.                  IN      A

;; ANSWER SECTION:
google.com.             300     IN      A       142.250.71.206

;; Received 478 B
;; Time 2025-01-14 19:31:08 CST
;; From 192.168.1.5@443(TCP) in 87.8 ms

# 查看主节点连接信息
[root@dnsproxy-001 ~]# ipvsadm -Lnc
IPVS connection entries
pro expire state       source             virtual            destination
TCP 13:52  ESTABLISHED 192.168.3.1:35371 192.168.1.5:53    192.168.1.2:53
UDP 03:35  UDP         192.168.3.1:60454 192.168.1.5:53    192.168.1.2:53
TCP 13:55  ESTABLISHED 192.168.3.1:40675 192.168.1.5:853   192.168.1.2:853
TCP 14:20  ESTABLISHED 192.168.3.1:33753 192.168.1.5:443   192.168.1.2:443
TCP 14:08  ESTABLISHED 192.168.3.1:32859 192.168.1.5:853   192.168.1.2:853

[root@dnsproxy-001 ~]# ipvsadm -Ln
IP Virtual Server version 1.2.1 (size=4096)
Prot LocalAddress:Port Scheduler Flags
  -> RemoteAddress:Port           Forward Weight ActiveConn InActConn
TCP  192.168.1.5:53 rr persistent 50
  -> 192.168.1.1:53             Route   1      0          0
  -> 192.168.1.2:53             Route   1      1          0
TCP  192.168.1.5:443 rr persistent 50
  -> 192.168.1.1:443            Route   1      0          0
  -> 192.168.1.2:443            Route   1      1          0
TCP  192.168.1.5:853 rr persistent 50
  -> 192.168.1.1:853            Route   1      0          0
  -> 192.168.1.2:853            Route   1      1          0
UDP  192.168.1.5:53 rr
  -> 192.168.1.1:53             Route   1      0          0
-> 192.168.1.2:53 Route 1 1 0 Nginx
Nginx 服务器配置
Nginx 支持 tcp 和 udp 协议的转发,但需要安装 --with-stream 模块。然而,Rocky Linux 9 默认提供的 Nginx 软件包并未包含该模块,因此无法通过简单的 dnf install nginx 命令满足需求。为实现对 TCP/UDP 的转发,必须手动源码编译安装 Nginx,并启用 --with-stream 模块。
注意:两台 Nginx 代理服务器均需进行源码编译安装。以下以 DNSProxy-001 服务器为例进行说明。
# 安装编译所需求包
[root@dnsproxy-001 ~]# dnf install gcc make pcre-devel zlib-devel openssl-devel perl-devel perl-ExtUtils-Embed libxml2-devel libxslt-devel gd-devel geoip-devel gperftools-devel redhat-rpm-config

# 下载 Nginx 源码包进行编译安装
[root@dnsproxy-001 ~]# wget http://nginx.org/download/nginx-1.27.5.tar.gz
[root@dnsproxy-001 ~]# tar -zxvf nginx-1.27.5.tar.gz
[root@dnsproxy-001 ~]# cd nginx-1.27.5
# 带 --with-stream 模块进行编译安装
[root@DNSProxy-001 nginx-1.27.5]# ./configure --prefix=/usr/share/nginx --sbin-path=/usr/sbin/nginx --modules-path=/usr/lib64/nginx/modules --conf-path=/etc/nginx/nginx.conf --error-log-path=/var/log/nginx/error.log --http-log-path=/var/log/nginx/access.log --with-http_stub_status_module --with-http_ssl_module --with-stream --pid-path=/run/nginx.pid
# 确保配置成功
Configuration summary
  + using system PCRE2 library
  + using system OpenSSL library
  + using system zlib library

  nginx path prefix: "/usr/share/nginx"
  nginx binary file: "/usr/sbin/nginx"
  nginx modules path: "/usr/lib64/nginx/modules"
  nginx configuration prefix: "/etc/nginx"
  nginx configuration file: "/etc/nginx/nginx.conf"
  nginx pid file: "/run/nginx.pid"
  nginx error log file: "/var/log/nginx/error.log"
  nginx http access log file: "/var/log/nginx/access.log"
  nginx http client request body temporary files: "client_body_temp"
  nginx http proxy temporary files: "proxy_temp"
  nginx http fastcgi temporary files: "fastcgi_temp"
  nginx http uwsgi temporary files: "uwsgi_temp"
  nginx http scgi temporary files: "scgi_temp"

# 编译
[root@DNSProxy-001 nginx-1.27.5]# make
# 安装
[root@DNSProxy-001 nginx-1.27.5]# make install
# 确保安装成功
[root@DNSProxy-001 nginx-1.27.5]# nginx -V
nginx version: nginx/1.27.5
built by gcc 11.5.0 20240719 (Red Hat 11.5.0-5) (GCC)
built with OpenSSL 3.2.2 4 Jun 2024
TLS SNI support enabled
configure arguments: --prefix=/usr/share/nginx --sbin-path=/usr/sbin/nginx --modules-path=/usr/lib64/nginx/modules --conf-path=/etc/nginx/nginx.conf --error-log-path=/var/log/nginx/error.log --http-log-path=/var/log/nginx/access.log --with-http_stub_status_module --with-http_ssl_module --with-stream

# 配置服务文件
[root@dnsproxy-001 ~]# cat /usr/lib/systemd/system/nginx.service
[Unit]
Description=The nginx HTTP and reverse proxy server
After=network-online.target remote-fs.target nss-lookup.target
Wants=network-online.target

[Service]
Type=forking
PIDFile=/run/nginx.pid
ExecStartPre=/usr/bin/rm -f /run/nginx.pid
ExecStartPre=/usr/sbin/nginx -t
ExecStart=/usr/sbin/nginx
ExecReload=/usr/sbin/nginx -s reload
KillSignal=SIGQUIT
TimeoutStopSec=5
KillMode=mixed
PrivateTmp=true

[Install]
WantedBy=multi-user.target
Nginx 配置 DNS 代理时,TCP 和 UDP 协议的转发应使用四层(stream)方式实现。对于 DoH(DNS over HTTPS)协议的 443 端口代理,同样建议使用四层转发,而不要采用七层(HTTP/HTTPS)代理方式,否则可能导致请求失败。
# --with-stream 模块 access 输出日志,需要自定义日志格式
[root@dnsproxy-001 ~]# vi /etc/nginx/nginx.conf
stream {
    log_format basic '$time_local $remote_addr $upstream_addr $protocol $status $session_time'; # 日志格式
    include /etc/nginx/stream_conf.d/*.conf; # stream 配置文件存放目录
}

# 创建 stream 配置文件存放目录
[root@dnsproxy-001 ~]# mkdir /etc/nginx/stream_conf.d
# 创建日志存放目录
[root@dnsproxy-001 ~]# mkdir /etc/nginx/logs/

# 创建配置文件
[root@dnsproxy-001 ~]# cat /etc/nginx/stream_conf.d/coredns.conf
# DNS UDP 代理 53 端口
upstream dns_udp53_backend {
    server 192.168.1.1:53;
    server 192.168.1.2:53;
}
server {
    listen 53 udp;
    proxy_pass dns_udp53_backend;
    proxy_timeout 1s;
    proxy_responses 1;
    error_log /etc/nginx/logs/dns.log;
    access_log /etc/nginx/logs/dns.log basic; # access 日志输出格式,指定为前面设置的 basic
}

# DNS TCP 代理 53 端口
upstream dns_tcp53_backend {
    server 192.168.1.1:53;
    server 192.168.1.2:53;
}
server {
    listen 53;
    proxy_pass dns_tcp53_backend;
    proxy_timeout 1s;
    proxy_responses 1;
    error_log /etc/nginx/logs/dns.log;
    access_log /etc/nginx/logs/dns.log basic;
}

# DoT (DNS over TLS) 853 端口
upstream dot_backend {
    server 192.168.1.1:853;
    server 192.168.1.2:853;
}
server {
    listen 853;
    proxy_pass dot_backend;
    proxy_timeout 3s;
    proxy_responses 1;
    error_log /etc/nginx/logs/dns.log;
    access_log /etc/nginx/logs/dns.log basic;
}

# DoH (DNS over HTTPS) 443 端口
upstream doh_backend {
    server 192.168.1.1:443;
    server 192.168.1.2:443;
}

server {
    listen 443;
    proxy_pass doh_backend;
    proxy_timeout 3s;
    proxy_responses 1;
    error_log /etc/nginx/logs/dns.log;
    access_log /etc/nginx/logs/dns.log basic;
}

# 验证配置可用性
[root@dnsproxy-001 ~]# nginx -t
nginx: the configuration file /etc/nginx/nginx.conf syntax is ok
nginx: configuration file /etc/nginx/nginx.conf test is successful

# 设置 Nginx 服务开机自启动,并启动服务
[root@dnsproxy-001 ~]# systemctl enable --now nginx
Created symlink /etc/systemd/system/multi-user.target.wants/nginx.service → /usr/lib/systemd/system/nginx.service.

# 查看服务状态,确保正常
[root@dnsproxy-001 ~]# systemctl status nginx
● nginx.service - The nginx HTTP and reverse proxy server
     Loaded: loaded (/usr/lib/systemd/system/nginx.service; enabled; preset: disabled)
     Active: active (running) since Sat 2025-01-14 14:54:33 CST; 1 day 20h ago
   Main PID: 966176 (nginx)
      Tasks: 5 (limit: 48916)
     Memory: 5.8M
        CPU: 518ms
     CGroup: /system.slice/nginx.service
             ├─ 966176 "nginx: master process /usr/sbin/nginx"
             ├─1543787 "nginx: worker process"
             ├─1543788 "nginx: worker process"
             ├─1543789 "nginx: worker process"
             └─1543790 "nginx: worker process"

Jan 14 14:54:32 dnsproxy-001 systemd[1]: Starting The nginx HTTP and reverse proxy server...
Jan 14 14:54:32 dnsproxy-001 nginx[966174]: nginx: the configuration file /etc/nginx/nginx.conf syntax is ok
Jan 14 14:54:32 dnsproxy-001 nginx[966174]: nginx: configuration file /etc/nginx/nginx.conf test is successful
Jan 14 14:54:33 dnsproxy-001 systemd[1]: Started The nginx HTTP and reverse proxy server.

# 确保端口监听正常
[root@dnsproxy-001 ~]# ss -antlp | grep nginx
udp   UNCONN 0      0            0.0.0.0:53        0.0.0.0:*    users:(("nginx",pid=32213,fd=15),("nginx",pid=32212,fd=15))
tcp   LISTEN 0      511          0.0.0.0:443       0.0.0.0:*    users:(("nginx",pid=32213,fd=18),("nginx",pid=32212,fd=18))
tcp   LISTEN 0      511          0.0.0.0:80        0.0.0.0:*    users:(("nginx",pid=32213,fd=14),("nginx",pid=32212,fd=14))
tcp   LISTEN 0      511          0.0.0.0:53        0.0.0.0:*    users:(("nginx",pid=32213,fd=16),("nginx",pid=32212,fd=16))
tcp   LISTEN 0      511          0.0.0.0:853       0.0.0.0:*    users:(("nginx",pid=32213,fd=17),("nginx",pid=32212,fd=17))
Keepalived 服务器配置
主节点配置
# Keepalived 配置
[root@dnsproxy-001 ~]# cat /etc/keepalived/keepalived.conf
global_defs {
   notification_email {
     [email protected]
   }
   notification_email_from [email protected]
   smtp_server 192.168.200.1
   smtp_connect_timeout 30
   router_id lvs134
   vrrp_skip_check_adv_addr
#   vrrp_strict
   vrrp_garp_interval 0
   vrrp_gna_interval 0
}

# 脚本检测 nginx(适用于 systemd 已安装 nginx.service 情况)
vrrp_script chk_nginx {
    script "/etc/keepalived/chk_nginx.sh"
    interval 2
    weight -20       # 失败扣权重,MASTER转移
}

vrrp_instance VI_1 {
    state MASTER
    interface ens18
    virtual_router_id 134
    priority 100
    advert_int 1
    authentication {
        auth_type PASS
        auth_pass dnsvip
    }
    virtual_ipaddress {
        192.168.1.5
    }
    # 检查Nginx是否正常,异常时移除VIP
    track_script {
        chk_nginx
    }
}

# 健康检测脚本
[root@dnsproxy-001 ~]# cat /etc/keepalived/chk_nginx.sh
#!/bin/bash
systemctl is-active nginx > /dev/null 2>&1
exit $?
Keepalived 健康检测逻辑:
- 0: 健康
- !0(非 0): 不健康
从节点配置
[root@dnsproxy-002 ~]# cat /etc/keepalived/keepalived.conf
global_defs {
   notification_email {
     [email protected]
   }
   notification_email_from [email protected]
   smtp_server 192.168.200.1
   smtp_connect_timeout 30
   router_id lvs134
   vrrp_skip_check_adv_addr
#   vrrp_strict
   vrrp_garp_interval 0
   vrrp_gna_interval 0
}

vrrp_instance VI_1 {
    state BACKUP
    interface ens18
    virtual_router_id 134
    priority 90
    advert_int 1
    authentication {
        auth_type PASS
        auth_pass dnsvip
    }
    virtual_ipaddress {
        192.168.1.5
    }
    # 检查Nginx是否正常,异常时移除VIP
    track_script {
        chk_nginx
    }
}

# 脚本检测nginx(适用于 Systemd 已安装nginx.service情况)
vrrp_script chk_nginx {
    script "/etc/keepalived/chk_nginx.sh"
    interval 2
    weight -20       # 失败扣权重,MASTER转移
}

[root@dnsproxy-002 ~]# cat /etc/keepalived/chk_nginx.sh
#!/bin/bash
systemctl is-active nginx > /dev/null 2>&1
exit $?
故障切换演练
为确保主节点能够在 Nginx 故障时,能够快速切换 VIP 至从节点,这里进行故障切换演练,进行实验。
# 当前 VIP 在主节点
[root@dnsproxy-001 ~]# ip addr
1: lo: <LOOPBACK,UP,LOWER_UP> mtu 65536 qdisc noqueue state UNKNOWN group default qlen 1000
    link/loopback 00:00:00:00:00:00 brd 00:00:00:00:00:00
    inet 127.0.0.1/8 scope host lo
       valid_lft forever preferred_lft forever
    inet6 ::1/128 scope host
       valid_lft forever preferred_lft forever
2: ens18: <BROADCAST,MULTICAST,UP,LOWER_UP> mtu 1500 qdisc fq_codel state UP group default qlen 1000
    link/ether 52:e9:eb:77:3d:fe brd ff:ff:ff:ff:ff:ff
    altname enp0s18
    inet 192.168.1.3/24 brd 192.168.1.255 scope global noprefixroute ens18
       valid_lft forever preferred_lft forever
    inet 192.168.1.5/32 scope global ens18 # VIP 信息
       valid_lft forever preferred_lft forever
    inet6 fe80::486a:e224:31e4:d1fc/64 scope link noprefixroute
       valid_lft forever preferred_lft forever

# 停用主节点 Nginx 服务
[root@dnsproxy-001 ~]# systemctl stop nginx

# 查看主节点 Keepalived 日志信息如下
[root@dnsproxy-001 ~]# journalctl -f -u keepalived
Jan 14 14:46:45 dnsproxy-001 Keepalived_vrrp[1589352]: Script `chk_nginx` now returning 3 # 检测脚本健康状态返回 3(非0)
Jan 14 14:46:45 dnsproxy-001 Keepalived_vrrp[1589352]: VRRP_Script(chk_nginx) failed (exited with status 3)
Jan 14 14:46:45 dnsproxy-001 Keepalived_vrrp[1589352]: (VI_1) Changing effective priority from 100 to 80 # 修改优化级从 100 降至 80
Jan 14 14:46:48 dnsproxy-001 Keepalived_vrrp[1589352]: (VI_1) Master received advert from 192.168.1.4 with higher priority 90, ours 80 # 从节点 192.168.1.4 优先级为 90,当前主节点优先级为 80
Jan 14 14:46:48 dnsproxy-001 Keepalived_vrrp[1589352]: (VI_1) Entering BACKUP STATE # 将当前节点切为备节点
Jan 14 14:46:48 dnsproxy-001 Keepalived_vrrp[1589352]: (VI_1) removing VIPs. # 移除 VIP

# 主节点 VIP 已经被移除
[root@dnsproxy-001 ~]# ip addr
1: lo: <LOOPBACK,UP,LOWER_UP> mtu 65536 qdisc noqueue state UNKNOWN group default qlen 1000
    link/loopback 00:00:00:00:00:00 brd 00:00:00:00:00:00
    inet 127.0.0.1/8 scope host lo
       valid_lft forever preferred_lft forever
    inet6 ::1/128 scope host
       valid_lft forever preferred_lft forever
2: ens18: <BROADCAST,MULTICAST,UP,LOWER_UP> mtu 1500 qdisc fq_codel state UP group default qlen 1000
    link/ether 52:e9:eb:77:3d:fe brd ff:ff:ff:ff:ff:ff
    altname enp0s18
    inet 192.168.1.3/24 brd 192.168.1.255 scope global noprefixroute ens18
       valid_lft forever preferred_lft forever
    inet6 fe80::486a:e224:31e4:d1fc/64 scope link noprefixroute
       valid_lft forever preferred_lft forever

# 查看从节点 Keepalived 日志信息如下
[root@dnsproxy-002 ~]# journalctl -f -u keepalived
Jan 14 17:06:06 dnsproxy-002 Keepalived_vrrp[32482]: (VI_1) received lower priority (80) advert from 192.168.1.3 - discarding # 丢弃来自 192.168.1.3 的较低优先级(80)广播
Jan 14 17:06:07 dnsproxy-002 Keepalived_vrrp[32482]: (VI_1) received lower priority (80) advert from 192.168.1.3 - discarding
Jan 14 17:06:08 dnsproxy-002 Keepalived_vrrp[32482]: (VI_1) received lower priority (80) advert from 192.168.1.3 - discarding
Jan 14 17:06:09 dnsproxy-002 Keepalived_vrrp[32482]: (VI_1) Receive advertisement timeout
Jan 14 17:06:09 dnsproxy-002 Keepalived_vrrp[32482]: (VI_1) Entering MASTER STATE # 将从节点切换成主节点
Jan 14 17:06:09 dnsproxy-002 Keepalived_vrrp[32482]: (VI_1) setting VIPs. # 设置 VIP
Jan 14 17:06:09 dnsproxy-002 Keepalived_vrrp[32482]: (VI_1) Sending/queueing gratuitous ARPs on ens18 for 192.168.1.5 # 在 ens18 接口上发送 ARP

# VIP 已经切换至从节点 ens18
[root@dnsproxy-002 ~]# ip addr
1: lo: <LOOPBACK,UP,LOWER_UP> mtu 65536 qdisc noqueue state UNKNOWN group default qlen 1000
    link/loopback 00:00:00:00:00:00 brd 00:00:00:00:00:00
    inet 127.0.0.1/8 scope host lo
       valid_lft forever preferred_lft forever
2: ens18: <BROADCAST,MULTICAST,UP,LOWER_UP> mtu 1500 qdisc fq_codel state UP group default qlen 1000
    link/ether 02:f9:6a:19:8e:05 brd ff:ff:ff:ff:ff:ff
    altname enp0s18
    inet 192.168.1.4/24 brd 192.168.1.255 scope global noprefixroute ens18
       valid_lft forever preferred_lft forever
    inet 192.168.1.5/32 scope global ens18 # VIP 地址
       valid_lft forever preferred_lft forever

# 启动主节点 Nginx 服务
[root@dnsproxy-001 ~]# systemctl start nginx

# 主节点 Keepalived 日志信息如下
[root@dnsproxy-001 ~]# journalctl -f -u keepalived
Jan 14 14:47:39 dnsproxy-001 Keepalived_vrrp[1589352]: Script `chk_nginx` now returning 0 # 检测脚本健康状态返回 0
Jan 14 14:47:39 dnsproxy-001 Keepalived_vrrp[1589352]: VRRP_Script(chk_nginx) succeeded
Jan 14 14:47:39 dnsproxy-001 Keepalived_vrrp[1589352]: (VI_1) Changing effective priority from 80 to 100 # 修改优化级从 80 升至 100
Jan 14 14:47:39 dnsproxy-001 Keepalived_vrrp[1589352]: (VI_1) received lower priority (90) advert from 192.168.1.4 - discarding # 丢弃来自 192.168.1.4 的较低优先级(90)广播
Jan 14 14:47:40 dnsproxy-001 Keepalived_vrrp[1589352]: (VI_1) received lower priority (90) advert from 192.168.1.4 - discarding
Jan 14 14:47:41 dnsproxy-001 Keepalived_vrrp[1589352]: (VI_1) received lower priority (90) advert from 192.168.1.4 - discarding
Jan 14 14:47:42 dnsproxy-001 Keepalived_vrrp[1589352]: (VI_1) Receive advertisement timeout
Jan 14 14:47:42 dnsproxy-001 Keepalived_vrrp[1589352]: (VI_1) Entering MASTER STATE # 将当前节点切换成主节点
Jan 14 14:47:42 dnsproxy-001 Keepalived_vrrp[1589352]: (VI_1) setting VIPs. # 设置 VIP
Jan 14 14:47:42 dnsproxy-001 Keepalived_vrrp[1589352]: (VI_1) Sending/queueing gratuitous ARPs on ens18 for 192.168.1.5 # 在 ens18 接口上发送 ARP

# 从节点 Keepalived 日志信息如下
[root@dnsproxy-002 ~]# journalctl -f -u keepalived
Jan 14 14:47:42 dnsproxy-002 Keepalived_vrrp[32482]: (VI_1) Master received advert from 192.168.1.3 with higher priority 100, ours 90 # 收到来自 192.168.1.3 的广播,优化级为 100,高于当前节点的 90
Jan 14 14:47:42 dnsproxy-002 Keepalived_vrrp[32482]: (VI_1) Entering BACKUP STATE # 将当前节点切换成备节点
Jan 14 14:47:42 dnsproxy-002 Keepalived_vrrp[32482]: (VI_1) removing VIPs. # 移除 VIP
客户端验证
# UDP 测试正常
[root@client-001 ~]# dig @192.168.1.5 www.baidu.com

; <<>> DiG 9.11.4-P2-RedHat-9.11.4-26.P2.el7_9.16 \<<>> @192.168.1.5 www.baidu.com
; (1 server found)
;; global options: +cmd
;; Got answer:
;; ->>HEADER<<- \opcode: QUERY, status: NOERROR, id: 21967
;; flags: qr rd ra; QUERY: 1, ANSWER: 3, AUTHORITY: 0, ADDITIONAL: 1

;; OPT PSEUDOSECTION:
; EDNS: version: 0, flags:; udp: 4096
;; QUESTION SECTION:
;www.baidu.com.                 IN      A

;; ANSWER SECTION:
www.baidu.com.          483     IN      CNAME   www.a.shifen.com.
www.a.shifen.com.       303     IN      A       183.2.172.177
www.a.shifen.com.       303     IN      A       183.2.172.17

;; Query time: 31 msec
;; SERVER: 192.168.1.5#53(192.168.1.5)
;; WHEN: 二 1月 14 14:40:35 CST 2025
;; MSG SIZE  rcvd: 149

# TCP 测试正常
[root@client-001 ~]# dig +tcp @192.168.1.5 www.baidu.com

; <<>> DiG 9.11.4-P2-RedHat-9.11.4-26.P2.el7_9.16 \<<>> +tcp @192.168.1.5 www.baidu.com
; (1 server found)
;; global options: +cmd
;; Got answer:
;; ->>HEADER<<- \opcode: QUERY, status: NOERROR, id: 55380
;; flags: qr rd ra; QUERY: 1, ANSWER: 3, AUTHORITY: 0, ADDITIONAL: 1

;; OPT PSEUDOSECTION:
; EDNS: version: 0, flags:; udp: 4096
;; QUESTION SECTION:
;www.baidu.com.                 IN      A

;; ANSWER SECTION:
www.baidu.com.          232     IN      CNAME   www.a.shifen.com.
www.a.shifen.com.       119     IN      A       183.2.172.177
www.a.shifen.com.       119     IN      A       183.2.172.17

;; Query time: 14 msec
;; SERVER: 192.168.1.5#53(192.168.1.5)
;; WHEN: 二 1月 14 14:40:37 CST 2025
;; MSG SIZE  rcvd: 149

# DoT 测试正常
[root@client-001 ~]# kdig @192.168.1.5 -p 853 baidu.com +tls -d
;; DEBUG: Querying for owner(baidu.com.), class(1), type(1), server(192.168.1.5), port(853), protocol(TCP)
;; DEBUG: TLS, received certificate hierarchy:
;; DEBUG:  #1, CN=dns.rockylinux.cn
;; DEBUG:      SHA-256 PIN: yZxRF4IxyMutN63XBYn7H36387B1JZHaCN44/DK+yRk=
;; DEBUG:  #2, C=US,O=Let's Encrypt,CN=E5
;; DEBUG:      SHA-256 PIN: NYbU7PBwV4y9J67c4guWTki8FJ+uudrXL0a4V4aRcrg=
;; DEBUG: TLS, skipping certificate PIN check
;; DEBUG: TLS, skipping certificate verification
;; TLS session (TLS1.2)-(ECDHE-ECDSA-SECP256R1)-(AES-128-GCM)
;; ->>HEADER<<- \opcode: QUERY; status: NOERROR; id: 20819
;; Flags: qr rd ra; QUERY: 1; ANSWER: 2; AUTHORITY: 0; ADDITIONAL: 1

;; EDNS PSEUDOSECTION:
;; Version: 0; flags: ; UDP size: 4096 B; ext-rcode: NOERROR
;; PADDING: 394 B

;; QUESTION SECTION:
;; baidu.com.                   IN      A

;; ANSWER SECTION:
baidu.com.              127     IN      A       39.156.66.10
baidu.com.              127     IN      A       110.242.68.66

;; Received 486 B
;; Time 2025-01-14 14:40:39 CST
;; From 192.168.1.5@853(TCP) in 72.5 ms

# DoH 测试正常
[root@client-001 ~]#  kdig @192.168.1.5 +https www.baidu.com +tls -d
;; DEBUG: Querying for owner(www.baidu.com.), class(1), type(1), server(192.168.1.5), port(443), protocol(TCP)
;; DEBUG: TLS, received certificate hierarchy:
;; DEBUG:  #1, CN=dns.rockylinux.cn
;; DEBUG:      SHA-256 PIN: yZxRF4IxyMutN63XBYn7H36387B1JZHaCN44/DK+yRk=
;; DEBUG:  #2, C=US,O=Let's Encrypt,CN=E5
;; DEBUG:      SHA-256 PIN: NYbU7PBwV4y9J67c4guWTki8FJ+uudrXL0a4V4aRcrg=
;; DEBUG: TLS, skipping certificate PIN check
;; DEBUG: TLS, skipping certificate verification
;; TLS session (TLS1.2)-(ECDHE-ECDSA-SECP256R1)-(AES-128-GCM)
;; HTTP session (HTTP/2-POST)-(192.168.1.5/dns-query)-(status: 200)
;; ->>HEADER<<- \opcode: QUERY; status: NOERROR; id: 0
;; Flags: qr rd ra; QUERY: 1; ANSWER: 4; AUTHORITY: 0; ADDITIONAL: 1

;; EDNS PSEUDOSECTION:
;; Version: 0; flags: ; UDP size: 4096 B; ext-rcode: NOERROR
;; PADDING: 337 B

;; QUESTION SECTION:
;; www.baidu.com.               IN      A

;; ANSWER SECTION:
www.baidu.com.          622     IN      CNAME   www.a.shifen.com.
www.a.shifen.com.       7       IN      CNAME   www.wshifen.com.
www.wshifen.com.        108     IN      A       103.235.46.115
www.wshifen.com.        108     IN      A       103.235.46.102

;; Received 533 B
;; Time 2025-01-14 14:40:42 CST
;; From 192.168.1.5@443(TCP) in 72.9 ms

# 从服务器端访问日志来看,解析都正常,并且能够自动负载均衡
[root@dnsproxy-001 ~]# tail -f /etc/nginx/logs/dns.log
14/Jan/2025:14:40:35 +0800 192.168.3.1 192.168.1.2:53 UDP 200 0.031
14/Jan/2025:14:40:37 +0800 192.168.3.1 192.168.1.1:53 TCP 200 0.060
14/Jan/2025:14:40:39 +0800 192.168.3.1 192.168.1.1:853 TCP 200 0.080
14/Jan/2025:14:40:42 +0800 192.168.3.1 192.168.1.2:443 TCP 200 0.081
Nftables
Nftables 可以与 Keepalived 配合使用,实现基本的高可用 DNS 服务。不过,Nftables 在负载均衡方面功能较为基础,仅支持简单的轮询(round robin)调度,不支持基于权重等更高级的分配算法。同时,Nftables 本身无法对后端服务器进行健康检查。因此,该方案更适合作为高可用架构的补充或应急方案,难以满足复杂生产环境的全部需求。
# nftables 配置
[root@dnsproxy-001 ~]# cat /etc/sysconfig/nftables.conf
table inet dnsnat {
    chain dnsdnat {
        type nat hook prerouting priority filter; policy accept;
        iifname "ens18" udp dport 53 dnat ip to numgen inc mod 2 map { 0 : 192.168.1.1, 1 : 192.168.1.2 } # 来自接口 en18,协议为 udp,端口为 53,1号封包使用 192.168.1.1,2号封包使用 192.168.1.2,简单理解就是包轮转。
        iifname "ens18" tcp dport {53, 443, 853} dnat ip to numgen inc mod 2 map { 0 : 192.168.1.1, 1 : 192.168.1.2 } # 来自接口 en18,协议为 tcp,端口为 53、443、853,1号封包使用 192.168.1.1,2号封包使用 192.168.1.2
    }
    chain localoutput { # 本地 kdig 请求,比如:kdig @192.168.1.5 +https www.baidu.com +tls -d,因为本地出流量不会走接入接口(PREROUTING),只会走 output 链,所以还需要在 nft(或者 iptables)nat 表中增加一个 output 链,对本机发往本地 IP(如 192.168.1.5:443)的流量做同样的 DNAT。
            type nat hook output priority filter; policy accept;
            ip daddr 192.168.1.5 udp dport 53 dnat ip to numgen inc mod 2 map { 0 : 192.168.1.1, 1 : 192.168.1.2 }
            ip daddr 192.168.1.5 tcp dport {53, 443, 853} dnat ip to numgen inc mod 2 map { 0 : 192.168.1.1, 1 : 192.168.1.2 }
    }
    chain dnssnat { # 将客户端请求的源IP,替换成 192.168.1.5 访问后端 DNS 服务器
        type nat hook postrouting priority srcnat; policy accept;
        oifname "ens18" ip daddr { 192.168.1.1, 192.168.1.2 } snat ip to 192.168.1.5
    }
}

# 生效配置
[root@dnsproxy-001 ~]# nft -f /etc/sysconfig/nftables.conf

# 列出当前所有规则集(确认配置是否生效)
[root@dnsproxy-001 ~]# nft list ruleset

# 设置 nftables 服务开机自启动,并启动服务
[root@dnsproxy-001 ~]# systemctl enable --now nftables
结论与推荐
综合上述四种 DNS 高可用方案的特性及测试表现,各方案在功能完善性、扩展性、兼容性和易用性方面各有优势与不足。结合实际部署和运维经验,推荐的优化级排序如下:
-
Nginx + Keepalived
优势:支持 TCP/UDP 四层转发,兼容 DoT、DoH 等新型协议,具备健康检查与灵活流量控制能力,配置简洁,应用场景广泛。特别适合对 DNS 多协议负载均衡和可用性要求较高的企业及互联网场景。
不足:需要手动编译以获得 stream 模块,操作复杂度略高。 -
LVS + Keepalived
优势:内核级转发,性能卓越,适合大规模高并发场景,高可用能力强。
不足:管理和调试复杂、缺乏灵活的健康检查及应用层调度能力,回环请求等问题需注意。 -
HAProxy + Keepalived
优势:成熟稳定,适用于 TCP、DoT、DoH 等 TCP 场景,配置灵活,健康检查能力较完善。
不足:开源社区版原生不支持 UDP,主要用于非 UDP 的 DNS 负载均衡。 -
nftables + Keepalived
优势:依赖少,性能高,易于原生集成。
不足:仅支持简单的轮询负载,无权重与健康检测,功能单一,更适合补充或小规模场景。
总结建议:如需兼顾多协议支持、健康检查能力和运维易用性,优先推荐采用 Nginx + Keepalived 方案;对极致性能和大流量场景可考虑 LVS + Keepalived 方案;如以 TCP、DoH、DoT 协议为主亦可选用 HAProxy + Keepalived。nftables + Keepalived 建议仅作为简易备选或补充手段。实际选型可结合业务需求、团队运维能力、预期规模等因素综合考量。