
SELinux 简介
SELinux(Security Enhanced Linux)中文简称: 安全增强型 Linux,是一种为 Linux 系统提供强制访问控制(Mandatory access control,MAC)的安全子系统。它最初是由美国国家安全局(National Security Agency, NSA)开发,并以开源许可证形式发布,旨在增强 Linux 系统的安全性。SELinux 通过定义一系列安全策略、限制程序和进程能够访问的资源和操作,从而减少潜在的安全漏洞和风险。需要特别说明的是 SELinux 主要用于 RHEL 发行版系列,虽然它在 Debian 发行版系列也可以使用,但并不是那么完美。Debian 发行版系列一般都集成了 AppArmor 系统,能实现 SELinux 类似需求。
使用 SELinux 的好处:
- 强制访问控制(MAC): 与传统的基于所有者的自主访问控制(Discretionary access control, DAC)不同,SELinux 的强制访问控制不依赖于对象的所有者或用户的权限。它基于预定义的安全策略来控制进程对文件、网络接口等资源的访问。
- 最小权限原则(RBAC): 确保每个进程只能访问执行其功能所必需的资源,限制恶意软件和漏洞的潜在影响。
- 安全上下文(Security Context): 管理员可以根据需要定制安全策略,进行灵活配置,以适应不同的应用场景和安全需求。
SELinux 简单运行示意图
SELinux 并不是为了取代传统的读写执行(rwx)权限,而是在文件权限判定通过之后,再增加了一层保护。这层 SELinux 的保护可以对某些程序可读取的文件的安全内容类型进行限制。因此,如果目标文件的安全上下文设计不符合相关程序的要求,那么程序就无法读写该文件。
上面的说法可能有点抽象,我们来通过一幅图来解释一下。如下图所示,要启动 httpd 或 vsftpd 服务,通常需要执行某些脚本或程序。这时 SELinux 就开始发挥作用了,如果您权限设置有误,不符合 SELinux 最初设定的默认规则,那么这些脚本或程序就无法成功加载到内存中了(蓝色箭头部分,可能会被 SELinux 阻挡),进程就无法正常启动。如果通过了默认规则并且程序加载成为网络服务,那么当这个网络服务想要读取系统上的某些文件时,如果网络程序和文件的安全上下文设计不匹配,它也无法读取那个文件(红色箭头部分)。也就是说不管是服务启动、文件访问都需要经过 SELinux 安全上下文验证。
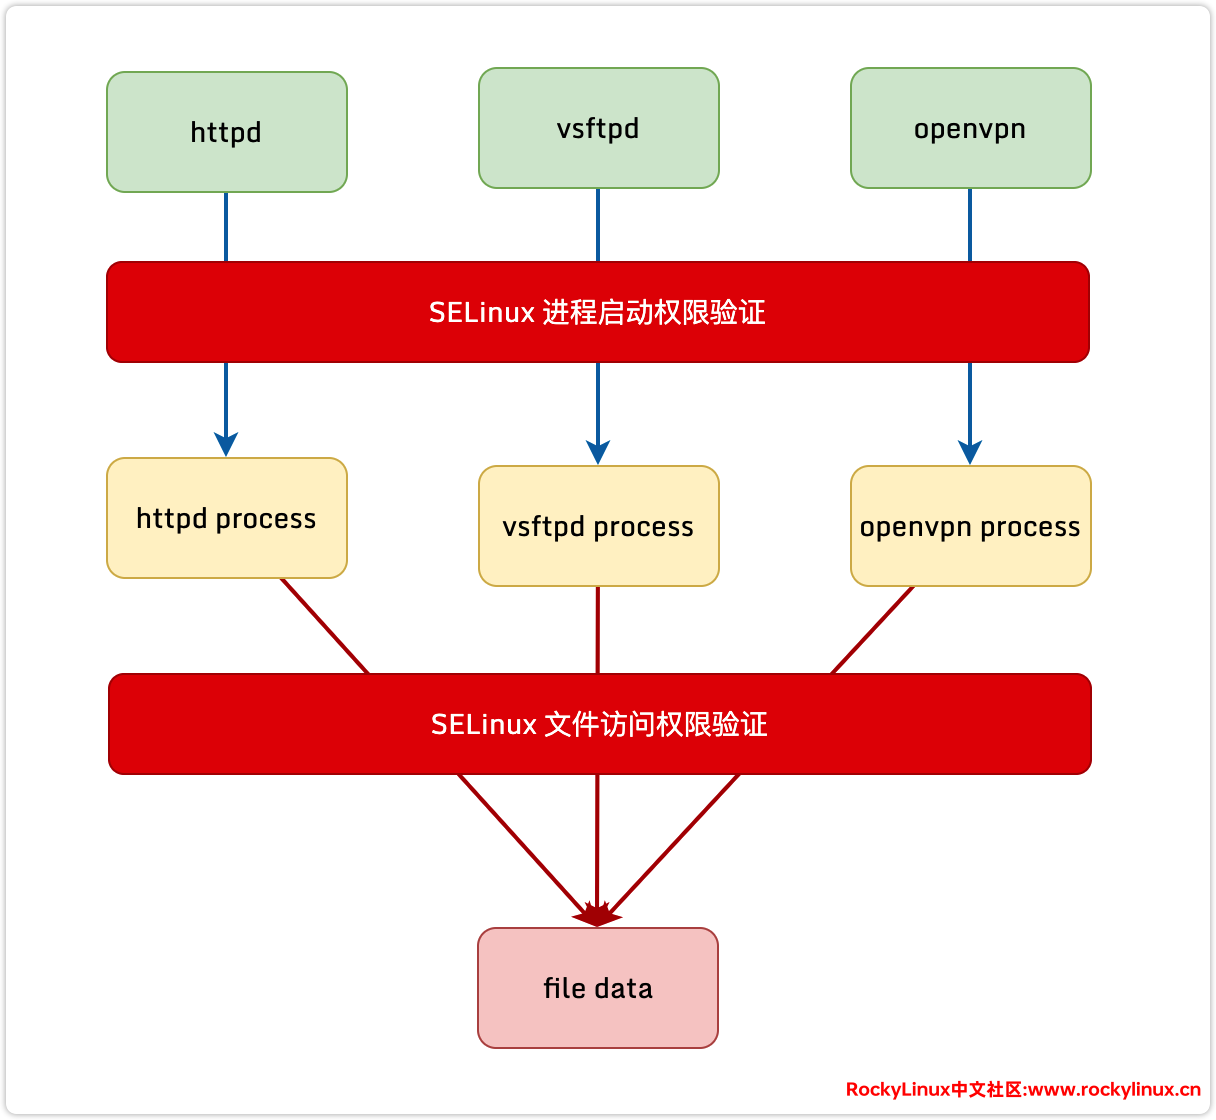
这么限制的好处就是,因为没有 root 的使用者概念,因此,上图当中,您的 httpd process 被黑客攻破,那也没关系,因为除了原本 httpd process 可以读写的位置之外,系统的其他目录 httpd process 是没有访问权的。举例来说, /etc/ 目录的安全上下文与 httpd process 能读取的 /var/html/www 并不相同,因此您的 /etc/ 目录,就不可能被有问题的 httpd process 访问,这样起码能够作到一定程度的保护。
SELinux 运行方式
在上图中,存在几个名词,我们逐一进行解释:
主体 (Subject):
通常所说的主体大多指的是进程,尤其是网络方面的进程,在本章节中讨论的主体主要都是进程。
目标 (Object):
主体进程能否访问的“目标资源”,通常目标指的是文件。但也有例外。例如,主体可能想要激活某个端口(port),这时目标就变成了端口。不过,大多数情况下,目标指的还是文件。
SELinux 模式 (Mode):
SELinux 有三种模式:关闭(Disabled)、宽容模式(Permissive)和强制模式(Enforcing)。在 disabled 和 permissive 模式下,SELinux 实际上并不会控制进程的访问行为。只有在 enforcing 模式下,才会真正进行访问控制。
- 强制模式(Enforcing):默认模式,在这种模式下,SELinux 会强制执行其安全策略,拒绝未授权的访问,并记录所有违反策略的行为,记录在
/var/log/messages文件中。 - 宽容模式(Permissive):SELinux 仍然检查所有访问,但不会拒绝未授权的访问,只是记录违反策略的行为,记录在
/var/log/messages文件中。这对于调试和调整安全策略很有用。 - 禁用模式(Disabled):SELinux 被完全禁用,不会执行任何安全检查。
策略与规则 (Policy、rules、boolean):.
因为存在大量的(主体)进程和(目标)文件,SELinux 根据不同的服务定义了基本的访问安全策略。这些策略中包含了详细的规则(rules),用以指定不同的服务是否允许访问某些资源,此外,还需控制和理解某些功能是否被允许(SELinux boolean)。在目前的 Rocky Linux 9 中,主要提供了三个策略,其中默认为 targeted 策略。相关策略描述可以参考 /etc/selinux/config 的内容:
- targeted:默认策略,主要针对网络进程,对本机进程(如 bash)的限制较少。
- minimum:最小控制策略,是对 targeted 策略的修改,只有少数选定的进程受到管理。
- mls (Multi Level Security protection):完整的 SELinux 管理,限制非常严格。
安全上下文 (security context):
每个主体进程可以访问的安全上下文并不相同,SELinux 规定了进程可以访问的安全上下文类型。当目标文件的安全上下文与主体进程允许访问的类型一致时,进程才能访问该文件。这个安全上下文有点类似于 SELinux 中的 rwx 概念。如果主体要访问的对象的安全上下文不匹配,在 enforcing 模式下,将会出现权限不符的错误信息。此时,无论权限设置如何开放,都无法使进程读取到文件。
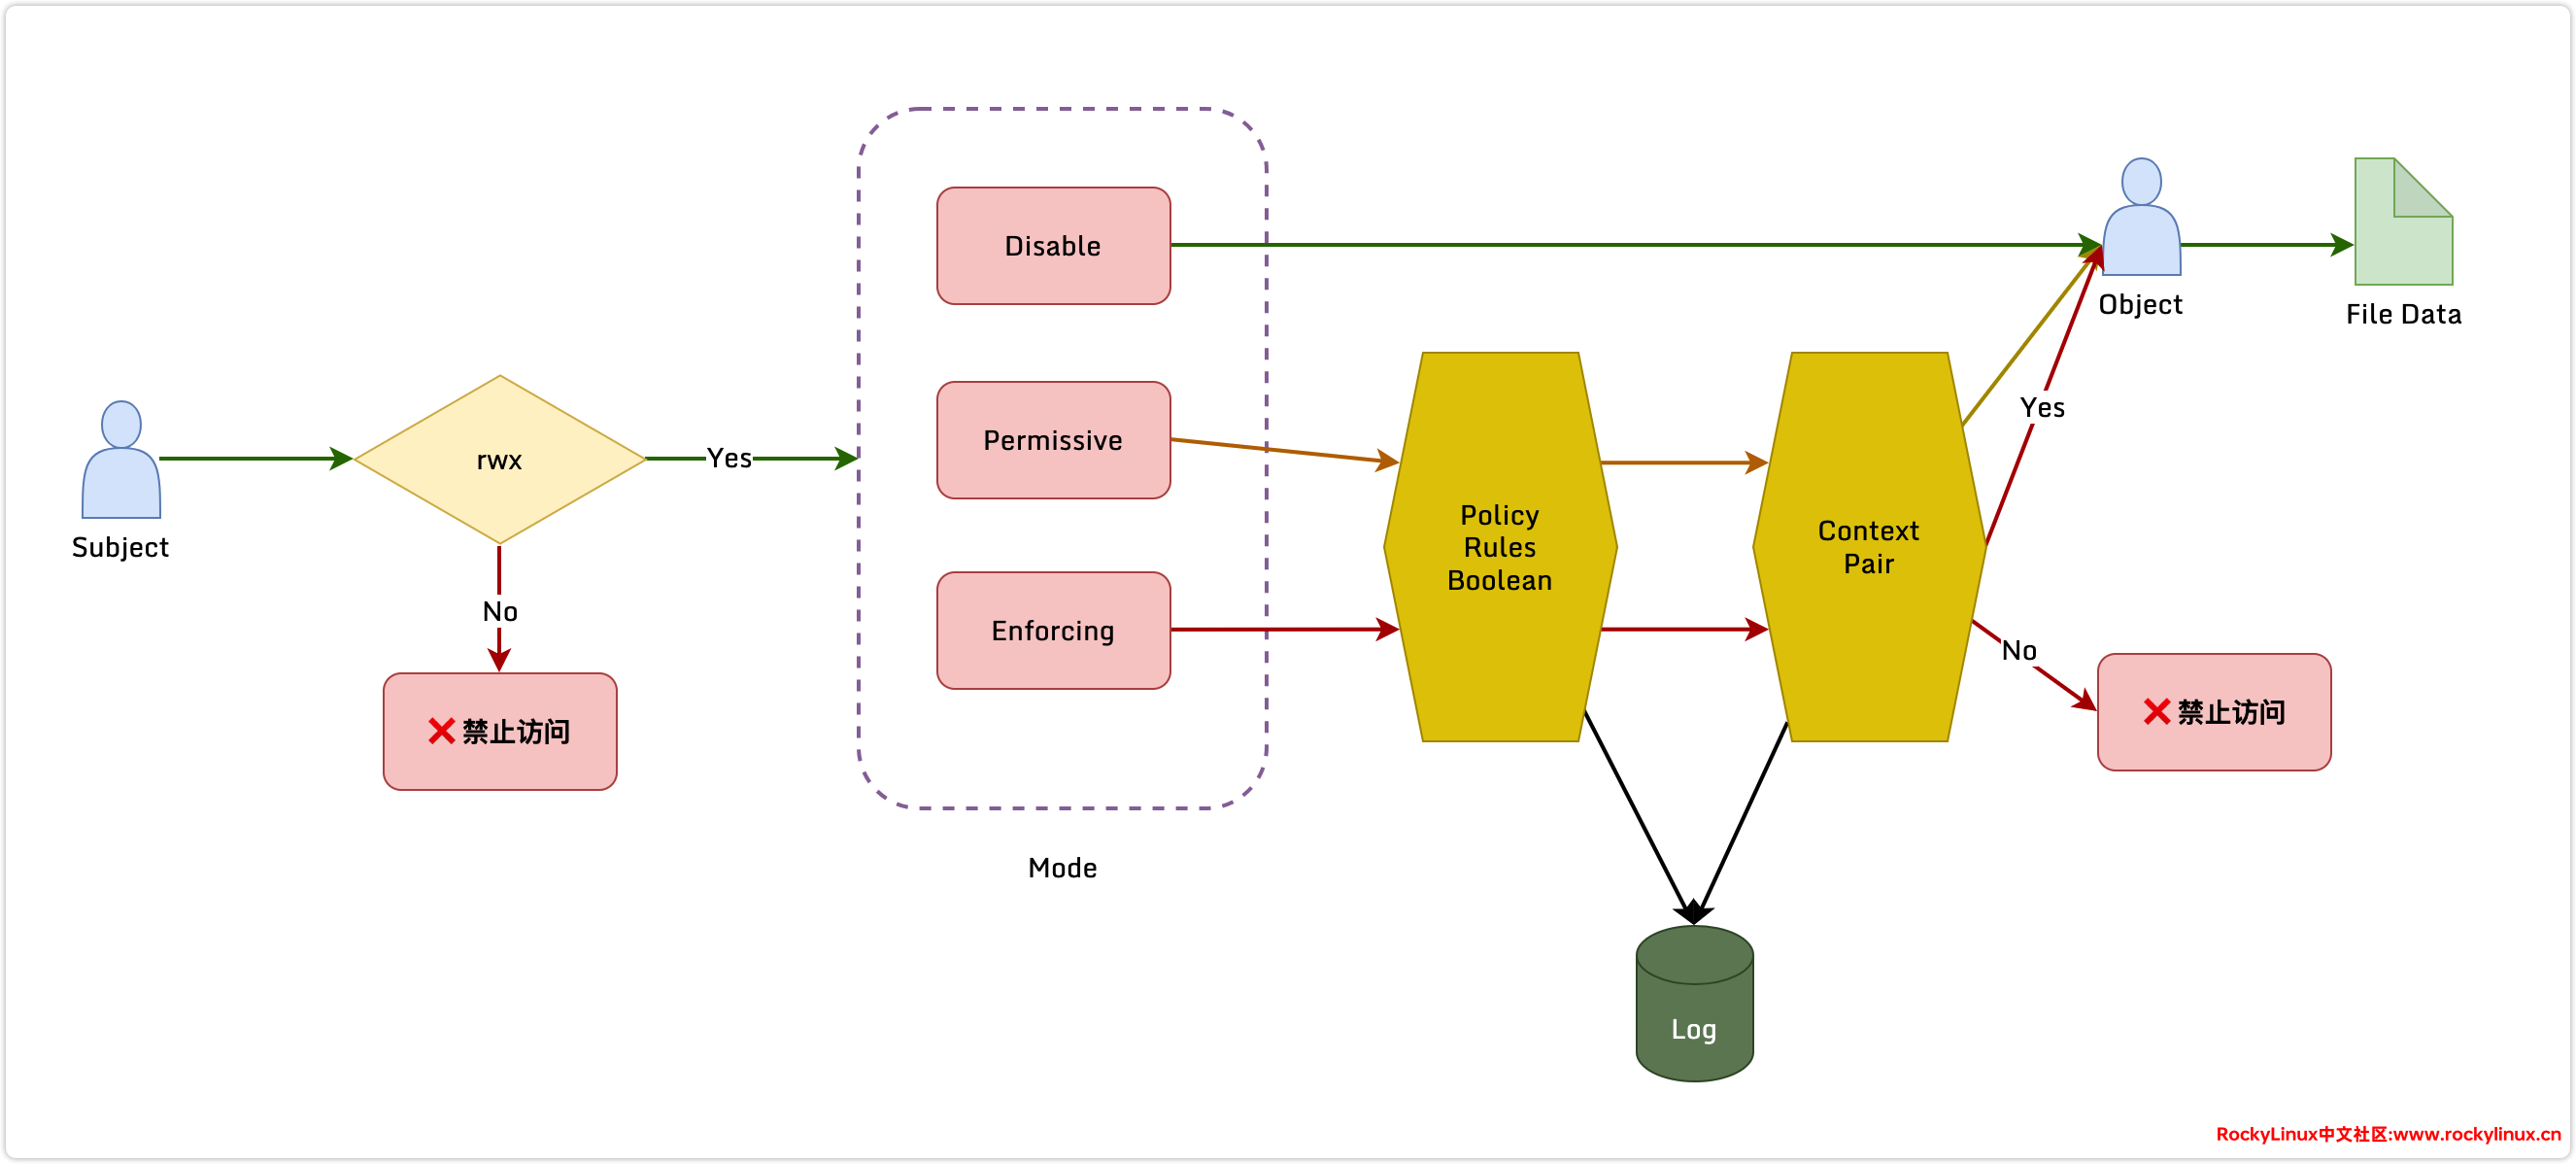
综上所述,重点在于“主体”如何获得“目标”的资源访问权限。可以发现,进程的读写操作首先需要通过 rwx 权限分析,如果 rwx 权限本身就被阻止,则后续的 SELinux 流程不会启动。如果通过了 rwx 权限并且确认可以读写之后,SELinux 在获取主体进程与需要访问的目标资源(目标文件)的安全上下类型后,开始在 SELinux 中搜索两者的规则,若是确认匹配可行,则予以放行,否则就予以阻止。
回过头来,我们再来看 SELinux 的运行方式图,红色线条为 Enforcing 模式,在读取文件没有权限时,会直接禁止。黄色线条为 Permissive 模式,只会写入日志记录,不会阻止。绿色线条为 Disabled 模式,不记录日志,完全放行。
为了让大家更好的理解 SELinux 的运行方式,这里举例说明,在 SELinux 启用的情况下,当用户 user1 需要访问文件 file1 时,大概过程是怎样的?
1、用户 user1 发起一个请求,比如试图读取文件 file1。
2、系统首先会进行常规的 Linux 权限检查。这包括检查用户 user1 对文件 file1 的读、写、执行等权限。
3、如果用户通过了常规的 Linux 权限检查,系统接着会进行 SELinux 权限检查。这是一个额外的安全检查层,它基于 SELinux 策略和安全上下文来决定是否允许访问。
4、SELinux 检查用户 user1 和文件 file1 的 SELinux 上下文。这包括用户、角色和类型信息。例如,用户 user1 可能有一个安全上下文 user_u:user_r:user_t,文件 file1 可能有一个安全上下文 system_u:object_r:file_t。
5、SELinux 查看其策略数据库,看看是否存在一个规则允许 user_t 类型的进程访问 file_t 类型的文件。如果存在这样的规则,SELinux 就会允许访问。否则,SELinux 会拒绝访问,并记录一个拒绝访问的审计日志 /var/logs/messages。
这个过程提供了一个额外的安全层(MAC),它可以防止即使有适当 Linux 权限的用户或进程访问他们不应该访问的文件或资源。
SELinux 安全上下文
在前面的举例中,我们提到安全上下文 user_u:user_r:user_t,在 SELinux(Security-Enhanced Linux)中,"安全上下文"是指附加在文件、进程或用户上的安全标签。这个标签包含了一些关于该对象的安全信息,SELinux 就是根据这些信息来执行访问控制的。怎么查看了?
# 查看文件安全上下文
[root@localhost ~]# ll -Zd /root/anaconda-ks.cfg
-rw-------. 1 root root system_u:object_r:admin_home_t:s0 1101 Dec 17 11:32 /root/anaconda-ks.cfg

# 查看进程安全上下文
[root@localhost ~]# ps -auxZ | egrep 'bash|chronyd|LABEL'
LABEL                           USER         PID %CPU %MEM    VSZ   RSS TTY      STAT START   TIME COMMAND
system_u:system_r:chronyd_t:s0  chrony       804  0.0  0.0  84436  3308 ?        S    Feb05   0:06 /usr/sbin/chronyd -F 2
unconfined_u:unconfined_r:unconfined_t:s0-s0:c0.c1023 root 11889 0.0  0.0 5044 4144 tty1 Ss+ Feb16   0:00 -bash

# 查看当前用户安全上下文
[root@localhost ~]# id -Z
unconfined_u:unconfined_r:unconfined_t:s0-s0:c0.c1023
# 查看指定用户安全上下文(需要root权限)
[root@localhost ~]# runcon -u root -- id -Z
root:unconfined_r:unconfined_t:s0-s0:c0.c1023

# 每个 Linux 用户都通过 SELinux 策略映射到一个 SELinux 用户
[root@localhost ~]# semanage login -l
Login Name           SELinux User         MLS/MCS Range        Service
__default__          unconfined_u         s0-s0:c0.c1023       *
root                 unconfined_u         s0-s0:c0.c1023       *
一个 SELinux 安全上下文通常包括三部分:用户身份识别 User_Identify(身份)、角色 Role 和类型 Type(域)。“域”一般指进程,“类型”一般指对象。一个“用户”被分配一个或多个角色,但每个“角色”只对应一个“域”。比如,一个文件的 SELinux 上下文可能是 user_u:role_r:type_t:s0。这里,“user_u”是用户,“role_r”是角色,“type_t”是类型,“s0”是可选的安全等级。
- 用户: 表示文件或进程的拥有者。在大多数情况下,这部分对访问控制没有影响,但在某些复杂的 SELinux 策略中,不同的用户可能会有不同的权限。
- system_u: 表示系统进程方面的识别,大部分指的是受到管理限制的情况。
- unconfined_u: 表示没有限制的情况。
- 角色: 对于文件通常是"object_r",对于进程则可能是"sysadm_r"或其他角色。角色主要用于 RBAC(基于角色的访问控制)。
- object_r: 代表的是文件或目录等文件资源,这应该是最常见的。
- system_r: 代表的就是受到管理限制的进程。
- unconfined_r: 表示没有限制的情况。
- 类型: 在默认的 targeted 政策中,User 与 Role 字段基本上是不重要的,重要的是这个类型 (type) 字段。基本上,一个主体进程能否读取到这个文件资源,都与类型字段有关。而类型字段在文件与进程的定义不太相同,分别是:
- type: 在文件资源 (Object) 上面称为类型 (Type)。
- domain: 在主体进程 (Subject) 则称为领域 (domain)。
因此,可以把 SELinux 上下文理解为一种标签,它告诉 SELinux 系统该文件、进程或用户应该有什么样的访问权限。
SELinux 常用命令
前面聊了很多关于 SELinux 的概念,终于到了实操环节。很多同学估计会直接禁用 SELinux,这是不建议的。
启用禁用 SELinux
# 永久禁用 SELinux,需要重启服务器生效。
[root@localhost ~]# sed -i "s/SELINUX=enforcing/SELINUX=disabled/g" /etc/selinux/config

# 查看是否禁用成功
[root@localhost ~]# cat /etc/selinux/config | grep SELINUX=disabled
# NOTE: Up to RHEL 8 release included, SELINUX=disabled would also
SELINUX=disabled

# 临时禁用(切换至 Permissive 模式)
[root@localhost ~]# setenforce 0

# 查看是否切换成功
[root@localhost ~]# getenforce
Permissive

# 永久启用 SELinux,需要重启服务器生效。
[root@localhost ~]# sed -i "s/SELINUX=disabled/SELINUX=enforcing/g" /etc/selinux/config

# 临时启用(切换至 Enforcing 模式)
[root@localhost ~]# setenforce 1

# 查看是否切换成功
[root@localhost ~]# getenforce
Enforcing

# 查看 SELinux 详细设置信息
[root@localhost ~]# sestatus
SELinux status:                 enabled # SELinux 启用状态
SELinuxfs mount:                /sys/fs/selinux # SELinux文件系统的挂载点
SELinux root directory:         /etc/selinux # 配置文件目录
Loaded policy name:             targeted # 已加载的策略名称:targeted
Current mode:                   enforcing # 当前工作模式
Mode from config file:          enforcing # 配置文件中的模式
Policy MLS status:              enabled # 策略中启用多级安全(MLS)
Policy deny_unknown status:     allowed # 允许未定义的行为
Memory protection checking:     actual (secure) # 正在实际检查内存保护
Max kernel policy version:      33 # 内核支持的SELinux策略的最大版本
内核级别禁用 SELinux
# 内核层禁用 SELinux
[root@localhost ~]# grubby --update-kernel ALL --args selinux=0

# 此命令禁用,不会变更 /boot/grub2/grub.cfg 配置文件
[root@localhost ~]# cat /boot/grub2/grub.cfg | grep kernelopts | tail -n 1
  set kernelopts="root=/dev/mapper/rl-root ro crashkernel=1G-4G:192M,4G-64G:256M,64G-:512M resume=/dev/mapper/rl-swap rd.lvm.lv=rl/root rd.lvm.lv=rl/swap "

# 验证内核参数是否禁用 SELinux,以下命令实际查看的是 /etc/default/grub 文件。
[root@localhost ~]# grubby --info DEFAULT
index=0
kernel="/boot/vmlinuz-5.14.0-362.8.1.el9_3.x86_64"
args="ro crashkernel=1G-4G:192M,4G-64G:256M,64G-:512M resume=/dev/mapper/rl-swap rd.lvm.lv=rl/root rd.lvm.lv=rl/swap selinux=0"
root="/dev/mapper/rl-root"
initrd="/boot/initramfs-5.14.0-362.8.1.el9_3.x86_64.img"
title="Rocky Linux (5.14.0-362.8.1.el9_3.x86_64) 9.3 (Blue Onyx)"
id="263d8af4bb1d454fbf67662961401825-5.14.0-362.8.1.el9_3.x86_64"

# 查看 /etc/default/grub 文件
[root@localhost ~]# cat /etc/default/grub
GRUB_TIMEOUT=5
GRUB_DISTRIBUTOR="$(sed 's, release .*$,,g' /etc/system-release)"
GRUB_DEFAULT=saved
GRUB_DISABLE_SUBMENU=true
GRUB_TERMINAL_OUTPUT="console"
GRUB_CMDLINE_LINUX="crashkernel=1G-4G:192M,4G-64G:256M,64G-:512M resume=/dev/mapper/rl-swap rd.lvm.lv=rl/root rd.lvm.lv=rl/swap selinux=0"
GRUB_DISABLE_RECOVERY="true"
GRUB_ENABLE_BLSCFG=true

# 重启生效配置
[root@localhost ~]# reboot

# 回滚配置
[root@localhost ~]# grubby --update-kernel ALL --remove-args selinux

# 验证是否变更成功,同样需要重启服务器生效。
[root@localhost ~]# grubby --info DEFAULT
index=0
kernel="/boot/vmlinuz-5.14.0-362.8.1.el9_3.x86_64"
args="ro crashkernel=1G-4G:192M,4G-64G:256M,64G-:512M resume=/dev/mapper/rl-swap rd.lvm.lv=rl/root rd.lvm.lv=rl/swap"
root="/dev/mapper/rl-root"
initrd="/boot/initramfs-5.14.0-362.8.1.el9_3.x86_64.img"
title="Rocky Linux (5.14.0-362.8.1.el9_3.x86_64) 9.3 (Blue Onyx)"
id="263d8af4bb1d454fbf67662961401825-5.14.0-362.8.1.el9_3.x86_64"Disabled 模式切换回 Enforcing 模式
如果您从 Disabled 模式切换回 Enforcing 或 Permissive 模式,需要执行以下操作,来进行安全上下文的修复。 fixfiles -F onboot 命令是用于修复 SELinux 文件上下文的。在 Linux 系统中,SELinux 通过为文件分配安全上下文来提供访问控制。然而,有时候这些文件的安全上下文可能会被错误地更改或者丢失,导致 SELinux 无法正确地执行访问控制。 fixfiles 命令可以检查并修复这些文件的安全上下文。-F 选项会强制 fixfiles 命令修复所有的文件,而不仅仅是那些已经被修改的文件。onboot 选项则会在下次系统启动时执行修复。因此,fixfiles -F onboot 命令的作用是在下次系统启动时强制修复所有文件的 SELinux 安全上下文。这个命令通常在修改了 SELinux 策略,或者在文件的安全上下文被大规模错误地更改或丢失后使用。
当您执行 fixfiles -F onboot 命令时,它会在根目录下创建一个名为 .autorelabel 的文件。这个文件会在下次系统启动时被 SELinux 识别,并触发一个全系统的文件上下文修复过程。文件中的 -F 选项表示强制修复所有文件的上下文,而不仅仅是已经被修改的文件。这需要相当长的时间来进行处理。
# 执行以后会提示系统将在下次重新引导时执行修复
[root@localhost ~]# fixfiles -F onboot
System will relabel on next boot

# 执行上述命令后,会生成一个 .autoreabel 文件
[root@localhost ~]# ll /.autorelabel
-rw-r--r--. 1 root root 3 Feb 20 20:19 /.autorelabel

# 查看文件内容为 -F
[root@localhost ~]# cat /.autorelabel
-F
SELinux 布尔值(Boolean)配置
SELinux Boolean 本质就是系统预设的一组常用软件控制策略,我们可以通过 getsebool、setsebool、sesearch、seinfo、semanage 等命令来进行开关控制。
# 因为策略比较多,我们可以通过 grep 进行过滤,这里过滤常用的ftp、ssh、httpd 进行了解。
[root@localhost ~]# getsebool -a | grep ftpd
ftpd_anon_write --> off
ftpd_connect_all_unreserved --> off
ftpd_connect_db --> off
ftpd_full_access --> off
ftpd_use_cifs --> off
ftpd_use_fusefs --> off
ftpd_use_nfs --> off
ftpd_use_passive_mode --> off
[root@localhost ~]# getsebool -a | grep ssh
fenced_can_ssh --> off
selinuxuser_use_ssh_chroot --> off
ssh_chroot_rw_homedirs --> off
ssh_keysign --> off
ssh_sysadm_login --> off
ssh_use_tcpd --> off
sshd_launch_containers --> off
virt_qemu_ga_manage_ssh --> off
[root@localhost ~]# getsebool -a | grep httpd
httpd_anon_write --> off
httpd_builtin_scripting --> on
httpd_can_check_spam --> off
httpd_can_connect_ftp --> off
httpd_can_connect_ldap --> off
httpd_can_connect_mythtv --> off
httpd_can_connect_zabbix --> off
httpd_can_manage_courier_spool --> off
httpd_can_network_connect --> off
httpd_can_network_connect_cobbler --> off
httpd_can_network_connect_db --> off
httpd_can_network_memcache --> off
httpd_can_network_relay --> off
httpd_can_sendmail --> off
httpd_dbus_avahi --> off
httpd_dbus_sssd --> off
......(略)
这里提到 sesearch 和 seinfo 是两个用于查询和分析 SELinux 策略的工具,不过因为目前 RockyLinux 已经包含 setroubleshoot 问题分析工具,当 SELinux 出现问题会直接将日志写入 /var/log/messages,所以这个工具可以不用过多了解,如果您想安装,可以采用以下命令进行安装。
# sesearch 与 seinfo 包含在工具包 setools-console 中
[root@localhost ~]# dnf install -y setools-console
semanage 需要独立进行安装
# 查询 semanage 工具提供商
[root@localhost ~]# dnf whatprovides '*bin/semanage'
Last metadata expiration check: 1:20:05 ago on Sat Jan 2 10:03:18 2024.
policycoreutils-python-utils-3.5-2.el9.noarch : SELinux policy core python utilities
Repo        : @System
Matched from:
Other       : *bin/semanage

policycoreutils-python-utils-3.5-3.el9_3.noarch : SELinux policy core python utilities
Repo        : appstream
Matched from:
Other       : *bin/semanage

# 安装 semanage 工具
[root@localhost ~]# dnf install  -y policycoreutils-python-utils

# 获取 semanage 帮助信息
[root@localhost ~]# semanage -h
usage: semanage [-h] {import,export,login,user,port,ibpkey,ibendport,interface,module,node,fcontext,boolean,permissive,dontaudit} ...

semanage is used to configure certain elements of SELinux policy with-out requiring modification or recompilation from policy source.

positional arguments:
  {import,export,login,user,port,ibpkey,ibendport,interface,module,node,fcontext,boolean,permissive,dontaudit}
    import              Import local customizations
    export              Output local customizations
    login               Manage login mappings between linux users and SELinux confined users
    user                Manage SELinux confined users (Roles and levels for an SELinux user)
    port                Manage network port type definitions
    ibpkey              Manage infiniband ibpkey type definitions
    ibendport           Manage infiniband end port type definitions
    interface           Manage network interface type definitions
    module              Manage SELinux policy modules
    node                Manage network node type definitions
    fcontext            Manage file context mapping definitions
    boolean             Manage booleans to selectively enable functionality
    permissive          Manage process type enforcement mode
    dontaudit           Disable/Enable dontaudit rules in policy

optional arguments:
  -h, --help            show this help message and exit

# 获取 semanage boolean 帮助
[root@localhost ~]# semanage boolean -h
usage: semanage boolean [-h] [-n] [-N] [-S STORE] [  --extract  | --deleteall  | --list -C | --modify ( --on | --off ) boolean ]

positional arguments:
  boolean               boolean

optional arguments:
  -h, --help            show this help message and exit
  -C, --locallist       List boolean local customizations
  -n, --noheading       Do not print heading when listing boolean object types
  -N, --noreload        Do not reload policy after commit
  -S STORE, --store STORE
                        Select an alternate SELinux Policy Store to manage
  -m, --modify          Modify a record of the boolean object type
  -l, --list            List records of the boolean object type
  -E, --extract         Extract customizable commands, for use within a transaction
  -D, --deleteall       Remove all boolean objects local customizations
  -1, --on              Enable the boolean
  -0, --off             Disable the boolean

# 这里还是以 FTP 服务为例,可以看到 semanage 会有详细的解释各策略的作用,如果您刚刚接触 Linux,可能还没有办法理解所有策略的作用,但随着对于 Linux 各服务的深入学习,慢慢就会熟悉。
[root@localhost ~]# semanage boolean --list | grep ftpd
ftpd_anon_write                (off  ,  off)  Allow ftpd to anon write
ftpd_connect_all_unreserved    (off  ,  off)  Allow ftpd to connect all unreserved
ftpd_connect_db                (off  ,  off)  Allow ftpd to connect db
ftpd_full_access               (off  ,  off)  Allow ftpd to full access
ftpd_use_cifs                  (off  ,  off)  Allow ftpd to use cifs
ftpd_use_fusefs                (off  ,  off)  Allow ftpd to use fusefs
ftpd_use_nfs                   (off  ,  off)  Allow ftpd to use nfs
ftpd_use_passive_mode          (off  ,  off)  Allow ftpd to use passive mode
在 SELinux 中,布尔值(boolean)用来开启或关闭特定的安全策略规则,以此来调整系统的安全行为,而不需要修改或重新加载整个安全策略。下面我们以 FTP 为例,简单介绍一下 SELinux 中关于 FTP 各安全策略的作用以及怎么进行设置。
-
ftpd_anon_write --> off- 控制是否允许 FTP 守护进程(ftpd)对匿名用户提供写权限。当设置为 off 时,表示匿名用户不允许上传文件到 FTP 服务器。
-
ftpd_connect_all_unreserved --> off- 控制着 FTP 守护进程是否可以绑定到所有未预设的端口(除 21、20 端口外的端口,在被动模式下可以自定义端口范围,主要用于 FTP 位于防火墙及 NAT 模式后面)。当设置为 off 时,ftpd 只能绑定到它被允许的特定端口。
-
ftpd_connect_db --> off- 控制着 FTP 守护进程是否可以连接到数据库。当设置为 off 时,表示 ftpd 不能连接到任何数据库。
-
ftpd_full_access --> off- 当这个规则被设置为 off 时,FTP 守护进程不会获得对所有类型文件和目录的完全访问权限。这意味着它的访问将受到 SELinux 策略的限制。
-
ftpd_use_cifs --> off- 控制着 FTP 守护进程是否可以使用 CIFS(Common Internet File System,一个用于 Windows 系统的网络文件共享协议)。设置为 off 时,ftpd 无法通过 CIFS 协议访问共享文件。
-
ftpd_use_fusefs --> off- 控制着 FTP 守护进程是否可以使用 FUSE(Filesystem in Userspace,用户空间文件系统)文件系统。设置为 off 时,ftpd 无法挂载或使用 FUSE 文件系统。
-
ftpd_use_nfs --> off- 控制着 FTP 守护进程是否可以使用 NFS(Network File System,网络文件系统)。设置为 off 时,ftpd 不能通过 NFS 协议访问网络共享。
-
ftpd_use_passive_mode --> off- 控制着 FTP 守护进程是否可以使用被动模式(passive mode)。在被动模式中,客户端会连接到由服务器指定的任意端口上。设置为 off 时,ftpd 可能被限制仅使用主动模式(active mode)进行连接。
关闭这些规则通常是出于安全考虑,以限制 FTP 服务的某些功能,防止潜在的安全漏洞或不必要的权限扩展。我们可以根据实际需求来调整这些布尔值,以满足不同的安全策略和操作要求。
了解各规则的作用后,我们就可以根据自己的需求进行设置了,操作相对来说比较简单。
# 启用允许 ftpd 服务完全访问控制权限,1 为 on,0 为 off,-P 为永久生效
[root@localhost ~]# setsebool -P ftpd_full_access 1
[root@localhost ~]# getsebool -a | grep ftpd_full_access
ftpd_full_access --> on

# 禁用允许 ftpd 服务完全访问控制权限
[root@localhost ~]# setsebool -P ftpd_full_access 0
[root@localhost ~]# getsebool -a | grep ftpd_full_access
ftpd_full_access --> off

# 使用 semanage 命令进行控制,实际体验下来 semanage 的操作会比 setsebool 慢。
[root@localhost ~]# semanage boolean ftpd_full_access --modify --on
[root@localhost ~]# getsebool ftpd_full_access
ftpd_full_access --> on

[root@localhost ~]# semanage boolean ftpd_full_access --modify --off
[root@localhost ~]# getsebool ftpd_full_access
ftpd_full_access --> off
SELinux 文件安全上下文管理
使用 chcon 修改文件安全上下文
前面我们提到通过 ll -Zd 查看文件的安全上下文,那怎么修改文件的安全上下文了?我们可以使用 chcon 命令来进行修改。
# 查看 chcon 工具提供商
[root@localhost ~]# dnf whatprovides chcon
Last metadata expiration check: 3:34:30 ago on Sat Jan 2 10:03:18 2024.
coreutils-8.32-34.el9.x86_64 : A set of basic GNU tools commonly used in shell scripts
Repo        : @System
Matched from:
Filename    : /usr/bin/chcon

coreutils-8.32-34.el9.x86_64 : A set of basic GNU tools commonly used in shell scripts
Repo        : baseos
Matched from:
Filename    : /usr/bin/chcon

coreutils-single-8.32-34.el9.x86_64 : coreutils multicall binary
Repo        : baseos
Matched from:
Filename    : /usr/bin/chcon

# 安装 chcon
[root@localhost ~]# dnf install -y coreutils
Last metadata expiration check: 3:34:44 ago on Sat Jan 2 10:03:18 2024.
Package coreutils-8.32-34.el9.x86_64 is already installed.
Dependencies resolved.
Nothing to do.
Complete!
[root@localhost ~]# chcon -h
chcon: missing operand
Try 'chcon --help' for more information.

# 通过帮助我们可以看到使用 chcon 可以修改用户、角色、类型等
[root@localhost ~]# chcon --help
Usage: chcon [OPTION]... CONTEXT FILE...
  or:  chcon [OPTION]... [-u USER] [-r ROLE] [-l RANGE] [-t TYPE] FILE...
  or:  chcon [OPTION]... --reference=RFILE FILE...

# 这里我们以变更 /tmp/resolv.conf 文件权限为例,先复制 /etc/resolv.conf 文件至 /tmp/resolv.conf
[root@localhost ~]# cp /etc/resolv.conf /tmp/

# 我们会发现类型为 user_tmp_t
[root@localhost tmp]# ls -lZ /tmp/resolv.conf
-rw-r--r--. 1 root root unconfined_u:object_r:user_tmp_t:s0 78 Jan 2 13:42 resolv.conf

# 再看 /etc/resolv.conf 类型为 net_conf_t
[root@localhost tmp]# ls -lZ /etc/resolv.conf
-rw-r--r--. 1 root root system_u:object_r:net_conf_t:s0 78 Jan 2 11:02 /etc/resolv.conf

# 现在我们将 /tmp/resolv.conf 类型修改为 net_conf_t
[root@localhost tmp]# chcon -t net_conf_t /tmp/resolv.conf

# 验证成功
[root@localhost tmp]# ls -lZ /tmp/resolv.conf
-rw-r--r--. 1 root root unconfined_u:object_r:net_conf_t:s0 78 Jan 2 13:42 /tmp/resolv.conf

# 这时候我们会发现 /tmp/resolv.conf 的用户、角色分别为 unconfined_u:object_r,如果我们想让它和 /etc/resolv.conf 一致怎么办了?除了上面的方法,还有一种方法,参考 /etc/resolv.conf 快速修改安全上下文。
[root@localhost tmp]# chcon --reference=/etc/resolv.conf /tmp/resolv.conf

# 查看安全上下文是否一致
[root@localhost tmp]# ls -lZ /tmp/resolv.conf
-rw-r--r--. 1 root root system_u:object_r:net_conf_t:s0 78 Jan 2 13:42 /tmp/resolv.conf
[root@localhost tmp]# ls -lZ /etc/resolv.conf
-rw-r--r--. 1 root root system_u:object_r:net_conf_t:s0 78 Jan 2 11:02 /etc/resolv.conf
使用 semanage fcontext 查看目录文件预设安全上下文
前面提到我们可以在 SELinux 的 disable 与 enforcing 之前进行切换,只是从 disable 切换至 enforcing 的时候,系统需要花费大量的时间对所有文件重新设置安全上下文,那么说明系统本身默认存在一个预设值了?这里我们可能通过 semanage 命令进行查看,当然也可以直接查看 /etc/selinux/targeted/contexts/files/file_contexts 文件。
[root@localhost tmp]# semanage fcontext --list | grep /tmp
/home/[^/]+/tmp                                    directory          unconfined_u:object_r:user_tmp_t:s0
/tmp                                               all files          system_u:object_r:tmp_t:s0
......(略)

[root@localhost tmp]# more /etc/selinux/targeted/contexts/files/file_contexts
/.*     system_u:object_r:default_t:s0
/[^/]+  --      system_u:object_r:etc_runtime_t:s0
/a?quota\.(user|group)  --      system_u:object_r:quota_db_t:s0
/efi(/.*)?      system_u:object_r:boot_t:s0
/nsr(/.*)?      system_u:object_r:var_t:s0
/sys(/.*)?      system_u:object_r:sysfs_t:s0
/xen(/.*)?      system_u:object_r:xen_image_t:s0
/mnt(/[^/]*)?   -d      system_u:object_r:mnt_t:s0
/mnt(/[^/]*)?   -l      system_u:object_r:mnt_t:s0
......(略)
使用 semanage fcontext 自定义目录文件预设安全上下文
一般来说我们的 web 文件都存放在 /var/ www/html 目录下,所以这个目录 SELinux 是存在预设值的,如果我们更改了 web 的默认目录为 /data/ www,并且希望后续在进行 web 文件上传时,不用再去设置 web 文件的安全上下文,这时候我们可以为 /data/ www 目录预设一个安全上下文 ,来解决此问题。
# 查看 /var/www 目录的安全上下文
[root@localhost tmp]# semanage fcontext -l | grep '/var/www('
/var/www(/.*)?                                     all files          system_u:object_r:httpd_sys_content_t:s0
/var/www(/.*)?/logs(/.*)?                          all files          system_u:object_r:httpd_log_t:s0

# 创建新的 web 目录
[root@localhost tmp]# mkdir -p /data/www

# 查看对应安全上下文,实际继承的是 /.* 的安全上下文
[root@localhost tmp]# ll -Z /data
total 0
drwxr-xr-x. 2 root root unconfined_u:object_r:default_t:s0 6 Jan 2 14:41 www

# 设置 /data/www 安全上下文
[root@localhost tmp]# semanage fcontext -a -t httpd_sys_content_t "/data/www(/.*)?"

# 验证是否设置成功
[root@localhost tmp]# semanage fcontext -l | grep '/data/www('
/data/www(/.*)?                                    all files          system_u:object_r:httpd_sys_content_t:s0

# 为了让后面上传的文件可以继承对应安全上下文,需要使用 restorecon 命令来应用这些安全上下文规则
[root@localhost tmp]# restorecon -Rv /data/www
Relabeled /data/www from unconfined_u:object_r:default_t:s0 to unconfined_u:object_r:httpd_sys_content_t:s0

# 创建文件
[root@localhost tmp]# echo "hello" > /data/www/index.html

# 可以看到对应的 httpd_sys_content_t 已经继承
[root@localhost tmp]# ll -Z /data/www/index.html
-rw-r--r--. 1 root root unconfined_u:object_r:httpd_sys_content_t:s0 6 Jan 2 14:53 /data/www/index.html
使用 restorecon 恢复目录文件预设安全上下文
如果您觉得对应目录或文件的安全上下文不正确,希望恢复系统预设值,可以使用 restorecon 命令进行设置。
# 删除安全上下文规则
[root@localhost tmp]# semanage fcontext -d "/data/www(/.*)?"

# 验证确保没有返回
[root@localhost tmp]# semanage fcontext -l | grep '/data/www('

# 使用 restorecon 命令递归修复 /data/www 下所有文件的安全上下文
[root@localhost tmp]# restorecon -Rv /data/www
Relabeled /data/www from unconfined_u:object_r:httpd_sys_content_t:s0 to unconfined_u:object_r:default_t:s0
Relabeled /data/www/index.html from unconfined_u:object_r:httpd_sys_content_t:s0 to unconfined_u:object_r:default_t:s0

# 使用 restorecon 命令修复单个文件或目录的安全上下文
[root@localhost tmp]# restorecon /data/www/index.htmlfixfiles -F onboot 重启服务器是很慢的,建议这样操作:1、先将 selinux 设置为 permissive,并重启 reboot
2、重启完成进入系统,执行 restorecon -Rv
3、再将 selinux 设置为 enforcing
4、再执行 setenforce 1
这样就不需要多次重启,也不需要等待很久。
🔔提示: disable 模式下,是不能够对 selinux 进行操作的。
SELinux 端口管理
前面我们提到 SELinux 不仅仅可以管理文件,还可以对端口进行管理,大家可能知道 FTP 使用的端口为 21、20(ftps 989、990),但如果我们要指定被动模式端口为: 50000-51000 怎么办了?
# 查看端口信息
[root@localhost tmp]# semanage port --list | grep ^ftp
ftp_data_port_t                tcp      20
ftp_port_t                     tcp      21, 989, 990
ftp_port_t                     udp      989, 990

# 修改数据端口
[root@localhost tmp]# semanage port -a -t ftp_data_port_t -p tcp 50000-51000

# 验证修改是否成功
[root@localhost tmp]# semanage port --list | grep ^ftp
ftp_data_port_t                tcp      50000-51000, 20
ftp_port_t                     tcp      21, 989, 990
ftp_port_t                     udp      989, 990

# 删除修改的配置
[root@localhost tmp]# semanage port -d -t ftp_data_port_t -p tcp 50000-51000
[root@localhost tmp]# semanage port --list | grep ^ftp
ftp_data_port_t                tcp      20
ftp_port_t                     tcp      21, 989, 990
ftp_port_t                     udp      989, 990
SELinux 诊断工具
setroubleshoot 是一个与 SELinux 配套使用的工具,它帮助系统管理员和用户理解 SELinux 的日志和审计消息,并提供解决方案建议。当 SELinux 阻止某些操作时,例如文件访问,它会生成“拒绝”消息,这些消息记录在系统日志中,但通常很难理解。 setroubleshoot 服务会监控 SELinux 的审计日志,并在检测到拒绝消息时,提供更易于理解的解释,并在可能的情况下,给出了如何解决问题的建议。它可以将消息发送到不同的目的地,包括系统日志、电子邮件或桌面通知。
安装 setroubleshoot
通过了解 SELinux 的三种模式(disabled、permissive,、enforcing)、功能规则的开启与关闭(getsebool、setsebool)、安全上下文的修改(chcon、restorecon、semanage fcontext)以及端口规则(semanage port)修改方法,我们对 SELinux 的管理基本已经掌握。对于 SELinux 异常怎样快速诊断、分析,我们可以使用 setroubleshoot 命令行工具,它会自动分析可能的错误,并且把可能的解决方案直接记录到 /var/log/messages 日志文件中,这样我们配置 SELinux 就更加简单了。
[root@localhost ~]# dnf -y install setroubleshoot*
Last metadata expiration check: 2:44:44 ago on Mon Jan 2 16:49:09 2024.
Dependencies resolved.
================================================================================================================================================================================================================================================================
 Package                                                                     Architecture                                    Version                                                                   Repository                                          Size
================================================================================================================================================================================================================================================================
Installing:
 setroubleshoot                                                              x86_64                                          3.3.32-1.el9                                                              appstream                                           69 k
 setroubleshoot-plugins                                                      noarch                                          3.3.14-4.el9                                                              appstream                                          324 k
 setroubleshoot-server                                                       x86_64                                          3.3.32-1.el9                                                              appstream                                          323 k
......(略)

# 重启服务器,生效配置
[root@localhost ~]# reboot

# 确保 rsyslog 服务启动正常
[root@localhost ~]# systemctl status rsyslog
您可能会感到奇怪,虽然我们安装了名为 setroubleshoot-server 的软件,但是当我们用 systemctl 去检查相关的服务时,却找不到任何带有 setrouble 的服务名称。这是因为 setrouble 已经被集成到了审计模块 auditd 服务中。因此,setroubleshoot 的工作流程是这样的:
- 首先由 auditd 服务来调用 audispd 服务。
- 然后 audispd 服务负责启动 sedispatch 程序。
- Sedispatch 程序再将原本的 auditd 消息转化为 setroubleshootd 的消息,并将其保存下来。
端口问题排查
我们安装一个 httpd 服务,来对 setroubleshoot 的易用性进行验证。
# 安装 httpd
[root@localhost ~]# dnf -y install httpd

# 修改监听端口,需要注意修改的端口,必须在 SELinux 预设值中不存在
[root@localhost ~]# sed -i "s/Listen 80/Listen 8055/g" /etc/httpd/conf/httpd.conf

# 验证 SELinux 预设值中是否存在
[root@localhost ~]# semanage port -l | grep  8055

# 启动 httpd 服务,这时候会报错
[root@localhost ~]# systemctl start httpd
Job for httpd.service failed because the control process exited with error code.
See "systemctl status httpd.service" and "journalctl -xeu httpd.service" for details.

# 错误提示绑定 0.0.0.0:8055 权限被拒绝
[root@localhost ~]# journalctl -f -u httpd
Jan 2 19:48:52 localhost.localdomain systemd[1]: Starting The Apache HTTP Server...
Jan 2 19:48:52 localhost.localdomain httpd[4822]: AH00558: httpd: Could not reliably determine the servers fully qualified domain name, using localhost.localdomain. Set the 'ServerName' directive globally to suppress this message
Jan 2 19:48:52 localhost.localdomain httpd[4822]: (13)Permission denied: AH00072: make_sock: could not bind to address 0.0.0.0:8055
Jan 2 19:48:52 localhost.localdomain httpd[4822]: no listening sockets available, shutting down
Jan 2 19:48:52 localhost.localdomain httpd[4822]: AH00015: Unable to open logs
Jan 2 19:48:52 localhost.localdomain systemd[1]: httpd.service: Main process exited, code=exited, status=1/FAILURE
Jan 2 19:48:52 localhost.localdomain systemd[1]: httpd.service: Failed with result 'exit-code'.
Jan 2 19:48:52 localhost.localdomain systemd[1]: Failed to start The Apache HTTP Server.

# 查看 /var/log/messages
[root@localhost ~]# tail -f /var/log/messages
Jan 2 19:48:52 localhost systemd[1]: Starting SETroubleshoot daemon for processing new SELinux denial logs...
Jan 2 19:48:53 localhost systemd[1]: Started SETroubleshoot daemon for processing new SELinux denial logs.
Jan 2 19:48:53 localhost systemd[1]: Created slice Slice /system/dbus-:1.1-org.fedoraproject.SetroubleshootPrivileged.
Jan 2 19:48:53 localhost systemd[1]: Started dbus-:1.1-org.fedoraproject.SetroubleshootPrivileged@0.service.
# 下面的日志是重点,完整的 SELinux 信息运行 sealert -l e1d45e95-b7fc-4010-a355-dfa2d6adcd33 命令查看
Jan 2 19:49:03 localhost setroubleshoot[4825]: SELinux is preventing /usr/sbin/httpd from name_bind access on the tcp_socket port 8055. For complete SELinux messages run: sealert -l e1d45e95-b7fc-4010-a355-dfa2d6adcd33
Jan 2 19:49:03 localhost setroubleshoot[4825]: SELinux is preventing /usr/sbin/httpd from name_bind access on the tcp_socket port 8055.#012#012*****  Plugin bind_ports (92.2 confidence) suggests   ************************#012#012If you want to allow /usr/sbin/httpd to bind to network port 8055#012Then you need to modify the port type.#012Do#012# semanage port -a -t PORT_TYPE -p tcp 8055#012    where PORT_TYPE is one of the following: http_cache_port_t, http_port_t, jboss_management_port_t, jboss_messaging_port_t, ntop_port_t, puppet_port_t.#012#012*****  Plugin catchall_boolean (7.83 confidence) suggests   ******************#012#012If you want to allow nis to enabled#012Then you must tell SELinux about this by enabling the 'nis_enabled' boolean.#012#012Do#012setsebool -P nis_enabled 1#012#012*****  Plugin catchall (1.41 confidence) suggests   **************************#012#012If you believe that httpd should be allowed name_bind access on the port 8055 tcp_socket by default.#012Then you should report this as a bug.#012You can generate a local policy module to allow this access.#012Do#012allow this access for now by executing:#012# ausearch -c 'httpd' --raw | audit2allow -M my-httpd#012# semodule -X 300 -i my-httpd.pp#012
Jan 2 19:49:04 localhost systemd[1]: dbus-:1.1-org.fedoraproject.SetroubleshootPrivileged@0.service: Deactivated successfully.
Jan 2 19:49:04 localhost systemd[1]: dbus-:1.1-org.fedoraproject.SetroubleshootPrivileged@0.service: Consumed 2.756s CPU time.
Jan 2 19:49:13 localhost systemd[1]: setroubleshootd.service: Deactivated successfully.
Jan 2 19:49:13 localhost systemd[1]: setroubleshootd.service: Consumed 5.640s CPU time.

# setroubleshoot 日志排查
[root@localhost ~]# journalctl -t setroubleshoot
Jan 2 19:49:03 localhost.localdomain setroubleshoot[4825]: SELinux is preventing /usr/sbin/httpd from name_bind access on the tcp_socket port 8055. For complete SELinux messages run: sealert -l e1d45e95-b7fc-4010-a355-dfa2d6adcd33
Jan 2 19:49:03 localhost.localdomain setroubleshoot[4825]: SELinux is preventing /usr/sbin/httpd from name_bind access on the tcp_socket port 8055.

                                                            *****  Plugin bind_ports (92.2 confidence) suggests   ************************

                                                            If you want to allow /usr/sbin/httpd to bind to network port 8055
                                                            Then you need to modify the port type.
                                                            Do
                                                            # semanage port -a -t PORT_TYPE -p tcp 8055
                                                                where PORT_TYPE is one of the following: http_cache_port_t, http_port_t, jboss_management_port_t, jboss_messaging_port_t, ntop_port_t, puppet_port_t.

                                                            *****  Plugin catchall_boolean (7.83 confidence) suggests   ******************

                                                            If you want to allow nis to enabled
                                                            Then you must tell SELinux about this by enabling the 'nis_enabled' boolean.

                                                            Do
                                                            setsebool -P nis_enabled 1

                                                            *****  Plugin catchall (1.41 confidence) suggests   **************************

                                                            If you believe that httpd should be allowed name_bind access on the port 8055 tcp_socket by default.
                                                            Then you should report this as a bug.
                                                            You can generate a local policy module to allow this access.
                                                            Do
                                                            allow this access for now by executing:
                                                            # ausearch -c 'httpd' --raw | audit2allow -M my-httpd
                                                            # semodule -X 300 -i my-httpd.pp

# 使用 ausearch 命令搜索
[root@localhost ~]# ausearch -m AVC
time->Tue Jan 2 19:48:52 2024
type=PROCTITLE msg=audit(1709552932.311:110): proctitle=2F7573722F7362696E2F6874747064002D44464F524547524F554E44
type=SYSCALL msg=audit(1709552932.311:110): arch=c000003e syscall=49 success=no exit=-13 a0=3 a1=56136381b378 a2=10 a3=7fffca98736c items=0 ppid=1 pid=4822 auid=4294967295 uid=0 gid=0 euid=0 suid=0 fsuid=0 egid=0 sgid=0 fsgid=0 tty=(none) ses=4294967295 comm="httpd" exe="/usr/sbin/httpd" subj=system_u:system_r:httpd_t:s0 key=(null)
type=AVC msg=audit(1709552932.311:110): avc:  denied  { name_bind } for  pid=4822 comm="httpd" src=8055 scontext=system_u:system_r:httpd_t:s0 tcontext=system_u:object_r:unreserved_port_t:s0 tclass=tcp_socket permissive=0

# 摘要报告
[root@localhost ~]# aureport --avc

AVC Report
===============================================================
# date time comm subj syscall class permission obj result event
===============================================================
1. 03/04/24 19:48:52 httpd system_u:system_r:httpd_t:s0 49 tcp_socket name_bind system_u:object_r:unreserved_port_t:s0 denied 110

# 通过 sealert 命令查看相关信息
[root@localhost ~]# sealert -l e1d45e95-b7fc-4010-a355-dfa2d6adcd33
SELinux is preventing /usr/sbin/httpd from name_bind access on the tcp_socket port 8055.

*****  Plugin bind_ports (92.2 confidence) suggests   ************************

If you want to allow /usr/sbin/httpd to bind to network port 8055
Then you need to modify the port type.
Do
# semanage port -a -t PORT_TYPE -p tcp 8055
    where PORT_TYPE is one of the following: http_cache_port_t, http_port_t, jboss_management_port_t, jboss_messaging_port_t, ntop_port_t, puppet_port_t.

*****  Plugin catchall_boolean (7.83 confidence) suggests   ******************
.....(略)
其实 sealert 返回的信息中,提供的解决方法不止一种。当然我们选择可性度 92.2% 的解决方案。semanage port -a -t PORT_TYPE -p tcp 8055 就是一个好的解决方案,PORT_TYPE 必须要选择正确的类型才行,因为我们正在处理 HTTP 的端口,所以选择 http_port_t 类型。所以,整个问题的解决过程应该是这样的:
# 放开 8055 端口
[root@localhost ~]# semanage port -a -t http_port_t -p tcp 8055

# 允许端口是否添加成功
[root@localhost ~]# semanage port -l | grep  8055
http_port_t                    tcp      8055, 80, 81, 443, 488, 8008, 8009, 8443, 9000

# 启动 httpd 服务
[root@localhost ~]# systemctl start httpd

# httpd 服务正常
[root@localhost ~]# systemctl status httpd
● httpd.service - The Apache HTTP Server
     Loaded: loaded (/usr/lib/systemd/system/httpd.service; disabled; preset: disabled)
     Active: active (running) since Mon 2024-03-04 19:50:48 CST; 4s ago
       Docs: man:httpd.service(8)
   Main PID: 4851 (httpd)
     Status: "Started, listening on: port 8055"
      Tasks: 213 (limit: 48839)
     Memory: 35.4M
        CPU: 339ms
     CGroup: /system.slice/httpd.service
             ├─4851 /usr/sbin/httpd -DFOREGROUND
             ├─4852 /usr/sbin/httpd -DFOREGROUND
             ├─4853 /usr/sbin/httpd -DFOREGROUND
             ├─4854 /usr/sbin/httpd -DFOREGROUND
             └─4855 /usr/sbin/httpd -DFOREGROUND

Jan 2 19:50:48 localhost.localdomain systemd[1]: Starting The Apache HTTP Server...
Jan 2 19:50:48 localhost.localdomain httpd[4851]: AH00558: httpd: Could not reliably determine the servers fully qualified domain name, using localhost.localdomain. Set the 'ServerName' directive globally to suppress this message
Jan 2 19:50:48 localhost.localdomain httpd[4851]: Server configured, listening on: port 8055
Jan 2 19:50:48 localhost.localdomain systemd[1]: Started The Apache HTTP Server.

# 端口开启成功
[root@localhost ~]# ss -antlp | grep 8055
LISTEN 0      511          0.0.0.0:8055      0.0.0.0:*    users:(("httpd",pid=4855,fd=3),("httpd",pid=4854,fd=3),("httpd",pid=4853,fd=3),("httpd",pid=4851,fd=3))

# 命令行验证 httpd 服务请求是否正常
[root@localhost ~]# curl http://localhost:8055 2> /dev/null | head
<!doctype html>
<html>
  <head>
    <meta charset='utf-8'>
    <meta name='viewport' content='width=device-width, initial-scale=1'>
    <title>HTTP Server Test Page powered by: Rocky Linux</title>
    <style type="text/css">
      /*<![CDATA[*/

      html {
目标资源(文件)安全上下文问题排查
前面我们提到所有的目录、资源,在 SELinux 中默认都有一个预设值,对应值不正常,访问也会报错。这里我们模拟一个故障,来进行验证与修复。
在进行这个模拟之前,先要明确一个概念,那就是整个网页服务器的文件默认是放在 /var/ www/html 里面的,所以如果您想要访问 http://localhost:8055/hello.html 这个地址,相应的文件应该放在 /var/ www/html/hello.html 才对。现在我们来模拟一个错误情况,就是用户在自己的家目录里创建了网页文件,然后使用 cp -a 命令把文件复制到 /var/www/html/hello.html,-a 参数很强大,它会连同 SELinux 的类型属性也一并复制过去(带权限复制)。这样会发生什么情况呢?
- 首先以 root 用户的身份,在自己的家目录里创建一个名为 hello.html 的文件。
- 使用
cp -a命令,把这个文件复制到 /var/ www/html httpd 服务主目录。 - 使用
curl命令去访问这个文件,看看访问结果如何,然后再来判断问题。 - 查看 /var/log/messages 文件,看看有没有最近的 setroubleshoot 输出结果。
- 根据
sealert给出的建议,执行相应的修改来纠正错误。
# 创建 hello.html 文件
[root@localhost ~]# echo "Hello,Rocky Linux 中文社区" > ~/hello.html
[root@localhost ~]# cat ~/hello.html
Hello,Rocky Linux 中文社区

# 复制至 /var/www/html/ 目录
[root@localhost ~]# cp -a  ~/hello.html /var/www/html/

# 这时候我们查看 SELinux 相关信息,type 为 admin_home_t
[root@localhost ~]# ll -Z /var/www/html/hello.html
-rw-r--r--. 1 root root unconfined_u:object_r:admin_home_t:s0 31 Jan 2 20:10 /var/www/html/hello.html

# 请求对应页面
[root@localhost ~]# curl http://localhost:8055/hello.html
<!DOCTYPE HTML PUBLIC "-//IETF//DTD HTML 2.0//EN">
<html><head>
<title>403 Forbidden</title>
</head><body>
<h1>Forbidden</h1>
<p>You dont have permission to access this resource.</p> # 重点,这是会提示没有权限访问对应资源,说明文件是存在的,但是您没有权限访问。
</body></html>

# 查看对应日志
[root@localhost ~]# grep setrouble /var/log/messages | grep sealert
Jan 2 19:49:03 localhost setroubleshoot[4825]: SELinux is preventing /usr/sbin/httpd from name_bind access on the tcp_socket port 8055. For complete SELinux messages run: sealert -l e1d45e95-b7fc-4010-a355-dfa2d6adcd33
Jan 2 20:11:35 localhost setroubleshoot[5106]: SELinux is preventing /usr/sbin/httpd from getattr access on the file /var/www/html/hello.html. For complete SELinux messages run: sealert -l 2ee1ffbe-b904-4318-af80-21613da46b78
Jan 2 20:11:35 localhost setroubleshoot[5106]: SELinux is preventing /usr/sbin/httpd from getattr access on the file /var/www/html/hello.html. For complete SELinux messages run: sealert -l 2ee1ffbe-b904-4318-af80-21613da46b78

# 因为 SELinux 会记录到 audit 中,所以其实也可以直接过滤 audit 审计日志。
[root@localhost ~]# grep "avc: .denied" /var/log/audit/audit.log
type=AVC msg=audit(1709552932.311:110): avc:  denied  { name_bind } for  pid=4822 comm="httpd" src=8055 scontext=system_u:system_r:httpd_t:s0 tcontext=system_u:object_r:unreserved_port_t:s0 tclass=tcp_socket permissive=0
type=AVC msg=audit(1709554291.769:123): avc:  denied  { getattr } for  pid=4853 comm="httpd" path="/var/www/html/hello.html" dev="dm-0" ino=50615424 scontext=system_u:system_r:httpd_t:s0 tcontext=unconfined_u:object_r:admin_home_t:s0 tclass=file permissive=0
type=AVC msg=audit(1709554291.769:124): avc:  denied  { getattr } for  pid=4853 comm="httpd" path="/var/www/html/hello.html" dev="dm-0" ino=50615424 scontext=system_u:system_r:httpd_t:s0 tcontext=unconfined_u:object_r:admin_home_t:s0 tclass=file permissive=0

# 获取解决方案
[root@localhost ~]# sealert -l 2ee1ffbe-b904-4318-af80-21613da46b78
SELinux is preventing /usr/sbin/httpd from getattr access on the file /var/www/html/hello.html.

*****  Plugin restorecon (99.5 confidence) suggests   ************************

If you want to fix the label.
/var/www/html/hello.html default label should be httpd_sys_content_t.
Then you can run restorecon. The access attempt may have been stopped due to insufficient permissions to access a parent directory in which case try to change the following command accordingly.
Do
# /sbin/restorecon -v /var/www/html/hello.html

*****  Plugin catchall (1.49 confidence) suggests   **************************
......(略)

# 99.5% 解决方案就是重置权限
[root@localhost ~]# /sbin/restorecon -v /var/www/html/hello.html
Relabeled /var/www/html/hello.html from unconfined_u:object_r:admin_home_t:s0 to unconfined_u:object_r:httpd_sys_content_t:s0

# 这时候 type 为 httpd_sys_content_t
[root@localhost ~]# ll -Z /var/www/html/hello.html
-rw-r--r--. 1 root root unconfined_u:object_r:httpd_sys_content_t:s0 31 Jan 2 20:10 /var/www/html/hello.html

# 再请求页面,返回正常
[root@localhost ~]# curl http://localhost:8055/hello.html
Hello,Rocky Linux 中文社区写在最后
SELinux 配置相对比较复杂,但不用担心,我们将在接下来的教程中逐步深入其使用方法。除了已经提及的命令行工具,SELinux 还支持利用 audit2allow、matchpathcon、sesearch 等命令进行全面分析和故障诊断。这里就不再展开详述。