简介
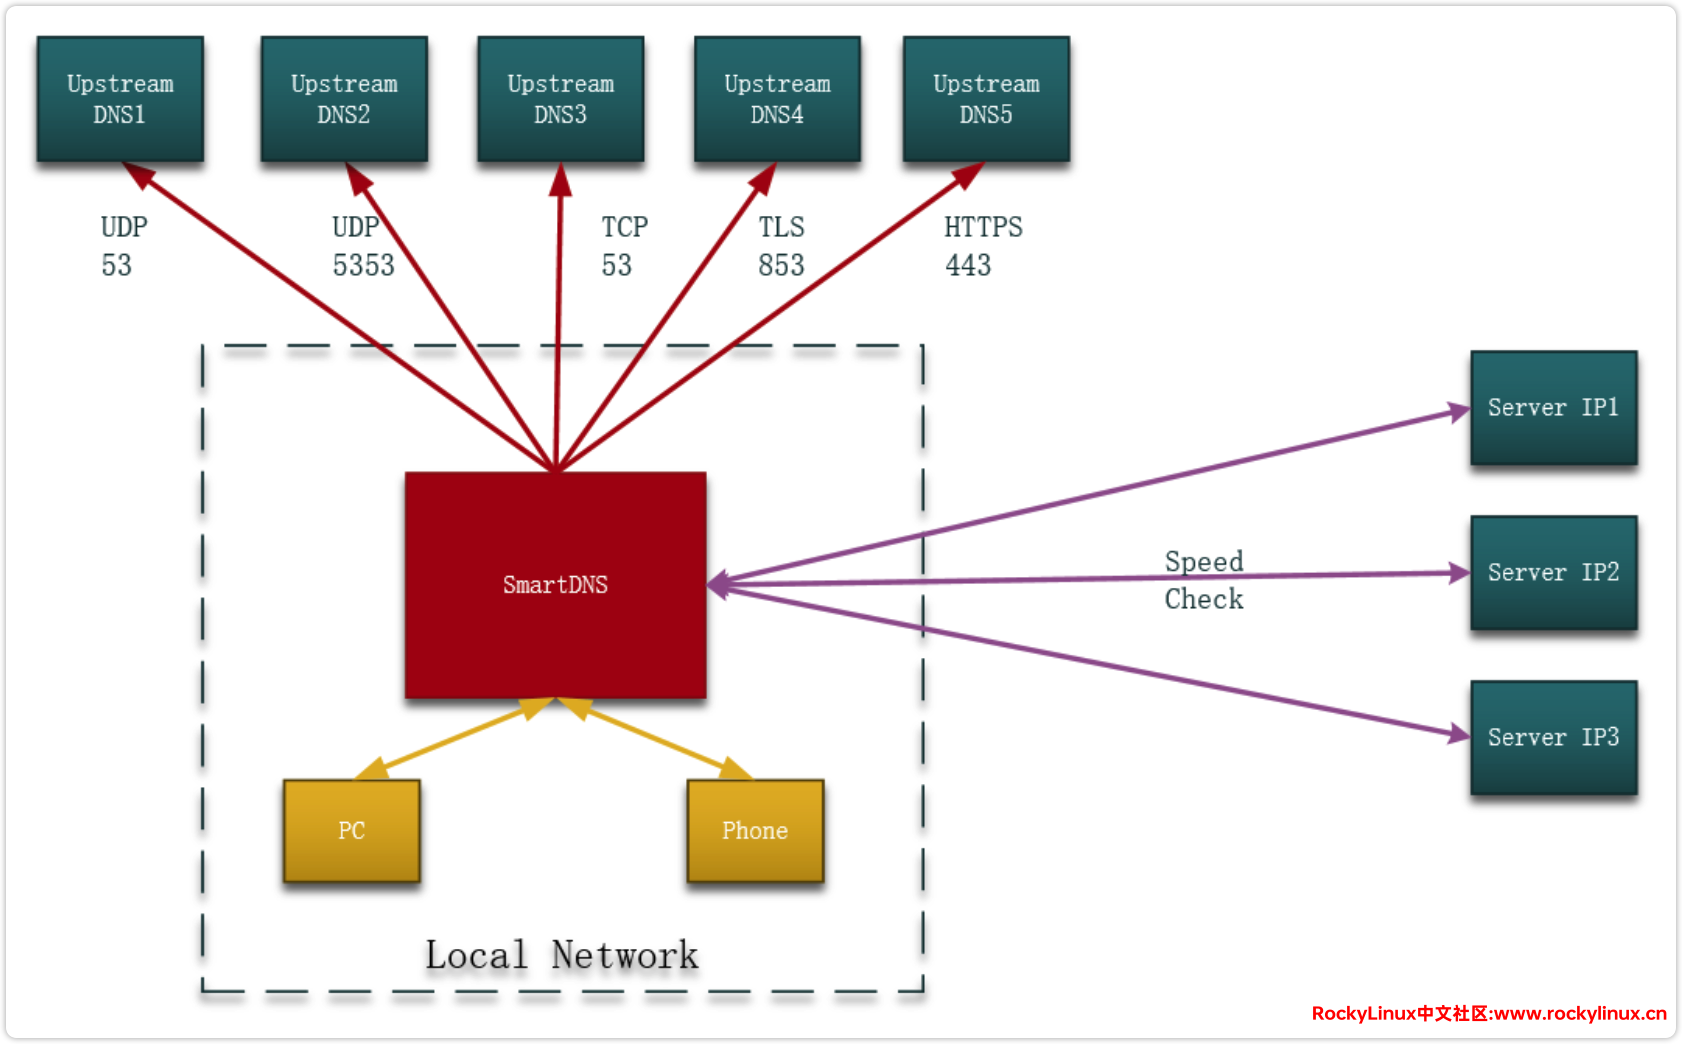
SmartDNS 是一个为 DNS 解析服务设计的软件,其主要目标是提供更快更准确的 DNS 解析。SmartDNS 将解析请求转发给多个上游 DNS 服务器,然后从返回的结果中选择最快的一个进行响应。这种设计使其在提供 DNS 服务的同时,能有效提高解析速度和准确性。
官方架构图如下:

SmartDNS 的特点:
- 速度快:SmartDNS 通过并发查询多个 DNS 服务器,从中选择响应最快的结果,大大提高了 DNS 解析速度。
- 准确性高:SmartDNS 采用 IP 优选技术,可以根据目标服务器的实际响应速度选择最优的 DNS 服务器,提高解析的准确性。
- 支持 IPv 6:SmartDNS 完全支持 IPv6,可以为使用 IPv6 的网络提供服务。
- 支持 DNSSEC:SmartDNS 支持 DNSSEC,可以提供安全的 DNS 解析服务。
- 灵活的配置:SmartDNS 提供了丰富的配置选项,可以满足不同用户的需求。
打包镜像
因为官方并未提供对应 alpine SmartDNS 镜像,所以这里自己打包镜像。
FROM alpine AS builder
RUN export URL=https://api.github.com/repos/pymumu/smartdns/releases/latest \
  && export OS="linux" \
  && apk --no-cache --update add curl \
  && cd / \
  && wget --tries=3 $(curl -s $URL | grep browser_download_url | egrep -o 'http.+\.\w+' | grep -i "$(uname -m)" | grep -m 1 -i "$(echo $OS)") \
  && tar zxvf smartdns.*.tar.gz

# 指定创建的基础镜像
FROM alpine
# 作者描述信息
LABEL author=木子 [email protected] site=https://www.rockylinux.cn
COPY --from=builder /smartdns/usr/sbin/smartdns /bin/smartdns
RUN sed -i 's/dl-cdn.alpinelinux.org/mirrors.aliyun.com/g' /etc/apk/repositories && apk update \
    && apk add --no-cache tzdata ca-certificates bash bash-completion busybox-extras net-tools lsof iproute2 iftop bind-tools vim \
    && chmod +x /bin/smartdns \
    && rm -rf /var/cache/apk/*
WORKDIR /
# 时区
ENV TZ Asia/Shanghai
CMD ["/bin/smartdns","-f","-x","-c","/etc/smartdns/config.conf"]
安装 SmartDNS
说明: 基于前期构建的 traefik 网关,详见: DIY NAS系列12 -- Traefik 出口网关配置
在 docker-compose.yaml 文件中,会对重要的配置进行说明,因个人网络环境等不同,需要根据自身实际情况调整配置。
[root@demo ~]# cat > /SSD/Demo/smartens/docker-compose.yml << \EOF
services:
  smartdns:
    image: rockylinux/alpine-smartdns-service:v1.0
    container_name: smartdns
    restart: always
    privileged: true
#  因为木子使用 ADGuardHome DNS 解析功能做广告拦截,ADGuardHome 上游使用 SmartDNS,所以不需要放出 SmartDNS 端口,在 ADGuardHome 上配置上游  DNS  为 SmartDNS 的容器 IP 即可。
#    ports:
#      - 53:53/tcp
#      - 53:53/udp
    volumes:
      - /SSD/Demo/smartdns/config.conf:/etc/smartdns/config.conf # 挂载配置文件
      - /SSD/Demo/smartdns/gfw.txt:/etc/smartdns/gfw.txt # 挂载 gfw.txt 文件
    networks:
      traefik_net:
        ipv4_address: 172.18.0.1 # 固定容器IP地址,避免每次重新 Docker,都需要在 ADGuardHome 上重设 SmartDNS IP。
networks:
  traefik_net:
    external: true
EOF

# 启动服务
[root@demo ~]# docker-compose up -d
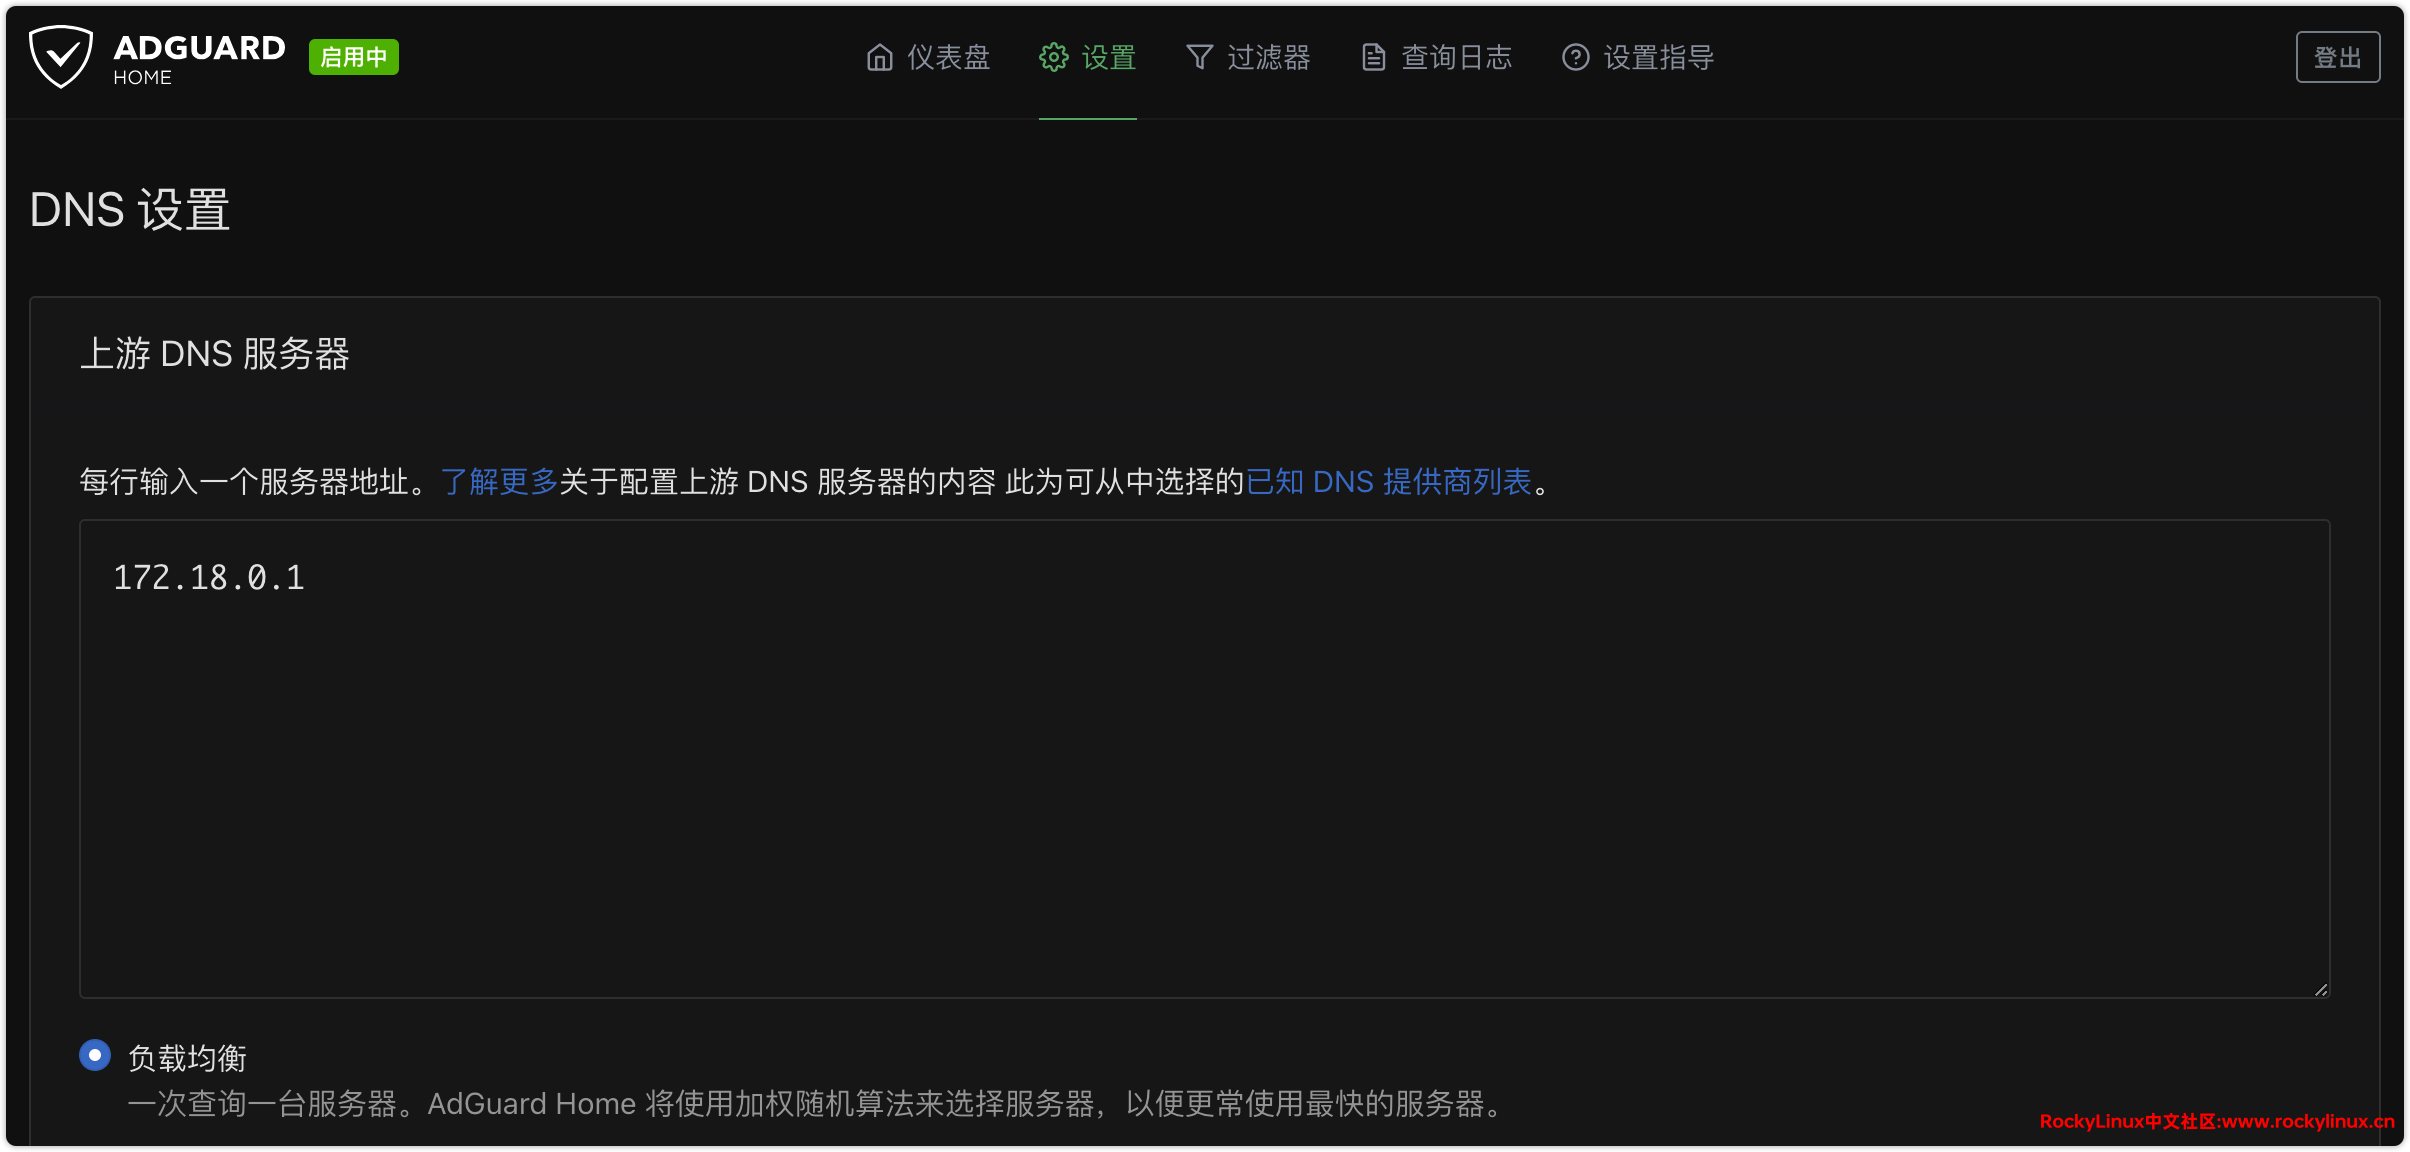
ADGuardHome 配置参考:DIY NAS系列22 — 去广告神器之 AdGuardHome。
在 ADGuardHome 配置上游 DNS 服务器为 SmartDNS 服务 IP:172.18.0.1。

确保测试上游工作正常。

配置 SmartDNS
SmartDNS 的配置相对比较复杂,涉及的参数配置比较多,另外很多参数的配置需要结合其它一些软件或工具,这是简单介绍一下目前木子个人正在使用的配置,更多配置参数官方文档: SmartDNS。
[root@demo smartdns]# cat > /SSD/Demo/smartdns/config.conf << \EOF
# 监听地址和端口
bind-tcp 0.0.0.0:53
bind 0.0.0.0:53

# IPv6 设置
ipv6 none

# 其他设置
tcp-idle-time 3
cache-size 4096
prefetch-domain yes
serve-expired yes
serve-expired-ttl 0
speed-check-mode tcp:80,tcp:443,ping
rr-ttl-min 60
rr-ttl-max 86400
log-level debug

# Host 解析
address /mv.rockylinux.cn/192.168.1.1

# 国内 DNS 服务器
server 114.114.114.119 # 114 DNS 安全版
server 223.6.6.6       # 阿里
server 223.5.5.5       # 阿里
server 119.29.29.29    # 腾讯
server 119.28.28.28    # 腾讯

# 设置代理服务器
proxy-server socks5://192.168.1.1:1080 -name v2ray-proxy

# 当去 Google DNS 获取解析时走 v2ray-proxy
server-https https://dns.google/dns-query -blacklist-ip -check-edns -proxy v2ray-proxy
server-tls 8.8.8.8:853 -blacklist-ip -check-edns -proxy v2ray-proxy

# 当去 Cloudflare DNS 获取解析时走 v2ray-proxy
server-tls 1.1.1.1:853 -blacklist-ip -check-edns -proxy v2ray-proxy
server-https https://cloudflare-dns.com/dns-query -blacklist-ip -check-edns -proxy v2ray-proxy

# 定义域名清单 gfw.txt 通过代理 v2ray-proxy 进行解析
domain-set -name gfw-domain-list -file /etc/smartdns/gfw.txt
domain-rules /domain-set:gfw-domain-list/ -proxy v2ray-proxy

# log-level debug
EOF
GFW 文件配置
# 创建 shell 脚本,主要用于更新 gfw.txt 文件
❯ cat /SSD/Demo/smartdns/get_gfw.sh
#!/bin/bash
curl -sS https://raw.githubusercontent.com/Loyalsoldier/v2ray-rules-dat/release/gfw.txt > /SSD/Demo/smartdns/gfw.txt
cd /SSD/Demo/smartdns && docker compose down && docker compose up -d

# 设置计划任务,每天 3 点更新对应文件
❯ crontab -l
0 3 * * * /SSD/Demo/smartdns/get_gfw.sh

# gfw.txt 文件格式如下
❯ more /SSD/Demo/smartdns/gfw.txt
000webhost.com
030buy.com
0rz.tw
1-apple.com.tw
后述
至此,我们对开源项目 SmartDNS 的基本介绍就告一段落了。这个项目的灵活性和强大的功能使得它具有很高的可玩性,您可以根据自己的实际需求进行深度定制和配置。SmartDNS 不仅提供了快速准确的 DNS 解析服务,而且通过其丰富的配置选项,允许您根据特定的网络环境和需求进行优化,从而带来更好的网络体验。希望通过这次的介绍,您能对 SmartDNS 有了更深入的了解,并激发出您对它的探索和尝试的兴趣。接下来,在我们的系列文章中,我们将带您了解另一个有趣的开源项目——DDNS-Go。敬请期待,我们不见不散!
变更记录
- 2024-06-24
- 设置 SmartDNS 容器为固定 IP,解决容器重启后 IP 变化问题。
- 新增 SmartDNS 与 ADGuardHome DNS 结合配置说明。
- 配置
gfw.txt文件,并定时每天 3 点更新。


