
CoreDNS 简介
CoreDNS 是一个灵活且可扩展的 DNS 服务器,它的设计目标是提供一种更现代化的 DNS 解决方案,用于服务发现和服务代理,特别是在云原生和容器化环境中。CoreDNS 是云原生计算基金会毕业的项目。CoreDNS 的主要特点包括:
- 插件架构:CoreDNS 采用模块化设计,所有功能都通过插件实现。用户可以根据需求启用或禁用插件,以定制 DNS 服务器的行为。
- 高性能:得益于 Go 语言的高并发处理能力,CoreDNS 在处理大量 DNS 请求时表现出色。
- 简洁配置:CoreDNS 的配置文件格式简单直观,用户易于上手和管理。
- 灵活性:支持多种后端,如 file、Kubernetes、etcd 等,能够适应各种应用场景。
- 云原生友好:与 Kubernetes 无缝集成,目前为 Kubernetes 集群默认 DNS 服务组件。
正因为 CoreDNS 是用 Go 语言编写的,所以它具有跨平台的特性,可以部署在多种操作系统环境中,包括:
- Windows:适合在 Windows 服务器或开发环境中使用。
- Linux:广泛应用于生产环境,支持各种 Linux 发行版。
- macOS:适合开发和测试用途。
- Docker:可以作为 Docker 容器运行,方便集成和部署。
- Kubernetes (K8S):Kubernetes 集群默认 DNS 服务组件,实现自动服务发现和负载均衡功能。
此外,CoreDNS 的开源社区活跃,Github 上 Star 超过 12K,链接地址:GitHub - coredns/coredns,用户可以通过社区获得支持和贡献插件,进一步扩展其功能。
CoreDNS 插件
在部署 CoreDNS 之前,还需要聊一聊 CoreDNS 插件。与传统的 Bind DNS 服务器不同,CoreDNS 通过插件形式实现更多功能,CoreDNS 插件有两种:官方插件和外部插件,用户可以根据自身需求安装插件或者自己开发插件以满足业务需求,插件链接:Plugins,通过 coredns -plugins 命令可以获取 CoreDNS 官方自带可用插件信息。这是简单介绍几个常用插件。
# 可用插件列表
[root@coredns-001 ~]# coredns -plugins
Server types:
  dns

Caddyfile loaders:
  flag
  default

Other plugins:
  dns.acl
  dns.any
  dns.auto
  dns.autopath
  dns.azure
  dns.bind
  dns.bufsize
  dns.cache
  dns.cancel
  dns.chaos
  dns.clouddns
  dns.debug
  dns.dns64
  dns.dnssec
  dns.dnstap
  dns.erratic
  dns.errors
  dns.etcd
  dns.file
  dns.forward
  dns.geoip
  dns.grpc
  dns.header
  dns.health
  dns.hosts
  dns.k8s_external
  dns.kubernetes
  dns.loadbalance
  dns.local
  dns.log
  dns.loop
  dns.metadata
  dns.minimal
  dns.nsid
  dns.pprof
  dns.prometheus
  dns.ready
  dns.reload
  dns.rewrite
  dns.root
  dns.route53
  dns.secondary
  dns.sign
  dns.template
  dns.timeouts
  dns.tls
  dns.trace
  dns.transfer
  dns.tsig
  dns.view
  dns.whoami
  on
Reload 插件
reload 插件参数链接:reload
重载插件:主要用于重载 Corefile 文件配置。
插件说明:
- 通过计算 Corefile 的 SHA512 与上一次的 Corefile 文件 SHA512 进行比较,如果不相同,就使用 CoreDNS 重新加载 Corefile,这样就无需在更改 Corefile 后发送 SIGHUP 或 SIGUSR1 信号。
- 重新加载过程不会出现任何问题,重新加载时您不会看到任何服务丢失。即使新的 Corefile 出现错误,CoreDNS 仍将继续运行旧配置,并将错误消息打印到日志中。
- 在一些特殊情况下,比如:Kubernetes 中,两个 Pod 的启动时间非常接近,相差可能不到 1 秒,并且它们共用一个 PV 或 Configmap 中的 Corefile 文件,这时候为了防止两个节点同时加载,添加了一个重载的间隔时间,但不并非必要的,因为本身 Corefile 的重载就很优雅,如第二点所述,加载出错,并不影响现有业务的正常使用。
reload [INTERVAL] [JITTER]INTERVAL 和 JITTER 使用 Golang 的时长,默认INTERVAL为 30s,默认JITTER 为 15s, INTERVAL最小值为 2s,JITTER最小值为 1s。如果JITTER大于INTERVAL的一半,则会设置为INTERVAL 的一半 。
Cache 插件
cache 插件参数链接:cache
缓存插件:主要用于缓存 DNS 解析记录,这样有效降低上游 DNS 负载。
插件说明:
默认缓存 3600 秒(1 小时),如果没有指定,则将使用默认的最大 TTL 值。对于 NOERROR 响应,最大 TTL 值为 3600 秒,对于否认存在的响应,最大 TTL 值为 1800 秒。设置 TTL 为 300 : cache 300 将把记录缓存最多 300 秒。
cache [TTL] [ZONES...]Hosts 插件
hosts 插件参数链接:hosts
hosts 插件:主要用于对 Host 记录进行解析,简单说就是类似本机添加 /etc/hosts 解析,只是这个我们是添加在 DNS 服务器端。比如:a.rockylinux.cn 192.168.2.1。
插件说明:
- 默认加载
/etc/hosts文件,可以手动指定hosts文件。 - 此插件仅支持 A、AAAA 和 PTR 记录。
- 可以用于黑名单 host 主机解析来阻止广告。
- 该插件默认每 5 秒重新加载一次 hosts 文件的内容。可以使用
reload 300ms或reload 1.5h指定下次加载间隔时长。 - 如果文件被删除,默认使用上一次加载的 hosts 文件内容,直到新文件创建才加载新解析内容。
- 如果您想在 hosts 插件中没有匹配项时,将请求传递给其它插件,则必须指定
fallthrough选项。 - 每台服务器只能使用一次此插件。
其它常用插件
- errors 插件:errors,用于将查询处理过程中遇到的任何错误都打印至标准输出。特定类型的错误可以合并并每隔一段时间打印一次。
- health 插件:health,用于健康检测,返回 HTTP 200 状态码,默认端口为 8080,路径:
:8080/health。可与通过 prometheus 插件结合使用。 - loadbalance 插件:loadbalance,负载均衡,用于多 DNS 服务器时负载均衡,支持轮训
round_robin与权重weighted两种方式,默认为轮训方式。 - log 插件:log,将所有日志都打印至标准输出,用户可以自定义日志输出格式。对于繁忙的服务器,日志输出将导致性能下降。
- rewrite 插件:rewrite,重写插件,在一些特定的场景重写插件有很大用处,比如:可以将 www.rockylinux.cn 的内网解析重写成 www.rockylinux.local ,当然这样说可能很难理解,后续我们再单独来说说它的强大功能。它支持 CNAME、PTR、TLL、隐式响应重写、显式响应重写等。
- prometheus 插件:metrics,主要用于对 CoreDNS 服务器进行性能监控。默认路径:
:9253/metrics - ready 插件:ready,用于检测所有插件是否就绪可用,当插件未就绪时返回
503,就绪返回200。 - loop 插件:loop,用于检测并防止 DNS 查询中的循环问题。循环问题可能会导致 DNS 查询在不同的服务器或插件之间无限制地来回传递,从而引起性能问题或资源耗尽。
- Header 插件:header,主要用于标记处理 DNS 查询和响应所需要的状态。修改对于客户端和后续插件而言是透明的。
- import 插件:import,用于导入不同区域(zone)解析公共配置,减少配置冗余。
DNS 服务器部署
前面就基础理论知识作了大量铺垫,终于到 DNS 服务器部署阶段啦。😂😂😂
DNS 集群架构规划
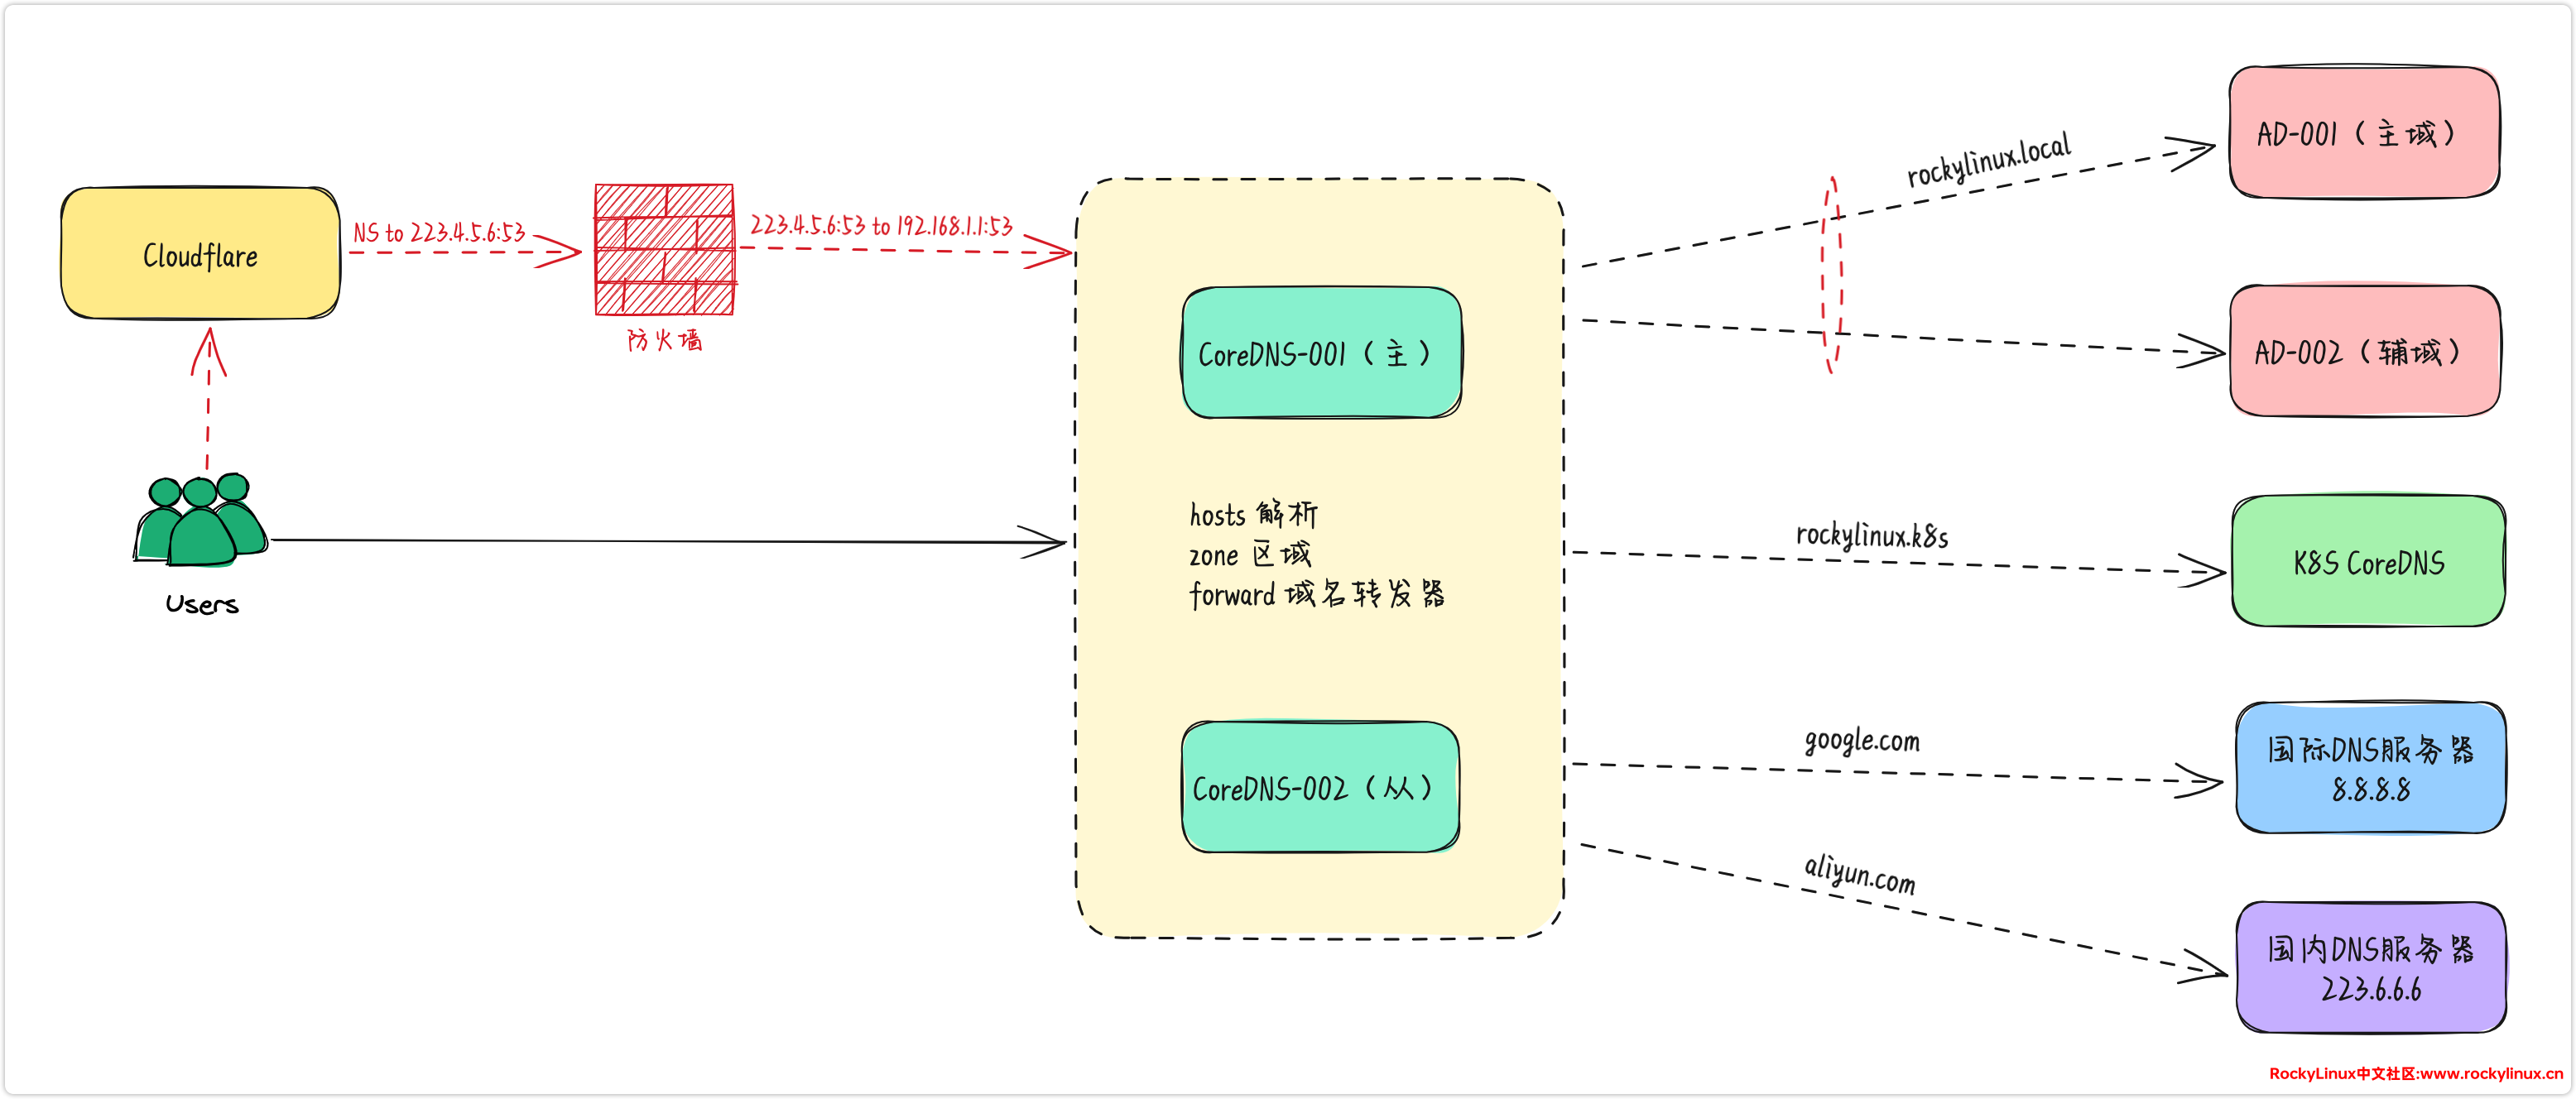
下面的 DNS 集群架构规划覆盖了 80% 的企业需求场景,其他需求场景也可以在此架构的基础上进行演变。
- 场景 1: 对于小型公司而言,两台 DNS 服务器已经足够。传统企业通常采用 Windows Active Directory 与 Windows DNS 来进行用户及 DNS 管理(如图所示的
AD-001和AD-002)。 - 场景 2: 稍大一些的企业或互联网公司可能会使用 Kubernetes(K8S)。在这种情况下,K8S 内会有一套专门用于内部解析的 CoreDNS(如图所示的
K8S CoreDNS)。 - 场景 3: 对于有跨境需求的企业,可能需要配置相应的 DNS 转发器,以便针对国外域名解析时使用指定的 DNS 服务器(如图所示的
国际 DNS 服务器)。 - 场景 4: 在更复杂的场景中,用户请求首先通过公网 DNS 服务器进行解析,然后将特定的二级域名通过 NS 记录指向内部 DNS 服务器,再由内部 DNS 服务器将请求转发至内部 K8S 集群的 CoreDNS,实现内部域名解析。在此过程中可能需要使用
rewrite插件等(如图所示的红色虚线)。
基于上述需求场景,我们将首先讲解场景 1、2 和 3。对于场景 4,如果有进一步需求,我们会在后续的拓展篇中详细介绍。
节点资源规划:
| 主机名 | IP | 作用 |
|---|---|---|
| CoreDNS-001 | 192.168.1.1 | CoreDNS 服务器主节点 |
| CoreDNS-002 | 192.168.1.2 | CoreDNS 服务器从节点 |
| Client-001 | 192.168.3.1 | CoreDNS 客户端测试节点 |
| Test-001 | 192.168.3.2 | CoreDNS 性能压测节点 |
hosts 解析:
| IP | 记录类型 | 域名 |
|---|---|---|
| 192.168.2.1 | host | a.rockylinux.cn |
| 192.168.2.2 | host | b.rockylinux.cn |
| 192.168.2.3 | host | www.rockylinux.cn |
其它配置信息:
| 配置名称 | 值 |
|---|---|
| Zone(本地区域) | rockylinux.lan |
| Zone(AD 区域) | rockylinux.local |
| Zone(K8S CoreDNS 区域) | rockylinux.k8s |
| Forward 域名转发器 | google.com 8.8.8.8 |
| 默认上级 DNS 服务器 | 223.6.6.6、114.114.114.119 |
架构图:
安装 CoreDNS
注:除非特别说明,主从 DNS 都采用相同的参数配置。
如上架构图所示,由于 CoreDNS 集群部署在生产环境的最前端,为确保其稳定性,我们选择在 Rocky Linux 9 上二进制部署 CoreDNS v1.11.1。二进制文件的下载链接:Releases - coredns/coredns。
在发文之前,我们特地查看了当前最新版本为 v1.11.3。大家在部署时,可以根据自身需求选择合适的版本。
# 安装解压软件
[root@coredns-001 ~]# dnf install -y tar

# 设置环境变量,指定 CoreDNS 版本
[root@coredns-001 ~]# export COREDNS_VERSION=1.11.1

# 下载 CoreDNS 二进制文件
[root@coredns-001 ~]# curl -LO https://github.com/coredns/coredns/releases/download/v${COREDNS_VERSION}/coredns_${COREDNS_VERSION}_linux_amd64.tgz

# 解压
[root@coredns-001 ~]# tar -zxvf coredns_${COREDNS_VERSION}_linux_amd64.tgz

# 安装
[root@coredns-001 ~]# mv coredns /usr/local/bin/

# 设置可执行权限
[root@coredns-001 ~]# chmod +x /usr/local/bin/coredns

# 删除压缩包
[root@coredns-001 ~]# rm -rf coredns_${COREDNS_VERSION}_linux_amd64.tgz
配置 CoreDNS
CoreDNS 的核心配置文件是 Corefile,常规都会配置转发器、日志、缓存、监控、健康检测等功能。Corefile 文件可以通过 reload 插件来实现热加载,从而在不重启 CoreDNS 服务的情况下应用新的配置。这种热加载功能对于生产环境尤为重要,因为它确保了配置的动态更新和服务的连续性。
对于各字段的作用,详见配置注释说明:
# 创建配置文件目录
[root@coredns-001 ~]# mkdir -p /etc/coredns

# 创建 Corefile 文件
[root@coredns-001 ~]# cat > /etc/coredns/Corefile << \EOF
.:53 {
    log  # 启用日志记录
    loop # 防止 DNS 查询在多个 DNS 服务器之间循环,导致无限查询循环。如果检测到循环,CoreDNS 会中止查询。
    errors  # 启用错误日志记录
    reload 30s # 通过 reload 插件实现热加载功能,确保在不重启 CoreDNS 服务的情况下,动态应用新的配置,每隔 30 秒重载一次 Corefile 配置文件。
    cache 300s # 配置 DNS 查询的缓存时间为 300 秒,减少重复查询,提高响应速度和性能。
    ready 0.0.0.0:8181 # 在指定地址和端口上提供 readiness(就绪)探针。
    health 0.0.0.0:8080 # 在指定地址和端口上提供健康检查(health check)。
    prometheus 0.0.0.0:9253 # 在指定地址和端口上启用 Prometheus metrics。
    loadbalance round_robin # 使用轮询模式进行负载均衡。
    forward . 180.184.1.1 114.114.114.119 #  DNS 转发
}
EOF
配置服务自启动
# 创建服务用户
[root@coredns-001 ~]# useradd coredns -s /sbin/nologin -c 'coredns user'

# 配置 coredns systemd 文件
[root@coredns-001 ~]# cat > /usr/lib/systemd/system/coredns.service << \EOF
[Unit]
Description=CoreDNS DNS server
Documentation=https://coredns.io
After=network.target

[Service]
PermissionsStartOnly=true
LimitNOFILE=1048576
LimitNPROC=512
CapabilityBoundingSet=CAP_NET_BIND_SERVICE
AmbientCapabilities=CAP_NET_BIND_SERVICE
NoNewPrivileges=true
User=coredns
WorkingDirectory=/home/coredns
ExecStart=/usr/local/bin/coredns -conf=/etc/coredns/Corefile # 指定 Corefile 文件路径
ExecReload=/bin/kill -SIGUSR1 $MAINPID
Restart=on-failure

[Install]
WantedBy=multi-user.target
EOF

# 启动 CoreDNS 服务
[root@coredns-001 ~]# systemctl enable coredns.service --now
Created symlink /etc/systemd/system/multi-user.target.wants/coredns.service → /usr/lib/systemd/system/coredns.service.

[root@coredns-001 ~]# systemctl status coredns
● coredns.service - CoreDNS DNS server
     Loaded: loaded (/usr/lib/systemd/system/coredns.service; enabled; preset: disabled)
     Active: active (running) since Fri 2024-05-24 18:49:59 CST; 2s ago
       Docs: https://coredns.io
   Main PID: 4846 (coredns)
      Tasks: 9 (limit: 48933)
     Memory: 10.5M
        CPU: 74ms
     CGroup: /system.slice/coredns.service
             └─4846 /usr/local/bin/coredns -conf=/etc/coredns/Corefile

May 24 18:49:59 coredns-001 systemd[1]: Started CoreDNS DNS server.
May 24 18:49:59 coredns-001 coredns[4846]: .:53
May 24 18:49:59 coredns-001 coredns[4846]: google.com.:53
May 24 18:49:59 coredns-001 coredns[4846]: google.com.hk.:53
May 24 18:49:59 coredns-001 coredns[4846]: CoreDNS-1.11.1
May 24 18:49:59 coredns-001 coredns[4846]: linux/amd64, go1.20.7, ae2bbc2

# 默认监听 tcp & udp 53 端口
[root@coredns-001 ~]# ss -antulp | grep 53
udp   UNCONN 0      0                  *:53               *:*    users:(("coredns",pid=42698,fd=11))
tcp   LISTEN 0      65535              *:53               *:*    users:(("coredns",pid=42698,fd=10))
在 CoreDNS 中,SIGUSR1 信号会使 CoreDNS 重新打开其日志文件,这对于日志文件轮换非常有用。
CoreDNS API 服务配置
CoreDNS API 服务是为实现 CoreDNS 平台化管理单独开发的一套 API 接口,主要针对 hosts 及 Corefile 文件进行文件增删改查操作,目前 API 已经实现 hosts、forward 插件功能的增删改查需求。如果您使用 CoreDNS API 服务,需要在对应 CoreDNS 服务器上部署 CoreDNS API 服务。
# 配置 CoreDNS API 服务
[root@coredns-001 ~]# cat > /usr/lib/systemd/system/coredns-api.service << EOF
[Unit]
Description=coredns-api Service
Documentation=https://rockylinux.cn
After=network.target
StartLimitBurst=1
StartLimitIntervalSec=15s

[Service]
User=coredns
ExecStart=/usr/local/bin/coredns-api --username="username" --password="password" --address=0.0.0.0:80 # 基础认证账号密码、监听端口配置
Restart=on-failure

[Install]
WantedBy=multi-user.target
EOF

# 启用 CoreDNS API 服务
[root@coredns-001 ~]# systemctl enable coredns-api --now
Created symlink /etc/systemd/system/multi-user.target.wants/coredns-api.service → /usr/lib/systemd/system/coredns-api.service.

# 确保 CoreDNS API 服务启动正常
[root@coredns-001 ~]# systemctl status coredns-api
● coredns-api.service - coredns-api Service
     Loaded: loaded (/usr/lib/systemd/system/coredns-api.service; enabled; preset: disabled)
     Active: active (running) since Fri 2024-06-28 16:50:13 CST; 5s ago
       Docs: https://rockylinux.cn
   Main PID: 42943 (coredns-api)
      Tasks: 14 (limit: 79999)
     Memory: 17.6M
        CPU: 30ms
     CGroup: /system.slice/coredns-api.service
             └─42943 /usr/local/bin/coredns-api --username=admin --password=password --address=0.0.0.0:80

Jun 28 16:50:13 coredns-001 systemd[1]: Started coredns-api Service.
Jun 28 16:50:13 coredns-001 coredns-api[42943]: {"level":"info","ts":"2024-06-28T16:50:13.581+0800","caller":"coredns-api/main.go:70","msg":"Server running on port 0.0.0.0:80"}

[root@coredns-001 ~]# ss -antlp | grep 80
LISTEN 0      65535              *:80               *:*    users:(("coredns-api",pid=42943,fd=3))
防火墙配置
# 启用 DNS 服务端口
[root@coredns-001 ~]# firewall-cmd --add-port=53/tcp --permanent
success

[root@coredns-001 ~]# firewall-cmd --add-port=53/udp --permanent
success

# 或者防火墙直接允许 DNS 服务
[root@coredns-001 ~]# firewall-cmd --add-service=dns --permanent
success

# 健康检测端口
[root@coredns-001 ~]# firewall-cmd --add-port=8080/tcp --permanent
success

# 就绪探针端口
[root@coredns-001 ~]# firewall-cmd --add-port=8181/tcp --permanent
success

# Prometheus metrics 端口
[root@coredns-001 ~]# firewall-cmd --add-port=9253/tcp --permanent
success

# 如果有部署 CoreDNS API 服务,还需要启用对应端口(默认端口80)
[root@coredns-001 ~]# firewall-cmd --add-port=80/tcp --permanent
success

# 重载防火墙配置
[root@coredns-001 ~]# firewall-cmd --reload
success

# 确认配置已经生效
[root@coredns-001 ~]# firewall-cmd --list-all
public (active)
  target: default
  icmp-block-inversion: no
  interfaces: ens18
  sources:
  services: cockpit dhcpv6-client dns ssh
  ports: 80/tcp 8080/tcp 8181/tcp 9253/tcp 53/tcp 53/udp
  protocols:
  forward: yes
  masquerade: no
  forward-ports:
  source-ports:
  icmp-blocks:
  rich rules:
SELinux 配置
因为 CoreDNS 并未在 Rocky Linux 9 的 SELinux 中进行预设,所以对于 SELinux 的设置,需要进行调试优化,强烈建议阅读:Rocky Linux 9 从入门到精通005 — SELinux配置。
# 启用 SELinux
[root@coredns-001 ~]# vi /etc/selinux/config
SELINUX=enforcing

# 确保状态为 enforcing
[root@coredns-001 ~]# sestatus
SELinux status:                 enforcing

# 配置 CoreDNS 的 SELinux 安全上下文
[root@coredns-001 ~]# semanage fcontext -a -t etc_t "/etc/coredns(/.*)?"
[root@coredns-001 ~]# restorecon -Rv /etc/coredns

# 配置 CoreDNS 数据目录的 SELinux 安全上下文
[root@coredns-001 ~]# semanage fcontext -a -t var_lib_t "/var/lib/coredns(/.*)?"
[root@coredns-001 ~]# restorecon -Rv /var/lib/coredns

# 检查 SELinux 报错,可以检查 /var/log/audit/audit.log 文件中的相关记录
[root@coredns-001 ~]# ausearch -m avc -c coredns

# 根据报错创建自定义 SELinux 模块
[root@coredns-001 ~]# audit2allow -w -a
[root@coredns-001 ~]# audit2allow -M my_coredns_policy
[root@coredns-001 ~]# semodule -i my_coredns_policy.pp
服务可用性验证
通过客户端 client-001 测试验证 CoreDNS 集群可用性,这里以测试验证主节点可用性为例,从节点测试方法相同不再赘述。
# 健康检查
[root@client-001 ~]# curl http://192.168.1.1:8080/health
OK

# 就绪检查
[root@client-001 ~]# curl http://192.168.1.1:8181/ready
OK

# Prometheus metrics 指标获取
[root@client-001 ~]# curl http://192.168.1.1:9253/metrics
# HELP coredns_build_info A metric with a constant '1' value labeled by version, revision, and goversion from which CoreDNS was built.
# TYPE coredns_build_info gauge
coredns_build_info{goversion="go1.20.7",revision="ae2bbc2",version="1.11.1"} 1
# HELP coredns_dns_request_duration_seconds Histogram of the time (in seconds) each request took per zone.
# TYPE coredns_dns_request_duration_seconds histogram
coredns_dns_request_duration_seconds_bucket{server="dns://:53",view="",zone=".",le="0.00025"} 0
coredns_dns_request_duration_seconds_bucket{server="dns://:53",view="",zone=".",le="0.0005"} 0
coredns_dns_request_duration_seconds_bucket{server="dns://:53",view="",zone=".",le="0.001"} 0
......(略)

[root@client-001 ~]# curl -I http://192.168.1.1:9253/metrics
HTTP/1.1 200 OK
Content-Type: text/plain; version=0.0.4; charset=utf-8
Date: Mon, 17 Jun 2024 11:51:33 GMT

# telnet 测试端口联通性
[root@client-001 ~]# telnet 192.168.1.1 53
Trying 192.168.1.1...
Connected to 192.168.1.1.
Escape character is '^]'.
Connection closed by foreign host.

# 通过 dig 请求 CoreDNS 主节点解析 www.baidu.com
[root@client-001 ~]# dig @192.168.1.1 www.baidu.com

; <<>> DiG 9.10.6 <<>> @192.168.1.1 www.baidu.com
; (1 server found)
;; global options: +cmd
;; Got answer:
;; ->>HEADER<<- opcode: QUERY, status: NOERROR, id: 21483
;; flags: qr rd ra; QUERY: 1, ANSWER: 2, AUTHORITY: 0, ADDITIONAL: 1

;; OPT PSEUDOSECTION:
; EDNS: version: 0, flags:; udp: 4096
;; QUESTION SECTION:
;www.baidu.com.         IN  A

;; ANSWER SECTION:
www.baidu.com.      81  IN  A   120.232.145.144
www.baidu.com.      81  IN  A   120.232.145.185

;; Query time: 36 msec
;; SERVER: 192.168.1.1#53(192.168.1.1)
;; WHEN: Tue Jul 09 16:51:30 CST 2024
;; MSG SIZE  rcvd: 100

# 也可以使用 nslookup 进行测试
[root@client-001 ~]# nslookup www.baidu.com 192.168.1.1
Server:     192.168.1.1
Address:    192.168.1.1#53

Non-authoritative answer:
Name:   www.baidu.com
Address: 120.232.145.144
Name:   www.baidu.com
Address: 120.232.145.185
性能测试
压测报告
为了确保 CoreDNS 上线后的稳定性,需要对其进行了压力测试。常用的 DNS 服务器性能测试工具包括 dnsperf 和 queryperf。本文以 dnsperf 为例,展示了性能压测结果。从以下结果来看,CoreDNS 在持久性和并发性能方面表现相当出色。
| 实例规则 | 线程数 | 并发数 | 持续时长 | 测试结果(QPS/s) | 请求超时/次 |
|---|---|---|---|---|---|
| 4C8G | 2 | 512 | 60 | 33872 | 0 |
| 4C8G | 2 | 512 | 120 | 32355 | 0 |
| 4C8G | 4 | 1014 | 60 | 33845 | 0 |
| 4C8G | 4 | 1014 | 120 | 33362 | 0 |
从以上数据可以看出,在不同线程数和并发数下,CoreDNS 的 QPS(每秒查询数)都能保持在较高水平,并且在所有测试中均未出现请求超时的情况。
安装 dnsperf
# 安装 dnsperf
[root@test-001 ~]# dnf instal dnsperf

# dnsperf 参数说明
[root@test-001 ~]# dnsperf -h
DNS 性能测试工具
版本 2.12.0

用法: dnsperf [-f family] [-m mode] [-s server_addr] [-p port]
              [-a local_addr] [-x local_port] [-d datafile] [-c clients]
              [-T threads] [-n maxruns] [-l timelimit] [-b buffer_size]
              [-t timeout] [-e] [-E code:value] [-D]
              [-y [alg:]name:secret] [-q num_queries] [-Q max_qps]
              [-S stats_interval] [-u] [-B] [-v] [-W] [-h] [-H] [-O]
  -f DNS 传输的地址族, inet 或 inet6 (默认: any)
  -m 设置传输模式: udp, tcp, dot 或 doh (默认: udp)
  -s 要查询的服务器 (默认: 127.0.0.1)
  -p 查询服务器的端口 (默认: udp/tcp 53, DoT 853 或 DoH 443)
  -a 发送查询的本地地址
  -x 发送查询的本地端口 (默认: 0)
  -d 输入数据文件 (默认: stdin)
  -c 模拟的客户端数量
  -T 要运行的线程数量
  -n 最多运行输入数据 N 次
  -l 运行最长时间 (秒)
  -b 套接字发送/接收缓冲区大小 (以千字节为单位)
  -t 查询完成的超时时间 (秒) (默认: 5)
  -e 启用 EDNS 0
  -E 发送 EDNS 选项
  -D 设置 DNSSEC OK 位 (隐含启用 EDNS)
  -y TSIG 算法、名称和密钥 (base64 编码)
  -q 最大未完成查询数 (默认: 100)
  -Q 限制每秒查询数
  -S 每 N 秒打印一次 QPS 统计信息
  -u 发送动态更新而不是查询
  -B 将输入文件作为 TCP 流二进制格式读取
  -v 详细模式: 将每个查询和附加信息报告到标准输出
  -W 将警告和错误日志记录到标准输出而不是标准错误输出
  -h 打印此帮助信息
  -H 打印长选项的帮助信息
  -O 设置长选项: <name>=<value>
压测配置
在压测之前需要准备压测数据,格式为 域名查询类型,如:
[ root@test-001 ~]# cat dnsfile
rockylinux.cn MX
api.rockylinux.cn A
app.rockylinux.cn AAA
其中有效数据由两列组成,第一列是查询域名,第二列是查询的资源类型,dnsperf 支持的资源类型如下:A 、NS、MD、MF、CNAME、SOA、MB、MG、MR、NULL、WKS、PTR、HINFO、MINFO、MX、TXT、AAAA、SRV、NAPTR、A6、ASFR、MAILB、MAILA、ANY。
压测
我们进行了四轮压力测试,前两轮持续 60 秒,后两轮持续 120 秒,以观察在长时间并发请求下,CoreDNS 服务器的性能是否会下降。测试结果中的各项参数的意义通过注释进行说明。
压测参数说明:
dnsfile文件包含压测数据3条。-T指定线程数为2。-c指定并发数为512,单线程最大并发为256个。-l持续压测时间为60秒。
# 第一次压测
[root@test-001 ~]# dnsperf -d dnsfile -s 192.168.1.1 -T 2 -c 512 -l 60
DNS Performance Testing Tool
Version 2.12.0
[Status] Command line: dnsperf -d dnsfile -s 192.168.1.1 -T 2 -c 512 -l 60
[Status] Sending queries (to 192.168.1.1:53)
[Status] Started at: Thu Jun 27 18:12:57 2024
[Status] Stopping after 60.000000 seconds
[Status] Testing complete (time limit)
Statistics:
Queries sent: 2032434 # 发送的查询总数
Queries completed: 2032434 (100.00%) # 完成的查询总数及其百分比。这里表示所有发送的查询都得到了响应。
Queries lost: 0 (0.00%) # 丢失的查询总数及其百分比。这里表示没有查询丢失。
Response codes: NOERROR 2032434 (100.00%) # 表示所有查询都收到了 NOERROR 响应码,这意味着所有查询都成功返回了有效的响应。
Average packet size: request 39, response 78 # 平均请求包大小为 39 字节,平均响应包大小为 78 字节。
Run time (s): 60.002653 # 测试运行的总时间为 60 秒(实际为 60.002653 秒)。
Queries per second: 33872.402275 # 每秒查询数。这是测试的关键指标,表示每秒完成的查询数量大约为 33,872 QPS。
Average Latency (s): 0.002707 (min 0.000195, max 0.068526) # 平均延迟时间为 2.707 毫秒,最小延迟为 0.195 毫秒,最大延迟为 68.526 毫秒。
Latency StdDev (s): 0.002441 # 延迟时间的标准偏差为 2.441 毫秒。这表示查询响应时间的波动范围。
# 第二次压测
[root@test-001 ~]# dnsperf -d dnsfile -s 192.168.1.1 -T 2 -c 512 -l 120
DNS Performance Testing Tool
Version 2.12.0
[Status] Command line: dnsperf -d dnsfile -s 192.168.1.1 -T 2 -c 512 -l 120
[Status] Sending queries (to 192.168.1.1:53)
[Status] Started at: Thu Jun 27 18:27:57 2024
[Status] Stopping after 120.000000 seconds
[Status] Testing complete (time limit)
Statistics:
Queries sent: 3882868
Queries completed: 3882868 (100.00%)
Queries lost: 0 (0.00%)
Response codes: NOERROR 3882868 (100.00%)
Average packet size: request 39, response 78
Run time (s): 120.004652
Queries per second: 32355.979000
Average Latency (s): 0.002826 (min 0.000192, max 0.072463)
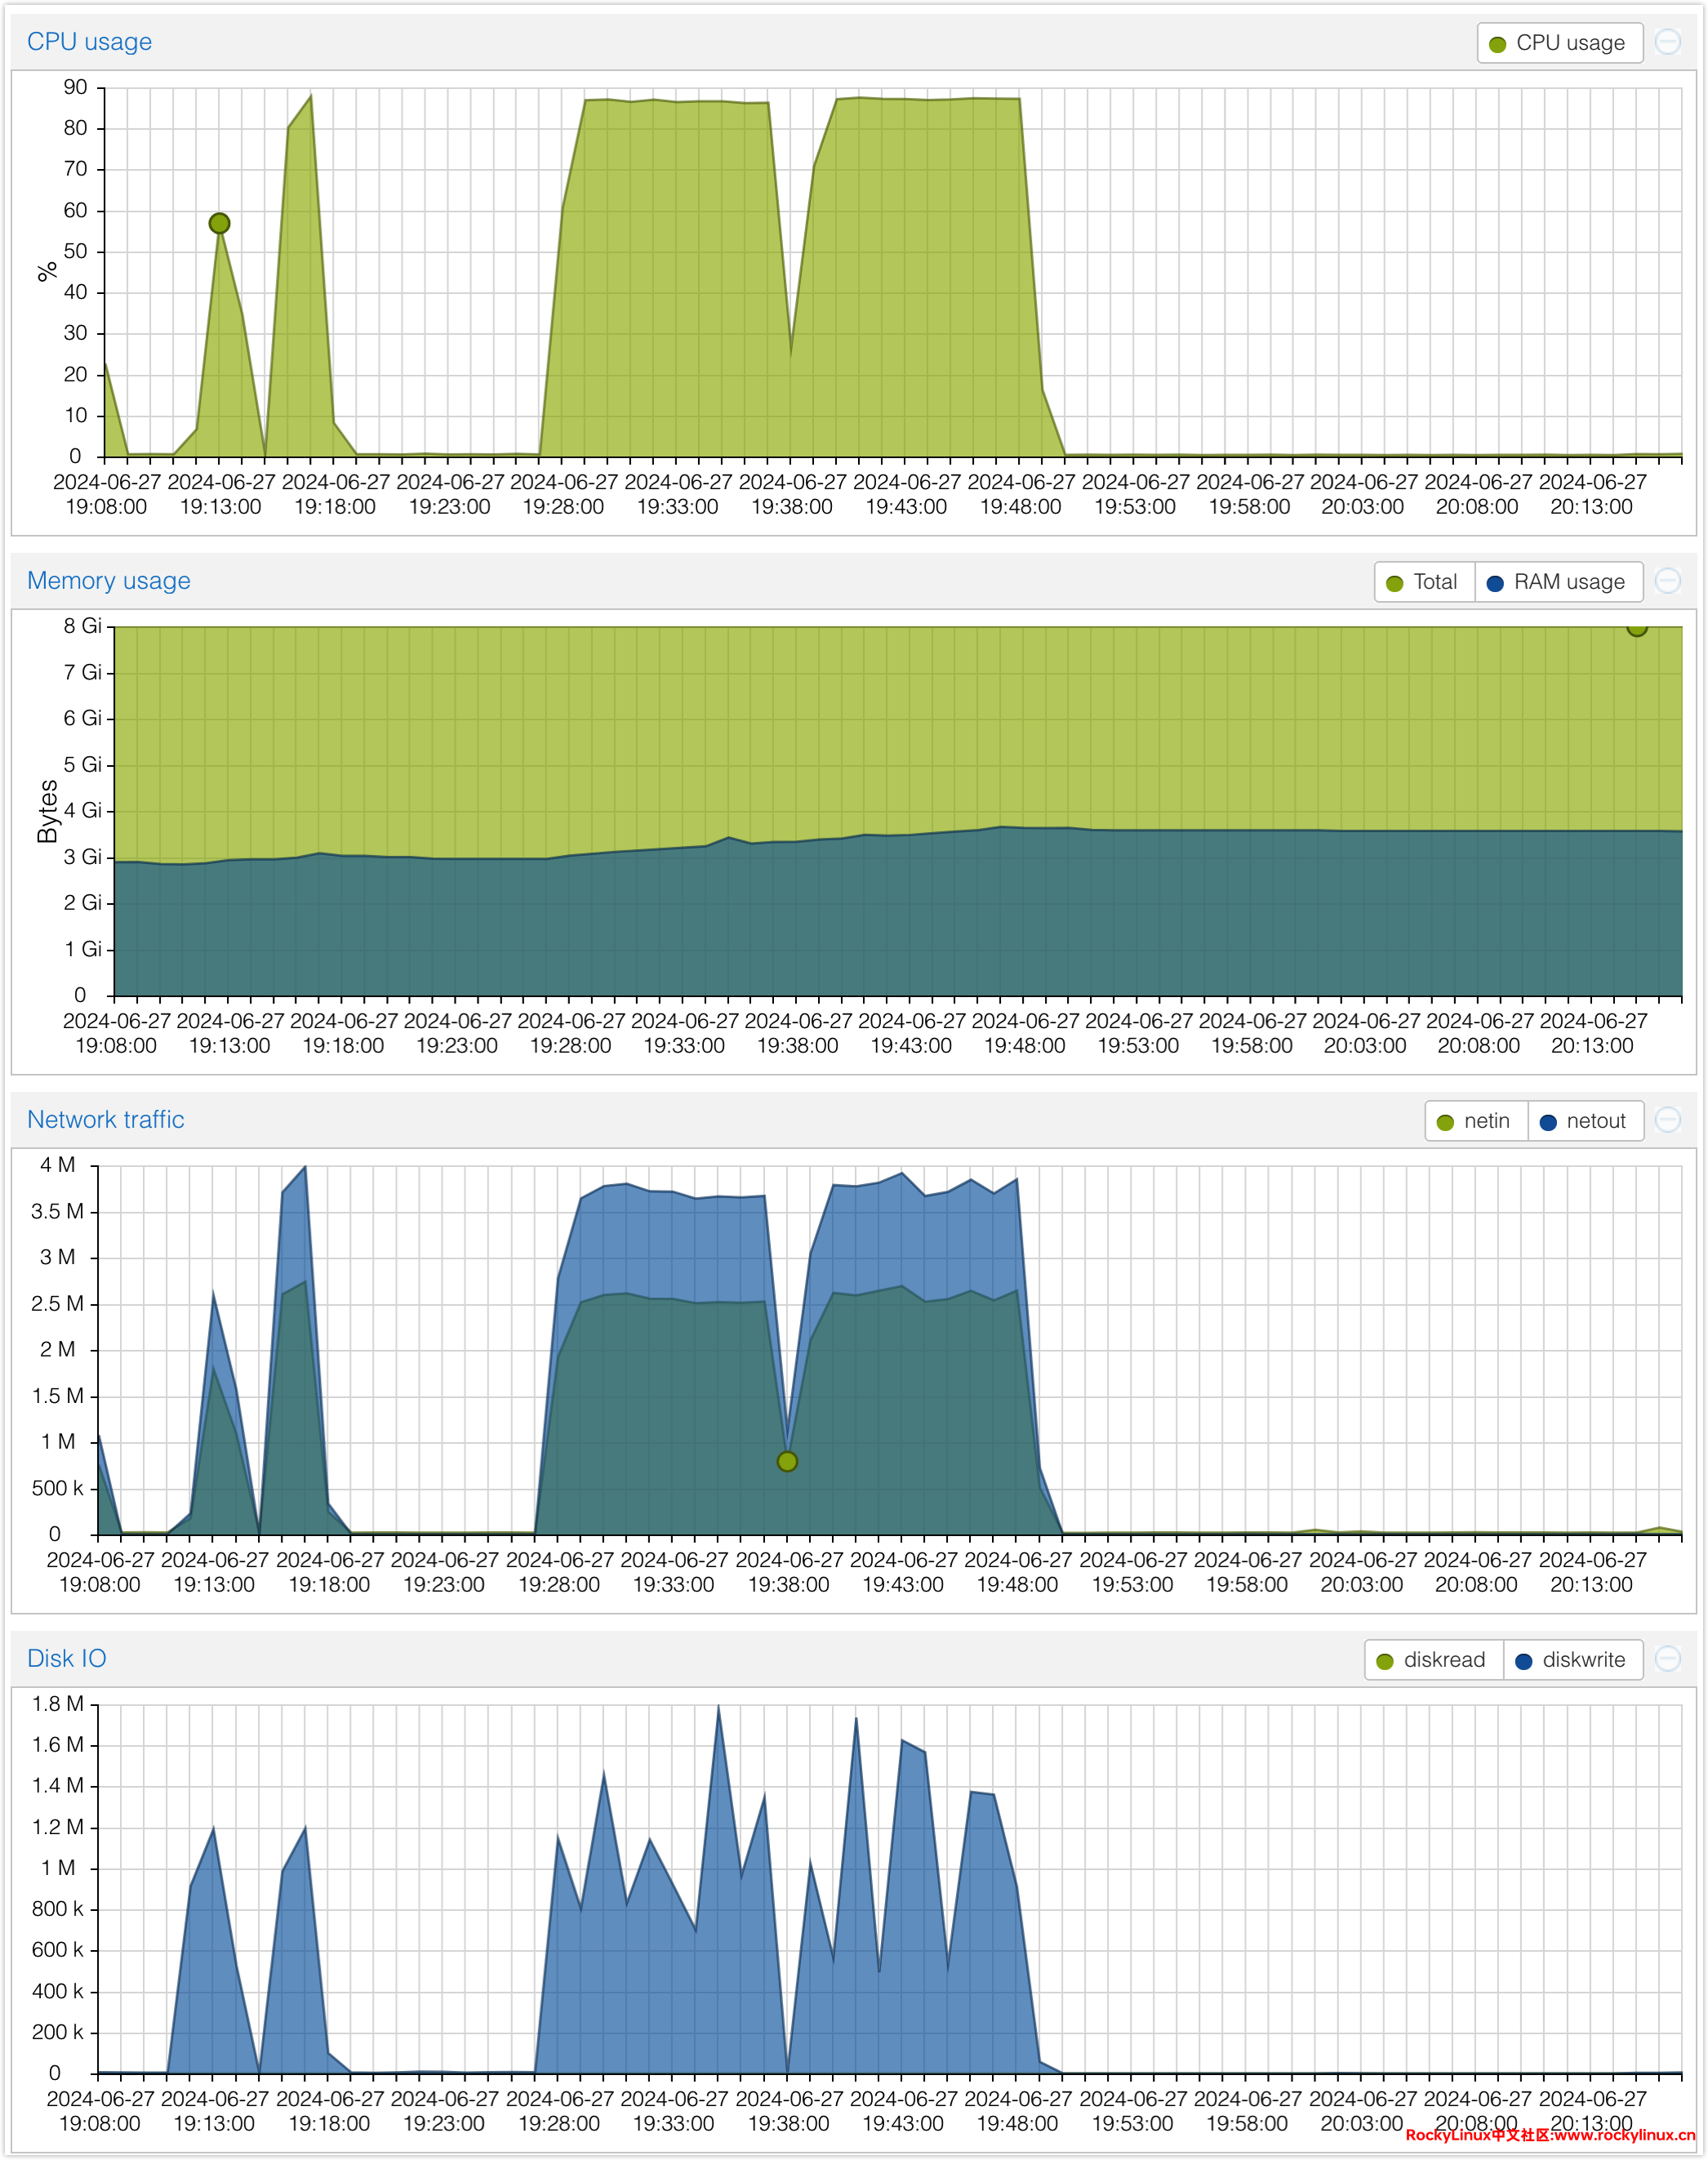
Latency StdDev (s): 0.002740 从持续四轮压测来看,CoreDNS 服务器 CPU 占用会被打满 4C,其它资源占用都比较低。
top - 18:13:13 up 34 days,  4:19,  2 users,  load average: 1.11, 0.78, 0.66
Tasks: 130 total,   1 running, 129 sleeping,   0 stopped,   0 zombie
%Cpu(s): 48.8 us, 26.8 sy,  0.0 ni, 16.3 id,  0.0 wa,  2.5 hi,  5.6 si,  0.0 st
MiB Mem :   7685.1 total,   5834.7 free,   1363.8 used,    723.4 buff/cache
MiB Swap:   2048.0 total,   2048.0 free,      0.0 used.   6321.3 avail Mem
    PID USER      PR  NI    VIRT    RES    SHR S  %CPU  %MEM     TIME+ COMMAND
  46548 coredns   20   0 2048732 179604  36480 S 263.1   2.3  14:41.88 coredns
    594 root      20   0  153712  87532  84452 S  37.9   1.1   5:12.75 systemd-journal
     36 root      rt   0       0      0      0 S   0.3   0.0   0:03.70 migration/3
     37 root      20   0       0      0      0 S   0.3   0.0   0:06.90 ksoftirqd/3
  47742 root      20   0    8052   3968   3200 R   0.3   0.1   0:00.95 top
  47745 root      20   0       0      0      0 I   0.3   0.0   0:00.13 kworker/0:0-event
压测性能监控
在进行性能监控时,通常应基于 Grafana 的 Node-Exporter 服务器性能监控和 CoreDNS Metrics 服务监控作为参考标准。然而,由于在压测时尚未配置这些监控工具,因此本文以 PVE 自带的监控图表为参考依据。从监控图表可以看到,压测过程中 CPU 资源会被占满达到 100%。内存资源则没有显著变化,这得益于 Golang 的高效内存管理。此外,网络 IO 会增加到 4Mbps,磁盘 IO 也会显著增加。
从整体测试结果来看,CoreDNS 在高并发和高负载条件下表现出色,能够快速且稳定地处理大量查询。其特点包括:高吞吐量、低延时、无丢包和一致性。
客户端配置
Linux 客户端 DNS 配置
# 配置 DNS
[root@test-001 ~]# nmcli connection modify ens18 ipv4.dns "192.168.1.1 192.168.1.2"

# 生效配置
[root@test-001 ~]# systemctl restart NetworkManager
Windows 客户端 DNS 配置
# 查看网络接口名称
netsh interface ipv4 show config

# 配置 DNS 服务器(将对应 Interface Name 替换成上面命令查看到的网络接口名称 )
netsh interface ipv4 set dnsservers name="Interface Name" source=static address=192.168.1.1 primary
netsh interface ipv4 add dnsservers name="Interface Name" address=192.168.1.2 index=2

# 验证配置是否生效
netsh interface ipv4 show config
刷新 DNS
不同操作系统、不同 DNS 管理工具,刷新 DNS 的方法有所不同,详细参考:
# Windows
ifconfig /flushdns

# macOS Sierra 及以后版本(不同的 macOS 版本不同)
sudo dscacheutil -flushcache; sudo killall -HUP mDNSResponder

# Linux(不同 DNS 管理工具操作命令有所不同)
# Rocky Linux
systemctl restart NetworkManager

# ubuntu 18.04 及以后版本
systemd-resolve --flush-caches

# 使用 dnsmasq
systemctl restart dnsmasq

# 使用 nscd
systemctl restart nscd
DNS 常用诊断工具
在 Linux 系统中,有许多命令行工具可用于 DNS 诊断和排查问题,其中包括:host 、dig、nslookup 等。
[ root@coredns-001 ~]# host www.rockylinux.cn
www.rockylinux.cn has address 36.150.160.188
www.rockylinux.cn has address 223.113.137.189
www.rockylinux.cn has address 36.150.160.202
www.rockylinux.cn is an alias for www.rockylinux.cn.cdn.dnsv1.com.
www.rockylinux.cn.cdn.dnsv1.com is an alias for 4mm2a9bp.slt.sched.tdnsv8.com.
www.rockylinux.cn is an alias for www.rockylinux.cn.cdn.dnsv1.com.
www.rockylinux.cn.cdn.dnsv1.com is an alias for 4mm2a9bp.slt.sched.tdnsv8.com.

[ root@coredns-001 ~]# nslookup www.rockylinux.cn
Server:         192.168.1.1
Address:        192.168.1.1#53

Non-authoritative answer:
Name:   www.rockylinux.cn
Address: 223.113.137.189
Name:   www.rockylinux.cn
Address: 36.150.160.188
Name:   www.rockylinux.cn
Address: 36.150.160.202
www.rockylinux.cn       canonical name = www.rockylinux.cn.cdn.dnsv1.com.
www.rockylinux.cn.cdn.dnsv1.com canonical name = 4mm2a9bp.slt.sched.tdnsv8.com.
Web GUI 工具:www.diggui.com
公共 DNS 服务器
题外话:自腾讯云开始对公共 DNS 119.29.29.29 和 119.28.28.28 限速后,阿里云也宣布对其公共 DNS 223.5.5.5 和 223.6.6.6 进行限速,自建 DNS 势在必行,如果您不想自建 DNS,这里提供两个链接,其中包括大量目前可用的公共 DNS 服务提供商信息,大家可以根据自身需求进行选择。
[1] CN DNS Server Info
[2] 公共DNS大全地址汇总 - dns.iui.im
参考文献
[1] CoreDNS: DNS and Service Discovery
[2] GitHub - coredns/coredns: CoreDNS is a DNS server that chains plugins
变更记录
- 2024-11-11
- 新增
coredns -plugins获取可用插件列表说明
- 新增